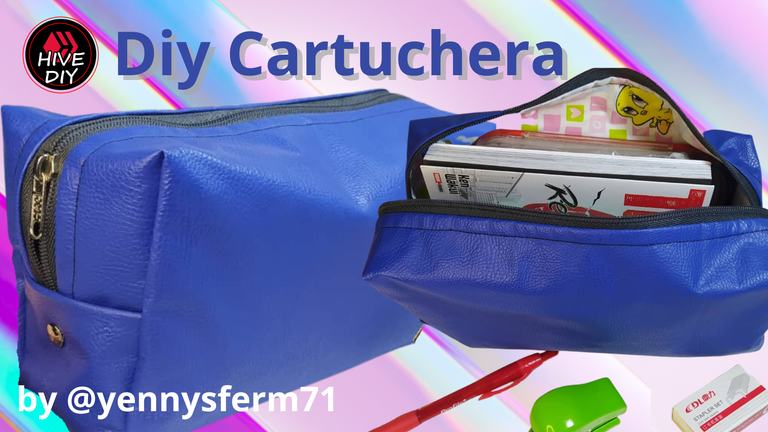
Concurso "Regreso a Clases" Mi Participación Diy Cartuchera / "Back to School" Contest My Participation Diy Pencil Case
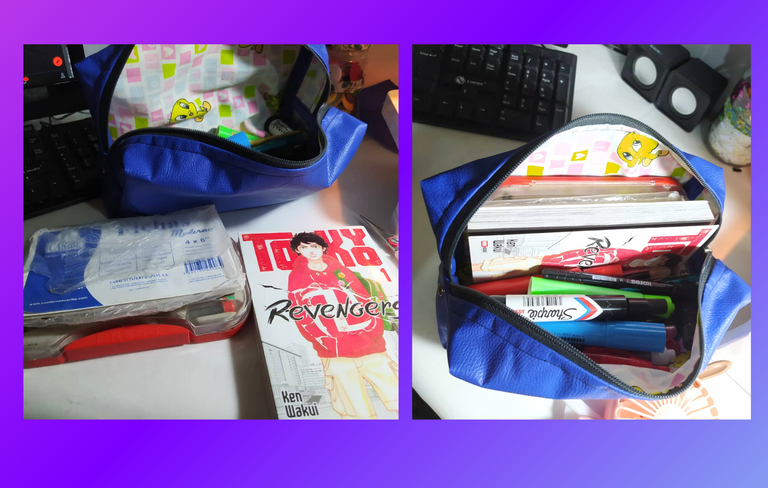
Diy de Cartuchera, esta es como una Cartuchera tamaño Maxi ya en mi opinión es muy grande, sin embargo, creo que la subestimé porque mi hija ya se apoderó de ella y resulta que tiene un tamaño ideal para ella.
Quise atender a la Invitación y Participar en el Concurso Mensual de nuestra Comunidad HIve Diy y para ello busqué mi carpeta de Patrones, donde tengo patrones desde hace muchos años, y elegí este patrón que recuerdo que cuando mi hijo mayor estaba pequeño, hice por primera vez este diseño porque era muy grande, lo tenía guardado y hasta ahora es que lo estoy sacando nuevamente.
Los invito a este Tutorial con información fotográfica del Paso a Paso.
Diy Pencil Case, this is like a Maxi size Pencil Case and in my opinion it is very big, however, I think I underestimated it because my daughter already got hold of it and it turns out that it is an ideal size for her.
I wanted to attend to the Invitation and Participate in the Monthly Contest of our Hive Diy Community and for this I looked for my Patterns folder, where I have had patterns for many years, and I chose this pattern that I remember that when my oldest son was little, I made for the first time. Maybe this design because it was very big, I had it saved and until now I am taking it out again.
I invite you to this Tutorial with photographic information of Step by Step.


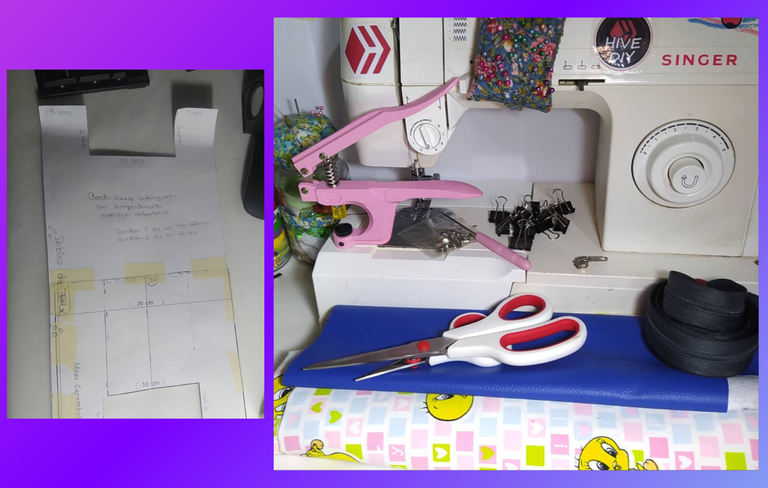
- Máquina de coser
- Semicuero u otro género para la parte externa
- Tela para el forro
- Tijeras
- Clips de presión
- Cierre y slider
- Broches plateados, alicate y punzón para colocarlos
- Patrón
- Sewing machine
- Semi-leather or other material for the external part
- Lining fabric
- Scissors
- Snap clips
- Closure and slider
- Silver brooches, pliers and punch to place them
- Pattern

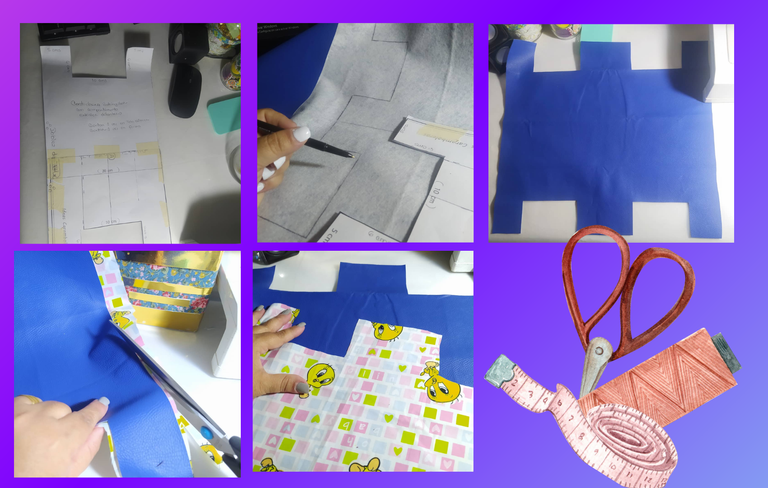
El Tutorial lo estaré explicando a través de collages de fotografías, y lo explicaré en cada uno. Es muy fácil, y todos los materiales los puedes cambiar a tu gusto.
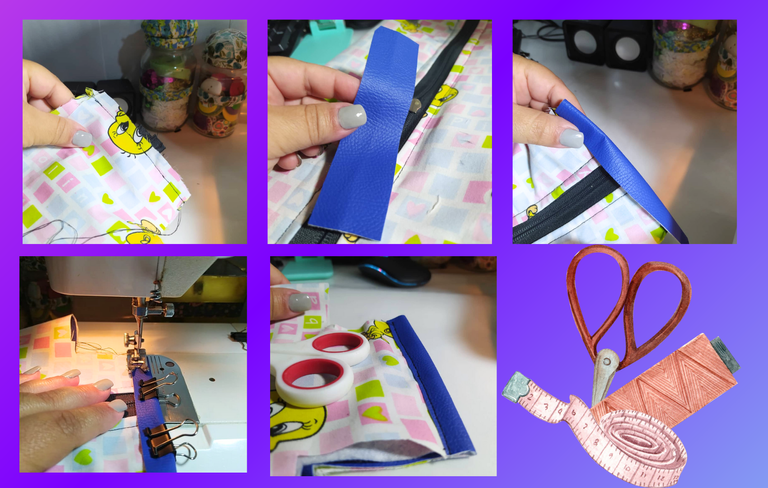
Primero ubiqué el patrón en el reverso del semicuero que estoy utilizando para la parte externa de la cartuchera, con un bolígrafo lo marqué y recorté. Ahora con el semicuero recortado lo ubico en la tela del forro y lo corto igualmente para tener ambas piezas preparadas para la Cartuchera.
I will be explaining the Tutorial through collages of photographs, and I will explain it in each one. It's very easy, and you can change all the materials to your liking.
First I located the pattern on the back of the semi-leather that I am using for the outside of the holster, with a pen I marked it and cut it out. Now with the semi-leather cut out, I place it on the lining fabric and cut it equally to have both pieces prepared for the Holster.
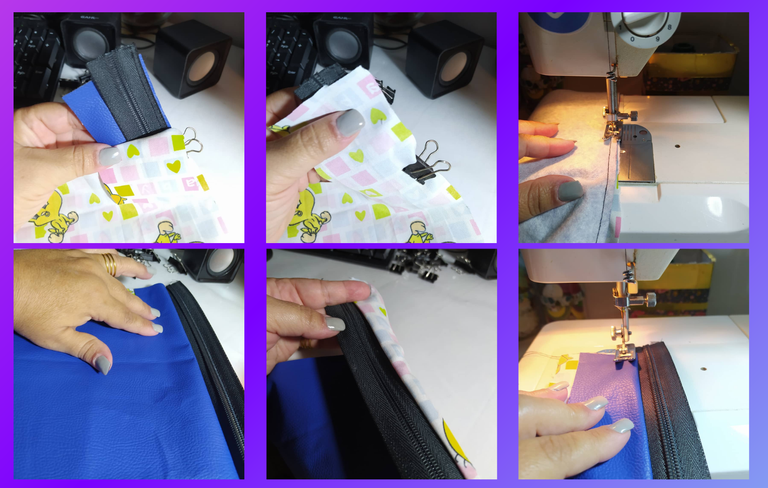
El cierre lo corté al ancho de los extremos del patrón que está trasladado y recortado en los géneros que usaré. Primero lo ubico en un extremo del semicuero, enfrentando derecho del cierre con derecho del semicuero.
Los fijo con los clips de presión para tener mayor control sobre ellos, y los llevo a la máquina de coser para unir con costura recta.
I cut the closure to the width of the ends of the pattern that is transferred and cut into the fabrics that I will use. First I place it at one end of the semi-leather, facing the right side of the closure with the right side of the semi-leather.
I secure them with the snap clips to have more control over them, and take them to the sewing machine for straight stitching.
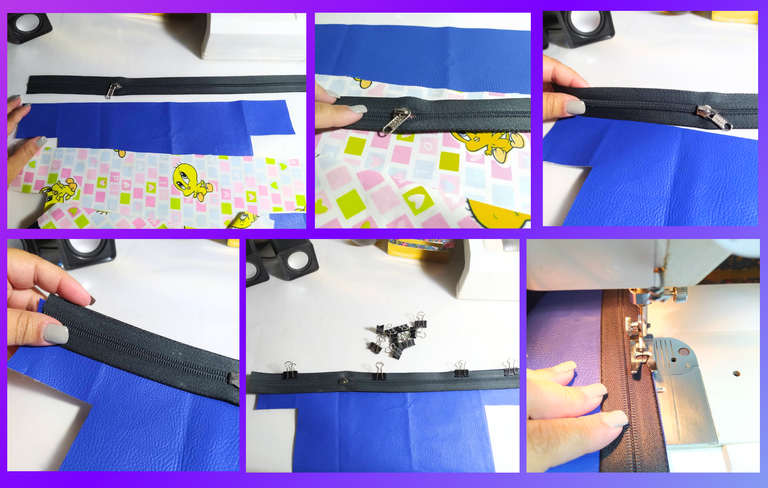
Luego, ubico la tela de forro en el otro lado del cierre, en este caso reverso de tela con reverso de cierre, y coso con costura recta.
Abro las piezas y realizo un repise con costura recta.
Then, I place the lining fabric on the other side of the zipper, in this case fabric back with zipper back, and sew with a straight seam.
I open the pieces and make a shelf with a straight seam.
Así luce la pieza repisada.
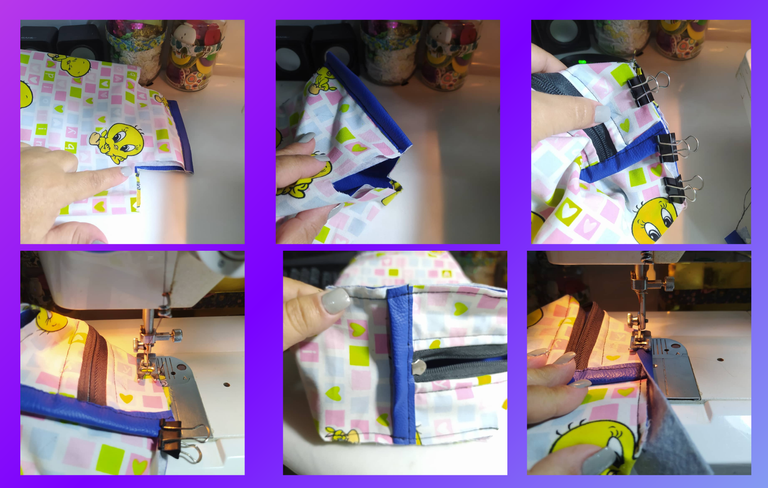
En el otro extremo del semicuero realizo la misma operación, llevo el extremo del semicuero hacia el borde libre del cierre, fijo con clips de presión coso con costura recta. Coso el extremo de la tela del forro por el otro lado del cierre al igual que hicimos en el paso anterior, fijo con clips de presión y coso con costura recta.
This is what the shelf piece looks like.
On the other end of the semi-leather I perform the same operation, I bring the end of the semi-leather towards the free edge of the closure, fixed with pressure clips I sew with a straight seam. I sew the end of the lining fabric on the other side of the zipper just like we did in the previous step, secure with snap clips and sew with a straight seam.
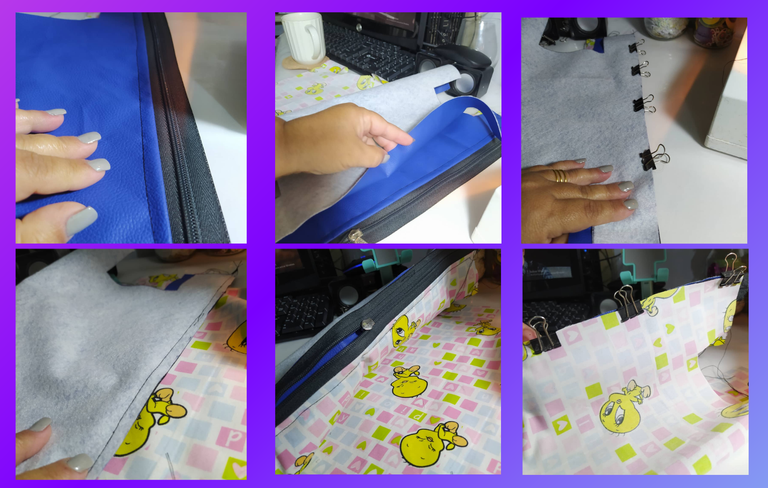
Aquí puedes ver la costura de la tela del forro, y como queda la pieza cosida, en una parte la pieza con el semicuero y del otro lado la pieza de la tela del forro.
Ahora volteo la pieza, y la abro completamente, para esto le quito el slider del cierre. Realizo el repise del extremo que aún le falta. Coloco el slider nuevamente.
Here you can see the sewing of the lining fabric, and how the sewn piece looks, on one side the piece with the semi-leather and on the other side the piece of the lining fabric.
Now I turn the piece over, and open it completely, for this I remove the closure slider. I make the shelf of the end that is still missing. I place the slider again.
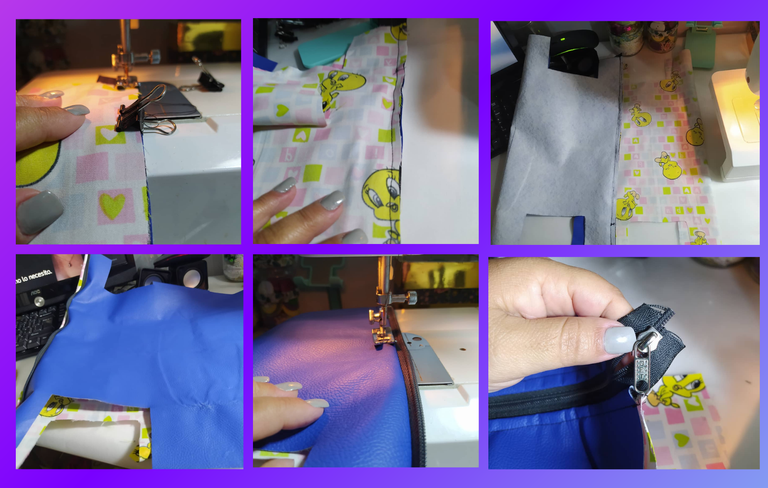
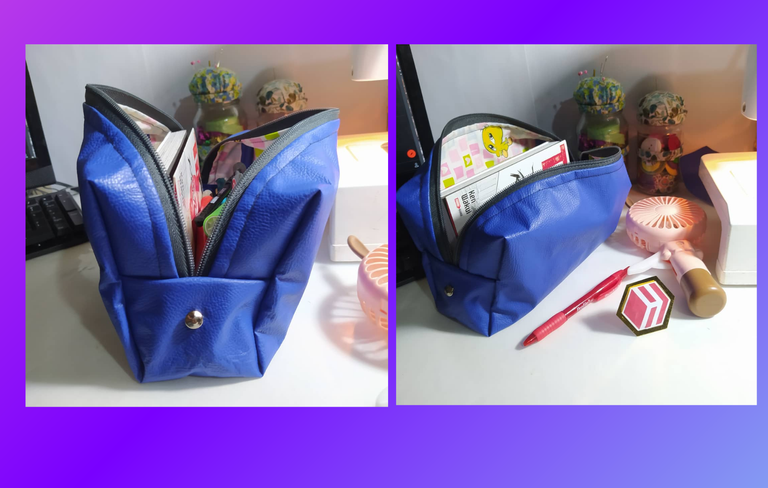
Así luce el cierre terminado, como pueden ver esta parte donde está el cierre vendría siendo el fuelle de la cartuchera, que en este patrón está integrado a la cartuchera.
Ahora voy a coser los extremos donde está ubicado el cierre o fuelle, con su extremo en la pieza de la cartuchera. Enfrento derechos y paso costura recta.
This is what the finished closure looks like, as you can see this part where the closure is located would be the bellows of the holster, which in this pattern is integrated into the holster.
Now I am going to sew the ends where the closure or bellows is located, with its end on the holster piece. I face right sides and sew straight.
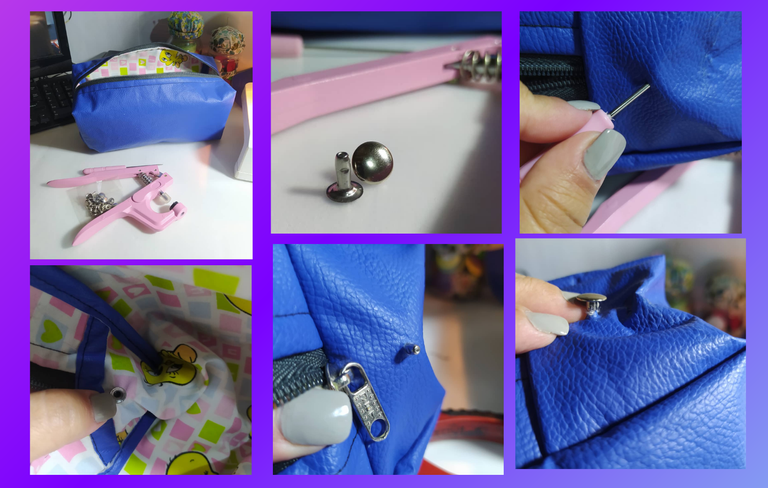
Con los extremos unidos, procedo a colocar un pedacito de la tela del semicuero, del largo de esa costura y de 2,5cms de ancho, con lo cual va a servir de tapa costura y además le aportaré más cuerpo y firmeza a la cartuchera, y también la hará más bella por dentro.
With the ends joined, I proceed to place a small piece of the semi-leather fabric, the length of that seam and 2.5cm wide, which will serve as a seam cover and will also give more body and firmness to the holster. and it will also make her more beautiful inside.
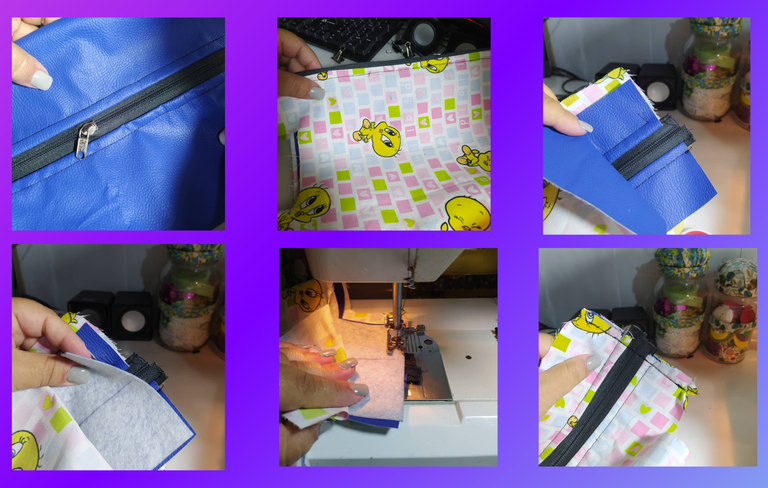
Como pueden ver se forman estas esquinas recortadas, y está perfecto así, ya que ahora los voy a coser uniéndolos de la forma que se aprecia en las fotos.
Paso costura recta en las 4 esquinas recortadas que tiene este diseño, e igualmente le coloco pedazos del semicuero para tapar costuras.
As you can see, these cut corners are formed, and it is perfect like this, since now I am going to sew them together in the way that can be seen in the photos.
I sew straight seams on the 4 cut corners of this design, and I also place pieces of semi-leather to cover the seams.
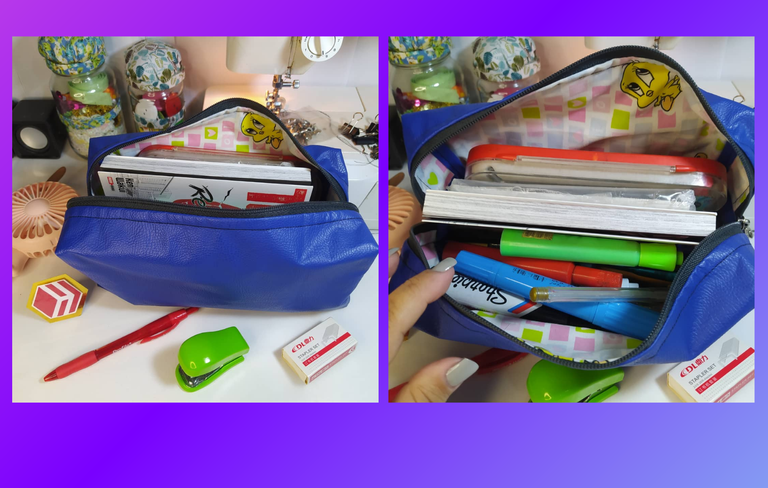
Así luce por dentro, vean que prolijo y bello. Siempre les digo que un proyecto de costura se debe de ver muy bien por dentro, debemos voltear la pieza y quedar bien ya que cuidamos estos detalles.
This is how it looks inside, see how neat and beautiful. I always tell them that a sewing project must look very good on the inside, we must turn the piece and it looks good since we take care of these details.

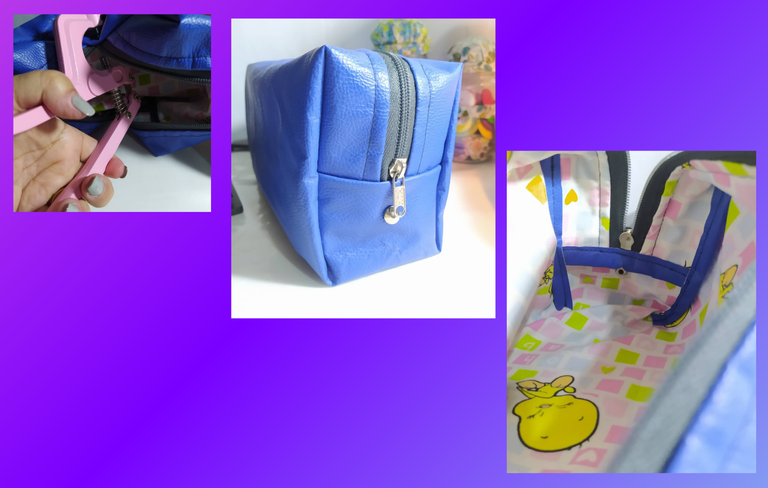
Este diseño no lo quise decorar mucho, pero si le coloqué un detalle para combinar con el cierre y su slider, que es un broche de metal.
El broche de metal son dos piezas que voy a colocar en donde termina el cierre. Abro con el punzón en el semicuero y coloco la pieza que tiene la punta, desde adentro y apuntando hacia la parte exterior. Ubico en la punta la otra pieza del broche de metal.
I didn't want to decorate this design much, but I did add a detail to combine with the closure and its slider, which is a metal clasp.
The metal clasp is two pieces that I am going to place where the closure ends. I open the semi-leather with the punch and place the piece that has the tip, from the inside and pointing towards the outside. I place the other piece of the metal clasp on the tip.
Después de colocar ambos broches en los extremos 😍 queda así la pieza. Es un detalle que hace mucho en el diseño, ya que es de color plateado como el cierre y me gustó mucho.
Así luce por por fuera y por dentro. Me gusta que sea tan prolija.
After placing both brooches at the ends 😍 the piece looks like this. It is a detail that does a lot in the design, since it is silver like the closure and I really liked it.
This is what it looks like inside and out. I like that it's so neat.
Aquí pueden ver la cantidad de cosas que le metió mi hija a la Cartuchera, ella está muy feliz con el tamaño maxi, puede llevar muchas de sus cosas dentro de la cartuchera.
Here you can see the amount of things my daughter put in the Pencil Case, she is very happy with the maxi size, she can carry many of her things inside the pencil case.
La tela de forro con muñequitos me gustó como quedo, y debo confesar que pensé que se vería infantil, pero realmente me gustó mucho, creo que si hubiese usado una tela unicolor se hubiese visto muy aburrida.
Con este diseño de tela en el interior, se ve más interesante el diseño de la Cartuchera.
I liked how the lining fabric with the dolls turned out, and I must confess that I thought it would look childish, but I really liked it a lot, I think that if I had used a solid color fabric it would have looked very boring.
With this fabric design inside, the design of the Cartridge looks more interesting.
Bueno, así termino este Post del Diy Cartuchera, con el cual Participo en la Iniciativa de la Comunidad.
Es solo cuestión de un día elaborar una cartuchera, realmente de unas horas, por ello aunque casi termina el mes, quiero invitar a @viviana.fitness y a @gardenkaiser a ver si se animan a realizar su proyecto y participar.
Una cartuchera puede realizarse con gran variedad de materiales que tenemos a nuestra disposición, y con varias técnicas, no necesariamente debemos disponer de una máquina de coser.
Well, this is how I end this Post of the Diy Cartuchera, with which I participate in the Community Initiative.
It is only a matter of a day to make a pencil case, really a few hours, so although the month is almost over, I want to invite @viviana.fitness and @gardenkaiser to see if they dare to carry out their project and participate.
A pencil case can be made with a wide variety of materials that we have at our disposal, and with various techniques, we do not necessarily have to have a sewing machine.

---------- ❤️❤️❤️❤️ ----------
Las fotos las tomé con mi teléfono Redmi Note 8
Apps que utilicé:
Canva para la Portada y los collages
Utilicé el Traductor Deepl
Mi redes sociales:
Discord: YennysYaneth#0189
Twitter: @yennysferm
Instagram: @yennysyaneth
---------- ❤️❤️❤️❤️ ----------
I took the photos with my phone Redmi Note 8
Apps I used:
Canva for the Cover and collages
I used Deepl Translator
I used Google Translate
My social networks:
Discord: YennysYaneth#0189
Twitter: @yennysferm
Instagram: @yennysyaneth
https://twitter.com/yennysferm/status/1719023636730761516
https://inleo.io/threads/view/yennysferm71/re-leothreads-2o7xhjvdb
La perfección! jajaj amiga te botaste! Quedó estupendo! profesional, excelentemente presentado wow!
¡Felicidades! Esta publicación obtuvo upvote y fue compartido por @la-colmena, un proyecto de Curación Manual para la comunidad hispana de Hive que cuenta con el respaldo de @curie.
Si te gusta el trabajo que hacemos, te invitamos a darle tu voto a este comentario y a votar como testigo por La Colmena.
Si quieres saber más sobre nuestro proyecto, te invitamos a acompañarnos en nuestro servidor de Discord.
Me gusto como te quedo la cartuchera, tiene un buen acabado y el diseño infantil que tiene por dentro, como tú dices, pues le dio el toque ideal para que quede llamativo. De verdad que quedo muy bien. Saludos.
✨Mi mamá hace cosas hermosa y útiles✨ Te felicito, madre, sigue asi😍😍
Con ese fondo de piolín me ganaste totalmente, aunque en vez de cartuchera para mí sería un hermoso portacosméticos ajajja, una entrada magistral amiga.
Me gusta así de grande, es muy practico. Disculpa pero no veo bien las medidas me la puedes poner en un comentario con el patrón. De antemano muchas gracias.
Congratulations @yennysferm71! You received a personal badge!
Wait until the end of Power Up Day to find out the size of your Power-Bee.
May the Hive Power be with you!
You can view your badges on your board and compare yourself to others in the Ranking
Check out our last posts:
Congratulations @yennysferm71! You received a personal badge!
Participate in the next Power Up Day and try to power-up more HIVE to get a bigger Power-Bee.
May the Hive Power be with you!
You can view your badges on your board and compare yourself to others in the Ranking
Check out our last posts: