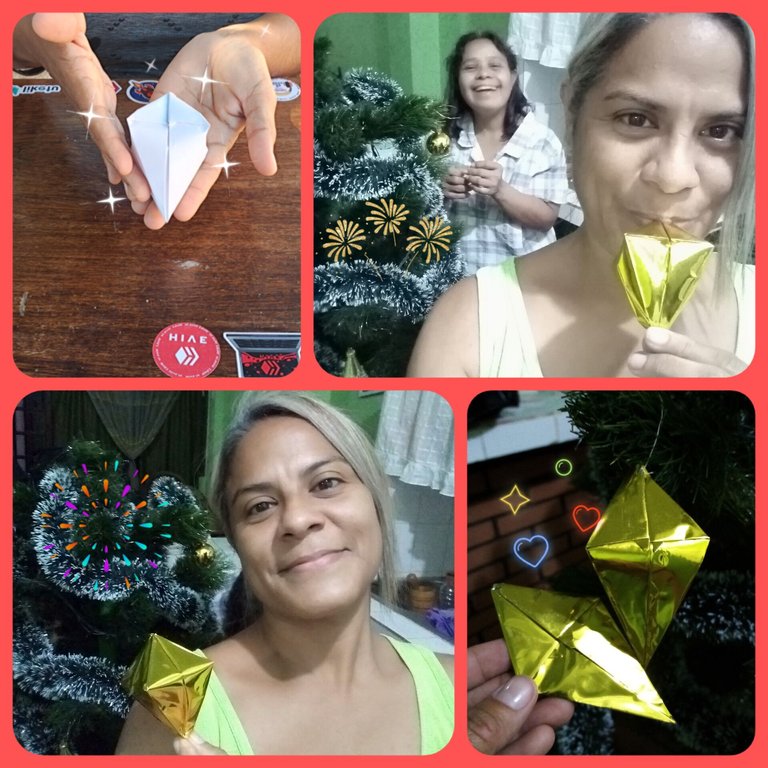
Paper balls for your Christmas tree 🌲 Bambalinas de papel para tu árbol de navidad
Origami technique | DIYHUB contest
Técnica de origami | concurso de DIYHUB
Hello friends of hive and @diyhub , this is my first post in the community and also my first time doing a tutorial, I was motivated by this contest that I found out recently, and I hope it's not too late to participate.
Another of my motivations is to share something that I learned years ago and is useful for this holiday season, because it serves to decorate in a unique and original way our Christmas tree without much expense, just with a little patience and love. I really don't know if it has a name, I learned it when in my adolescence a boy sent me this detail with my mom, I thought it was a nice gift, I liked it so much that I decided to take it apart to learn how to make it.
And that's how I learned this figure, taking apart the gift that had been sent to me, I practiced it so much that it comes naturally without thinking about it, a few years ago I decided to make several to decorate my tree and I did it with gold paper, it looked beautiful to reflect the colored lights. Well let's go with the tutorial, I hope it is easy to understand anyway I recorded a video to complement the idea of the photos.
Hola amigos de hive y de @diyhub, está mi primera publicación en la comunidad y también mi primera vez haciendo un tutorial, me motive por este concurso que me entere hace poco y espero que no sea tarde para participar.
Otra de mis motivaciones es querer compartir algo que aprendí hace años y es útil para estas fechas decembrinas, porque nos sirve para decorar de una forma única y original nuestro árbol de navidad sin mayores gastos, simplemente con un poco de paciencia y amor. Este bonito diamante de papel así lo nombre, realmente no sé si tiene nombre, lo aprendí cuando en mi adolescencia un muchacho me envió este detalle con mi mamá, me pareció un lindo regalo, me gusto tanto que decidí desarmarlo para aprender hacerlo.
Y así fue como aprendí esta figura, desarmando el regalo que me habían enviado, lo practique tanto que me sale natural sin pensarlo, hace algunos años decidí hacer varios para decorar mi árbol y lo hice con papel dorado, se veía hermoso al reflejar las luces de colores. Bueno vamos con el tutorial, espero que se entienda fácil de todas formas les grabe un video para complementar la idea de las fotos.
Materials and process
A sheet of paper of your choice, it can be a bright color, or any gift paper with figures, the important thing is that it can be folded and retains its shape.
And a transparent thread, or nylon, for hanging.
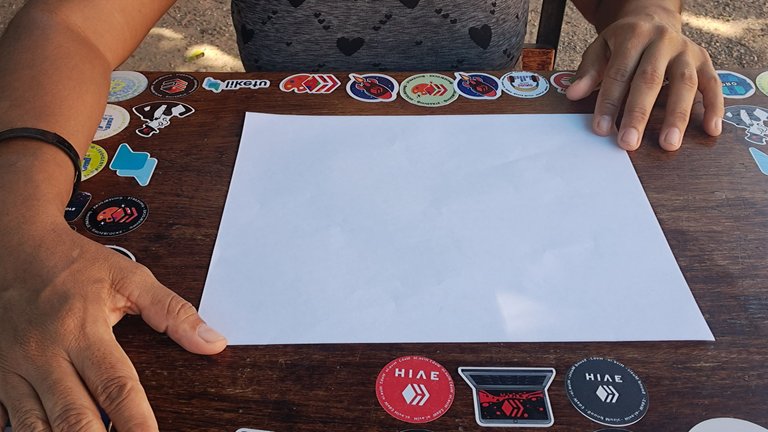
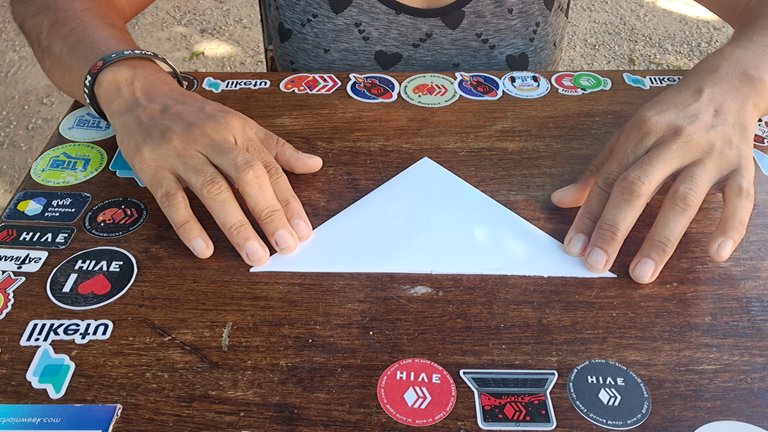
Step 1
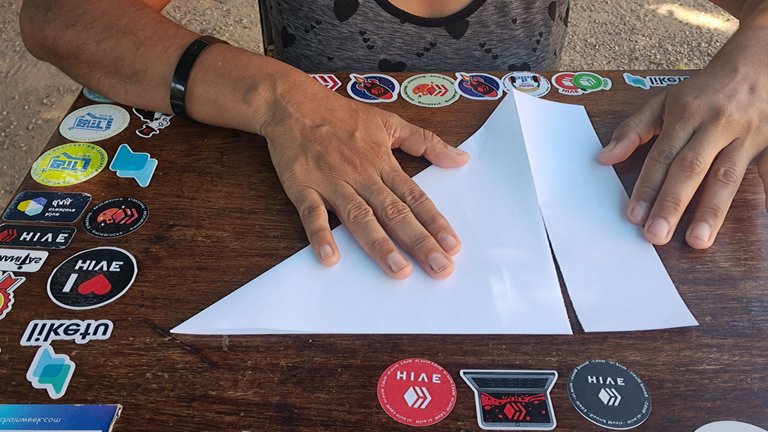
It has to be a perfect square, if you have a rectangular sheet like those that are letter type, you must detach the excess part and start with a square.
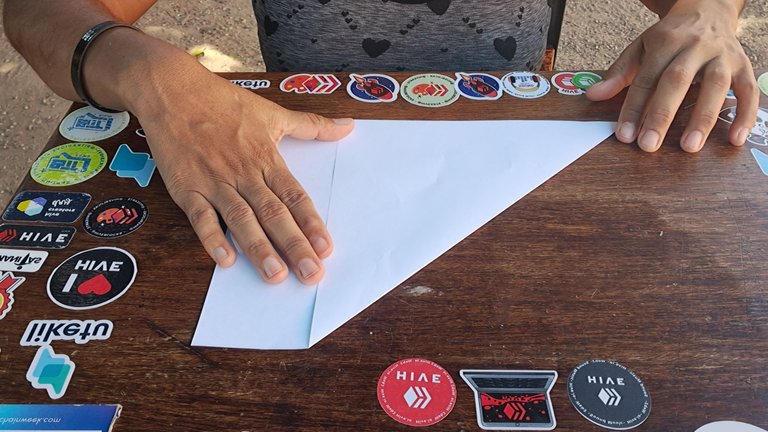
Step 2
Find the corners and fold in half, take each of the ends and join them so that the paper is folded in half, and you can see the folds that cross in the middle.
Materiales y proceso
Una hoja de papel de tu gusto, puede ser de un color brillante, o cualquier papel de regalo con figuras, lo importante es que se pueda doblar y conserve su forma.
Y un hilo transparente o nailon, para colgar.
Paso 1
Tiene que ser un cuadrado perfecto, si tienes una hoja rectangular como las que son tipo carta, debes desprender la parte sobrante e iniciar con un cuadrado.
Paso 2
Encuentra las esquinas y dobla por la mitad, toma cada una de las puntas y únelas de forma que se doble el papel por la mitad y se pueda ver los dobles que se cruza en el medio.
 |  |
|---|
 |  |
|---|
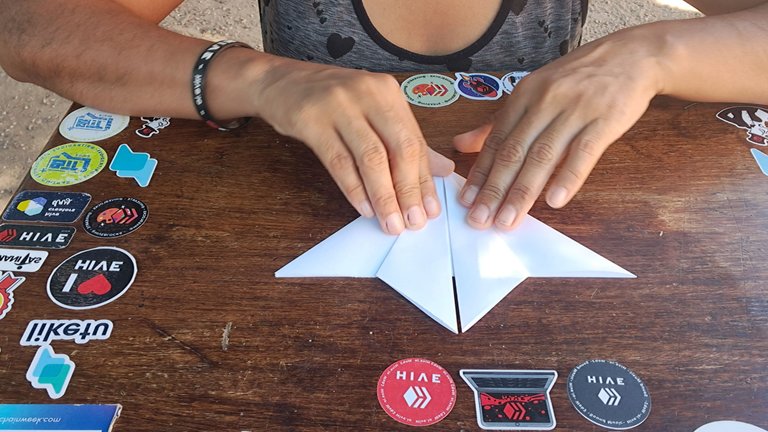
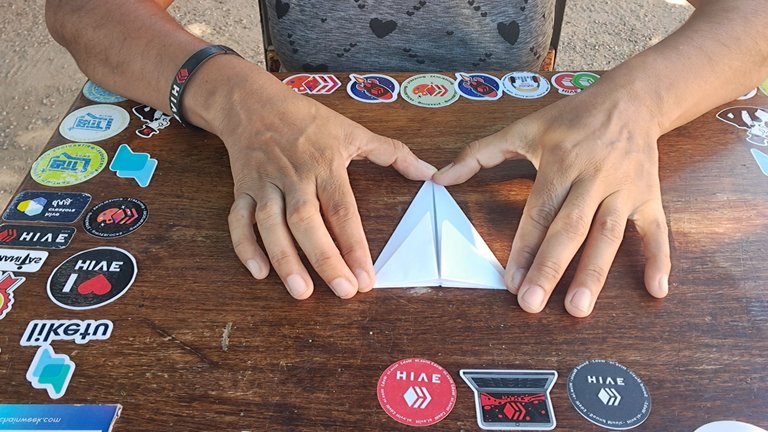
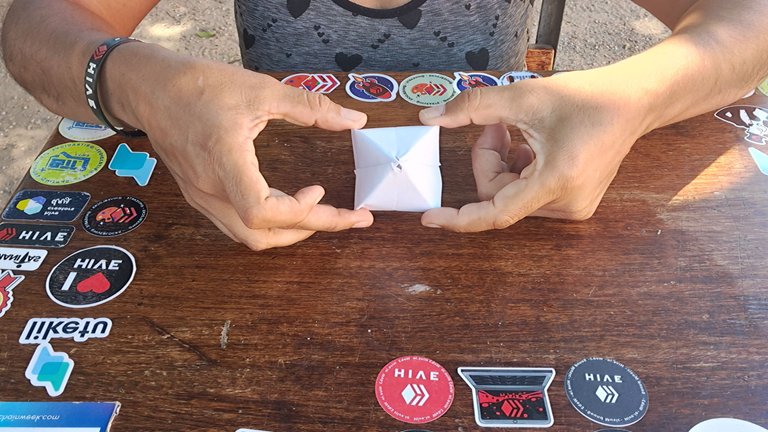
Step 3
Once you have the center lines, rejoin the corners forming a triangle, this part can be seen better in the video.
Step 4
Now the loose ends of the triangle are in the center and are folded tightly to keep that shape, it is important to note that all steps are repeated the same on both sides.
Paso 3
Una vez que tienes las líneas centrales se vuelven a unir las esquinas formando un triángulo, esta parte se puede apreciar mejor en el video.
Paso 4
Ahora las puntas sueltas del triángulo se encuentran en el centro y se doblan con fuerza para que mantengan esa forma, es importante destacar que todos los pasos se repiten igual en ambos lados.
 |  |
|---|
 |  |
|---|
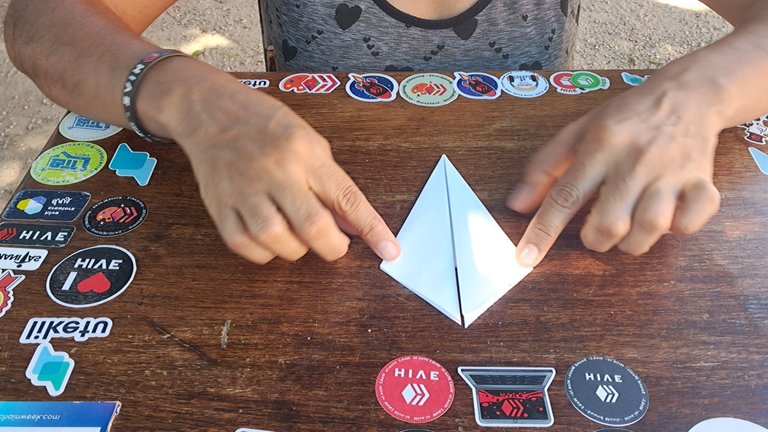
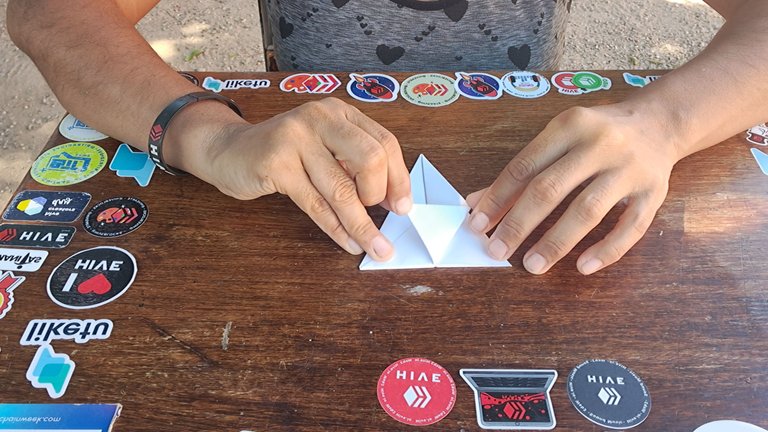
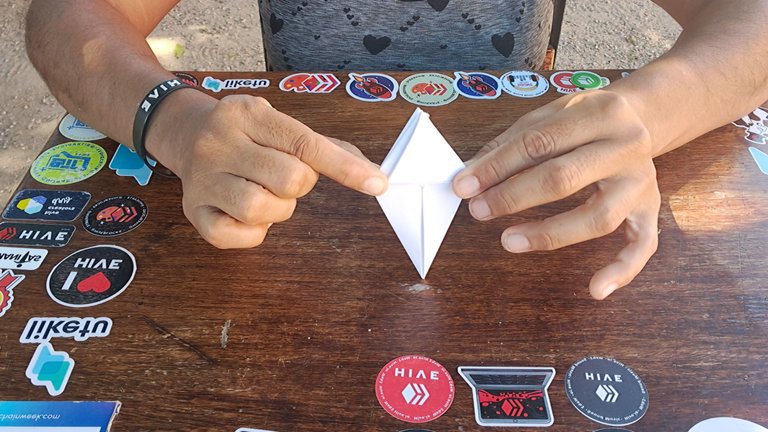
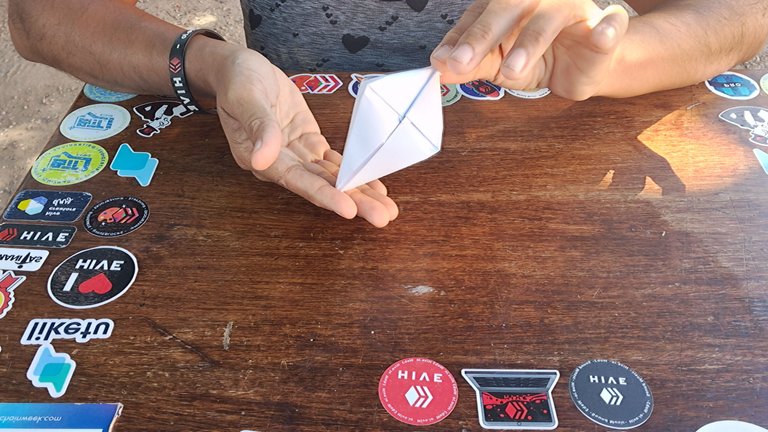
Step 5
These points are folded again, but upwards, following the guide of the same paper, by the four corners.
Step 6: This may be the most difficult step.
This may be the most difficult and confusing step to understand, here you have to fold the corners forming a triangle or a small pyramid, that is, you take the outside corner and fold the paper until the tip touches the edge, making a triangle.
It is important that it is well folded and in this form to make the penultimate step.
Paso 5
Esas puntas se vuelven a doblar, pero hacia arriba, siguiendo la guía del mismo papel, por las cuatro esquinas.
Paso 6
Este pueda que sea el paso más difícil de comprender y de mayor confusión, aquí tienes que doblar las esquinas formando un triángulo o una pirámide pequeña, es decir, tomas la esquina de afuera y doblas el papel hasta que la punta toque el borde, haciendo un triángulo.
Es importante que quede bien doblado y en esta forma para hacer el penúltimo paso.
 |  |
|---|
 |  |
|---|
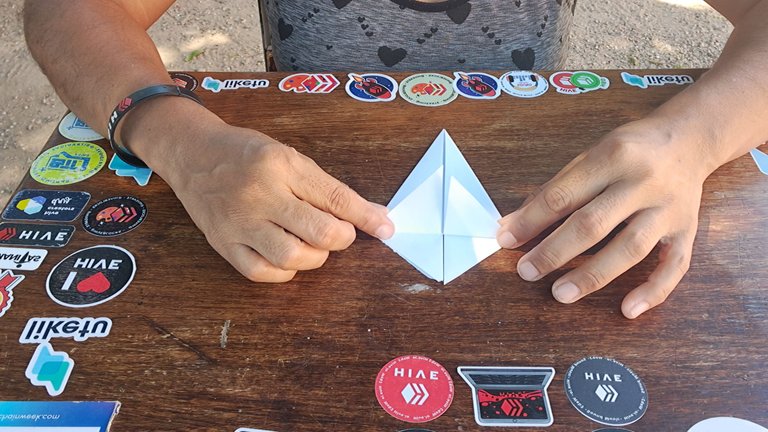
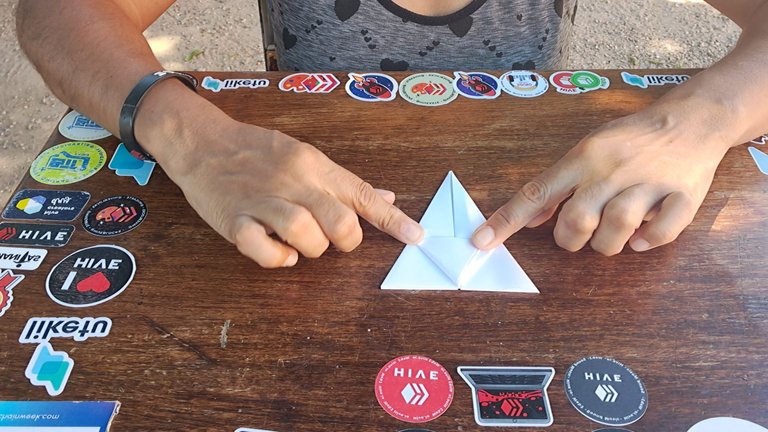
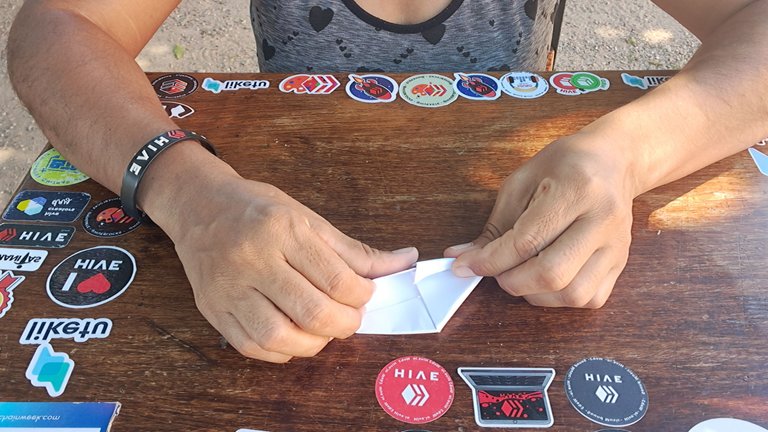
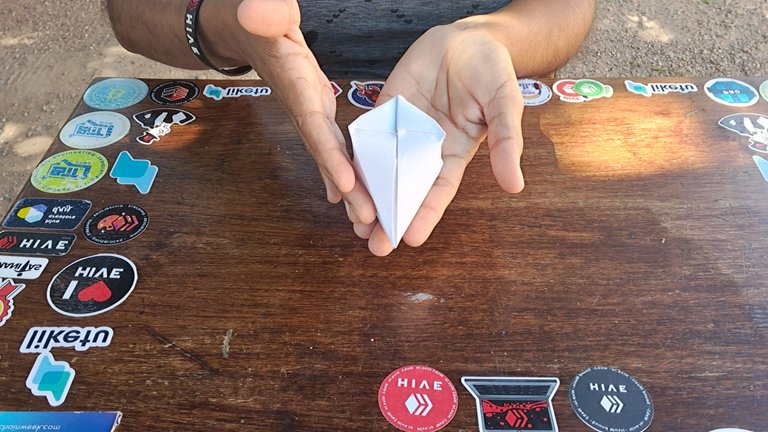
Step 7
That last triangle that we formed is going to be folded and put its corners through the center and inside the fold. This step is repeated on all sides, that is, four times.
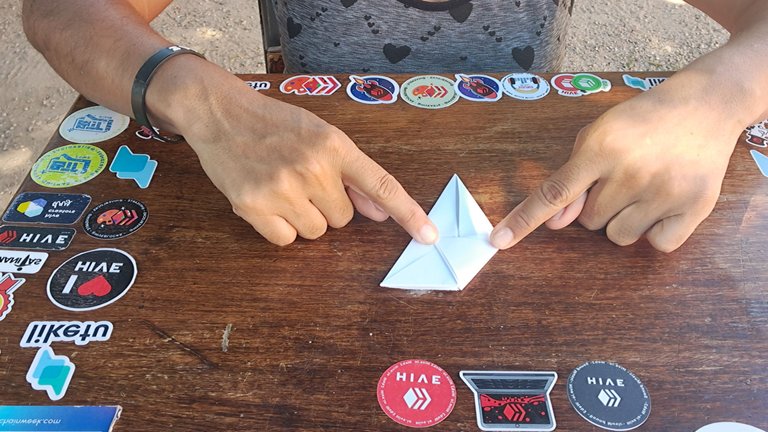
Step 8
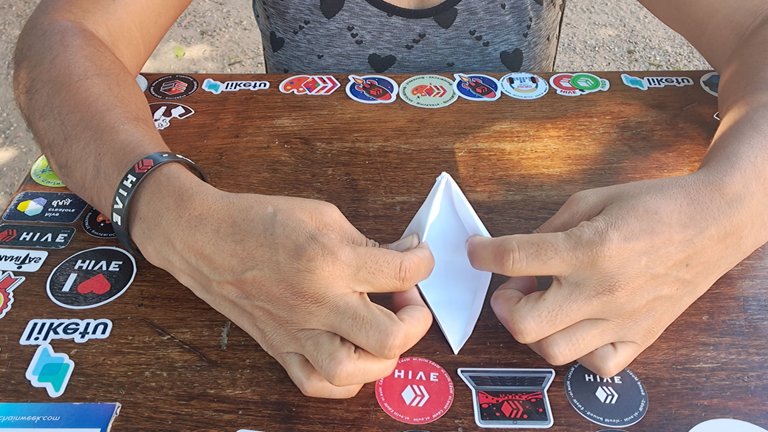
It is the last step and here we have our figure ready, it just needs a breath of life 😅, the top part will open or break a little and this is normal, allowing us to blow and fill our figure with air, it is like a game for adults, when you do it you will feel a great emotion, you'll see.
Paso 7
Ese último triángulo que formamos se va a doblar y meter sus esquinas por el centro y por dentro del pliegue. Este paso se repite por todos los lados, es decir cuatro veces.
Paso 8
Es el último paso y aquí ya tenemos nuestra figura lista, solo le falta aliento de vida 😅, por la parte de arriba se va a abrir o romper un poco y esto es normal, lo que nos permite soplar y llenar nuestra figura de aire, es como un juego para adultos, cuando lo realices vas a sentir una gran emoción ya verás.
 |  |
|---|
 |  |
|---|
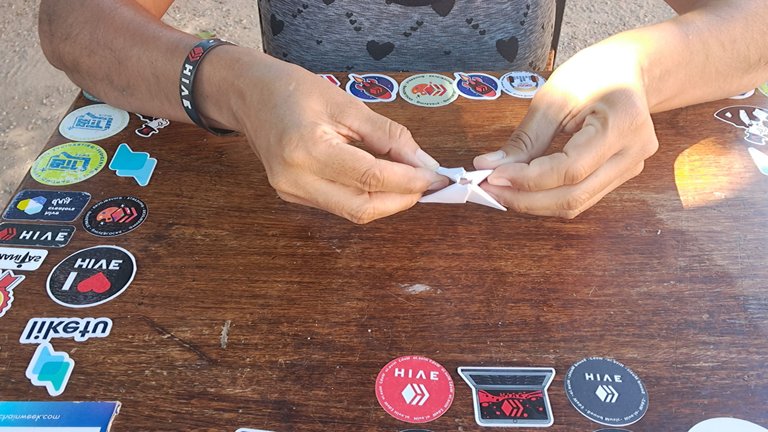
Final words
To use this rhombus, diamond or paper figure on your tree you only have to glue or sew a thread to it so you can hang it and that's it. As you can see, there are not many steps, you just have to try it and give that different touch to your Christmas.
Thanks for your time, did you already know this origami figure, did you like it? See you in the comments.
Palabras finales
Para usar este rombo, diamante o figura de papel en tu árbol solo tienes que pegarle o coserle un hilo para que puedas guindarlo y listo. Como puedes ver no son muchos pasos, solo tienes que intentarlo y darle ese toque diferente a tu navidad.
Gracias por tu tiempo, ¿Ya conocías esta figura de origami? ¿Te gustó? Nos leemos en los comentarios.
 |  |
|---|
 |  |
|---|

.png](https://files.peakd.com/file/peakd-hive/soyunasantacruz/AK9GPwxQBNma1TaU1n4nXkfyRfTbdy1qRdG7yzWsRFc6BcyNmqR1USkpSXUgmWh.png)
.png](https://files.peakd.com/file/peakd-hive/soyunasantacruz/AKJ3DCjFurFUD6uh4puiv7FUmjHPqgFs8mJAoxGQjxJhxSAaiXjCBAJCrHTCDxf.png)
▶️ 3Speak
!giphy wow
Via Tenor
#posh
https://x.com/la_santacruz/status/1729129565690249375?s=20
Pero que belleza 😍 eres talentosa..
jejeje gracias Maylin, hay que aprender de todo un poco.
jejejej gracias Maylin, hay que aprender de todo un poco.
Bonitas manualidades, versátiles y encantadoras, me animas a intentar hacerlas en mi hogar.
Que bueno, seria un gusto verlo en tu decoración, gracias.
Amiga esa bambalina te quedó muy linda
Hola @yraimadiaz gracias, sería un gusto que lo pudieran hacer.
Yay! 🤗
Your content has been boosted with Ecency Points, by @bhattg.
Use Ecency daily to boost your growth on platform!
Support Ecency
Vote for new Proposal
Delegate HP and earn more
@bhattg
you are welcome, keep sharing great content
Conocía el origami, pero nunca he intentado esta figura. Ya tengo trabajo para mi hijo pequeño para este próximo fin de semana!
Quedaron geniales.
Esoo, que bueno no sabes la alegría que me daria ver algun albolito o decoración hecho con esta idea.
Gracias 🥰
Hola amiga, bienvenida a la comunidad! _Te ha quedado muy hermoso el resultado.
Muchas gracias por la bienvenida y tu lindo coementario. 🥰🫠
Hola mi bella @soyunasantacruz, bienvenida a la comunidad, es un placer ver que te hayas animado a trabajar en origami haciendo esas bambalinas para embellecer tu arbol de navidad y tu hogar...
Buen trabajo y gracias por compartir en nuestra comunidad. Suerte en el concurso...
!DIY
Hola @dayadam 😊 desde el año pasado queria compartir este origami pero me faltaba motivación 😆, gracias amiga por tu bello recibimiento y los buenos deseos.
Nice origami work, the backdrops were beautiful. Thanks for participating in the contest. Best of luck
Thank you so much for rating my post, 😊😉 I appreciate the opportunity @diyhub
You can query your personal balance by
!DIYSTATSEstimada, un gustazo ver tus post y como cas creando esta pieza en el video. Sin dudas hay una gran diferencia el veelo en fotos y en video pues allí se aprecia con mayor detalle todo lo que se hace.
Hola amigo, tuve un poco de nervios que no se entendiera de ninguna forma, no te imaginas lo que me costo grabar porque yo queria una toma desde arriba, o desde atras de mi, pero mi tripode esta malito y tiene vida propia, pero al final decidi hacerlo de frente y arriesgarme a que se destacara en una comunidad de creadores de este nicho.
Valoro tu comentario, gracias por la visita y tu opinión. 🥰
Esto es asombroso e Increíble
😆 muchas gracias, que te sea util.
Claro que es muy útil
Wooo! Ya sé como decorar mi árbol este año ... Un tutorial muy completo amiga. Gracias por compartir...suerte en el concurso y feliz inicio de semana 😊
!discovery 45
Gracias a ti @chacald.dcymt espero ver ese hermoso árbol.
This post was shared and voted inside the discord by the curators team of discovery-it
Join our Community and follow our Curation Trail
Discovery-it is also a Witness, vote for us here
Delegate to us for passive income. Check our 80% fee-back Program
It look unique and beautiful
Thank you 😊😉
Excelente explicacion tanto en el video como en las imagenes
Muchas gracias, 🫢⚘️🌹
Hace un tiempo hice algo parecido, pero como una flor, lo digo porque el soplete y no sé cómo llamarlo es lo que más me costó jajaja, que bueno que te hayas animado a participar y ver tu origami, bien hecho amiga, saludos.
Jejejeje es chevere cuando armamos algo soplando.
Gracias, Nohely me entere tarde concurso para la próxima pensaré en invitarte.
Buen trabajo, el resultado muy lindo 🎄 gracias por compartir esta idea con nosotros ☺️
Graciasna ti por tu bonito comentario, que sea de provecho.
¡Caramba, qué bueno, manita! Te quedó bien bonito, vale.
🥰😊😉😍 Gracias Yecenia.