Meet the premiere for the Niño Jesús/Conoce el estreno para el Niño Jesús
When Christmas approaches, I feel inside me a process of transformation and illusion, the reasons? the preparation for the arrival of Baby Jesus. It is what I call since I was a child, the most beautiful and magical month of the year. As a Catholic, I dedicate special attention to the image I have at home. Every year, I change her costume, so that she can also wear a new outfit, as our parents used to do at home. They used to prepare us for the Christmas season. We had our premieres, both for December 24, to receive the Baby Jesus, as well as to say goodbye to the year that is leaving, or old year.
In this, my first publication in your community, I will show you how I made the new suit for the Baby Jesus, using the crochet technique. Besides being a beautiful and simple technique for those who have been dedicated to it for many centuries, it is also a way to turn threads into beautiful works of art. Creations that, over the years, have transcended from the everyday to the exclusive. I can affirm that in every family, there is or there will always be a weaver.
In my case, I confess, I am not an expert, and with the little that I have learned empirically, I have been able to elaborate the wardrobe of my Baby Jesus, some hats and pot holders, because impatience always wins me, although it is also a technique that serves to relax. . Of course, when I start a weaving, I don't let go until I see the end. I hope to be able to meet the expectations of this Christmas Contest, promoted by C/DIYHub.
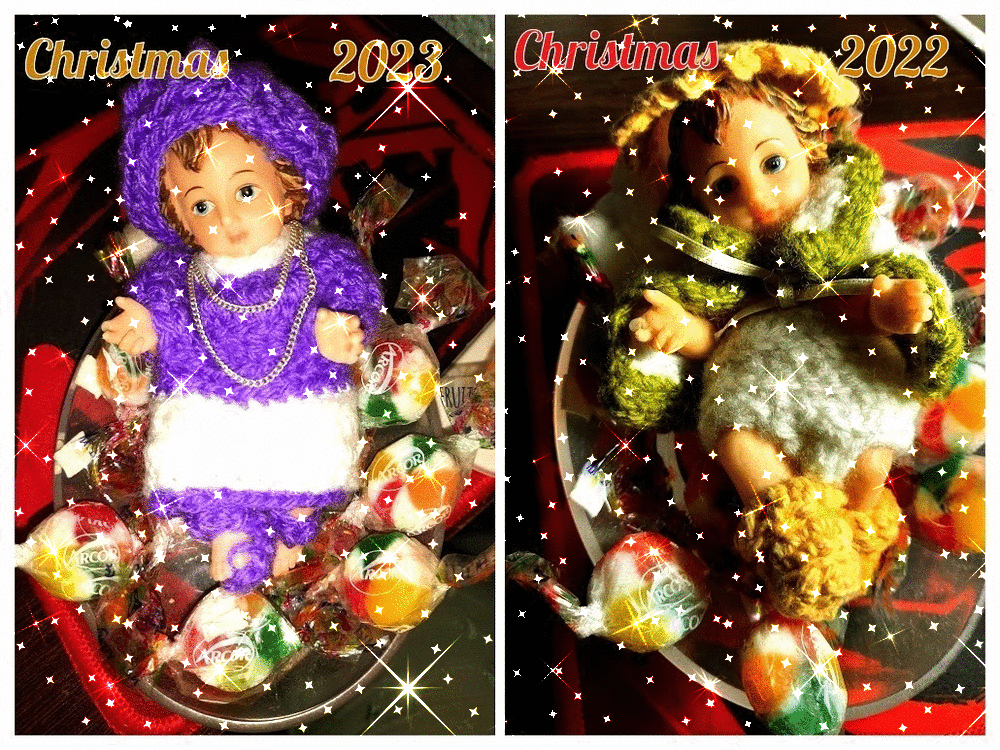
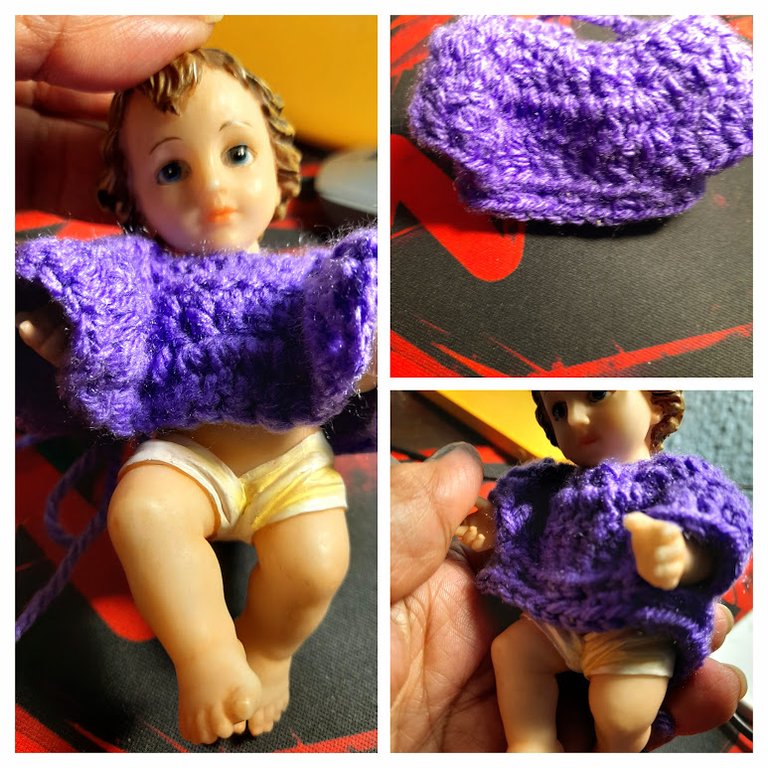
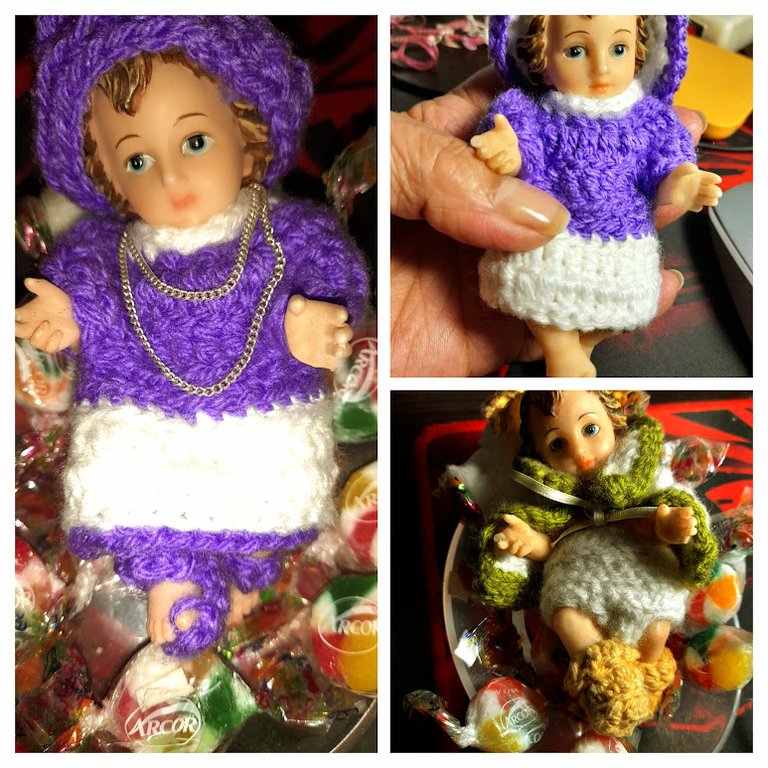
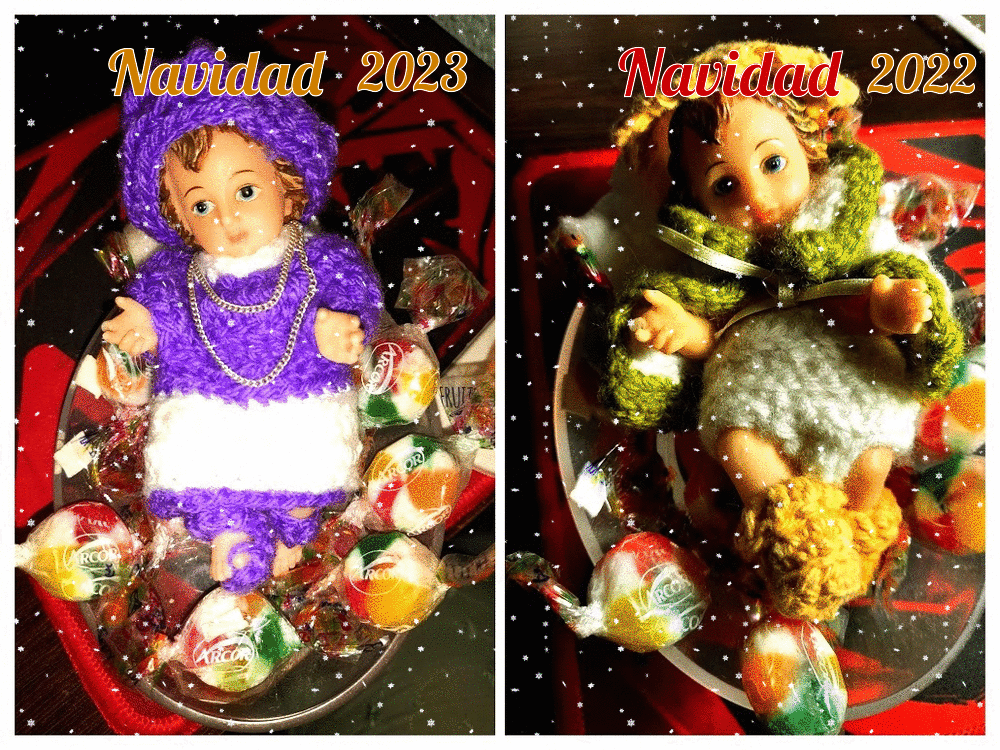
Now, I will explain the process of changing clothes for my spoiled Baby Jesus. Last year, his outfit was white, green and yellow, as you can see on the cover. This time, I chose purple combined with white.
It is the color of the Jacaranda tree, an emblematic species of the city of Buenos Aires.
The selected materials are:
*_ 2.5 mm. crochet hook (depending on the thickness of the yarn)
*_ Yarn for knitting, purple color
*_ Knitting yarn, white color
*_ Scissors
*_ Measuring tape
STEP BY STEP
FOR THE NIGHTGOWN
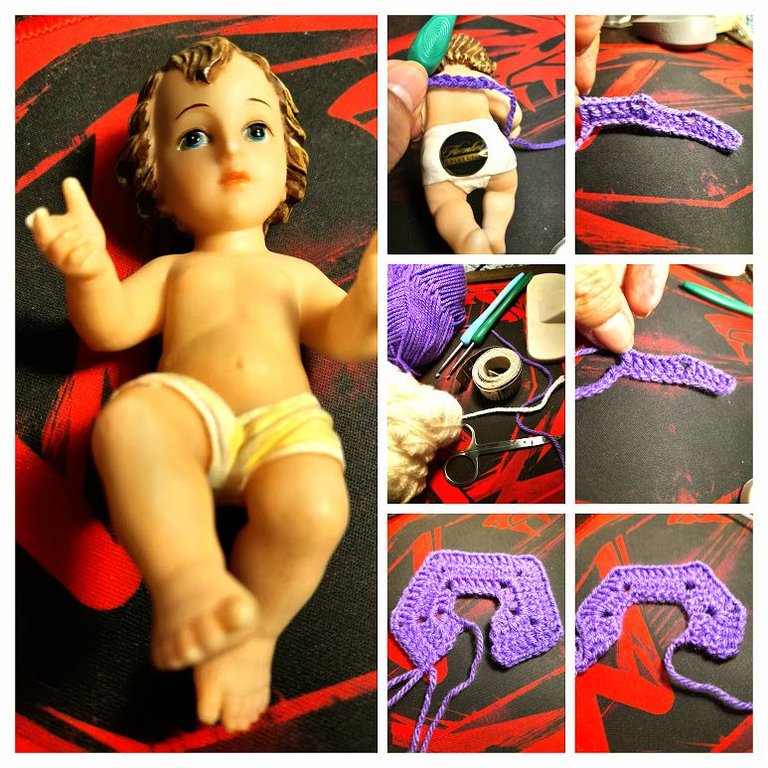
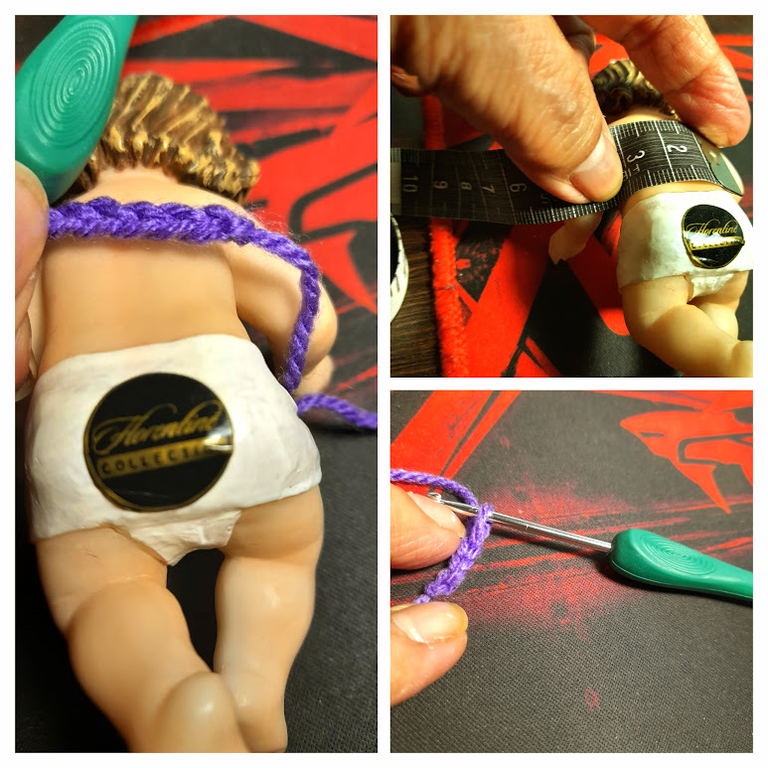
Measure the child's back (you can do this with a chain stitch or a tape measure).
I took mine and it was 4 cm. Remember that each child Jesus is a different size.
Assemble 16 chains (4 X 4 = 16)
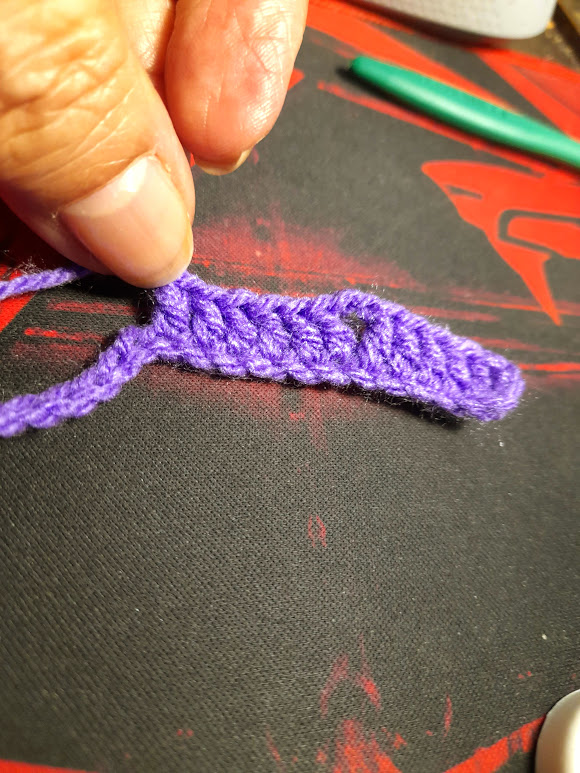
4._ Begin the first row by knitting three purl stitches and inserting them into the same stitch.
5_ Continue with three double crochet stitches and in the fourth space, knit two double crochets and a chain, followed by two double crochets (this would be the first stitch to start the sleev(*)
6_ In the next space, knit stitch over stitch until the next four stitches are completed.
7_ In the next space, knit two double crochet stitches, a chain and two double crochet stitches.
8_ Continue knitting stitch over stitch, until you reach eight stitches.
9_ In the next space, knit a double crochet, until you have four more stitches, and in the next space, knit two double crochets, a chain and two double crochets.
10_ Continue knitting over stitch, until you reach the last four spaces, to close the first row, joining with a slip stitch.
Second row
11_ Begin the second row with three purl stitches and insert them in the same space.
12_ Continue with double crochet until you reach the space where you have the separation.
13_ In the center of the gap, knit two double crochet, two chains and two double crochet.
14_ Continue in the same way until the last stitch, with the difference that you will have increased the fan in two chains.
15 _ Knit one last row and take the measurements to place the sleeves.
16_ Knit the next row with only medium stitch. And when you reach the junction of the sleeves, make chains according to the position of your arms (*).
17_ Continue with the half stitch over all the spaces, until you reach the other sleeve and repeat chain count according to the size.
18 _ Begin the next and last row with slip stitch, up to the last space.
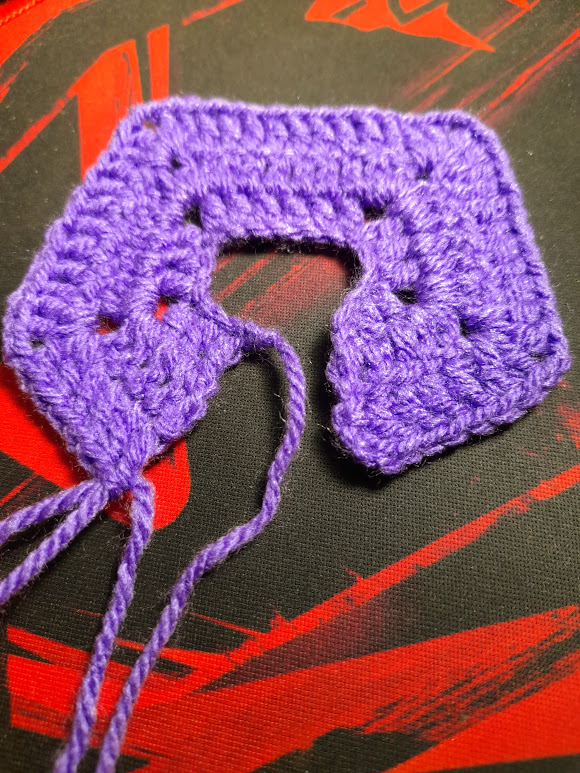
NOTE: In image Nº 1, you will notice that when knitting two groups of four and one group of eight, the sleeves will automatically separate from the back. Just where the increases are made. That is, I have four centimeters of the child's back. I distribute it in four rows, two rows of four stitches on the sides and the center row with eight stitches, which is the back.
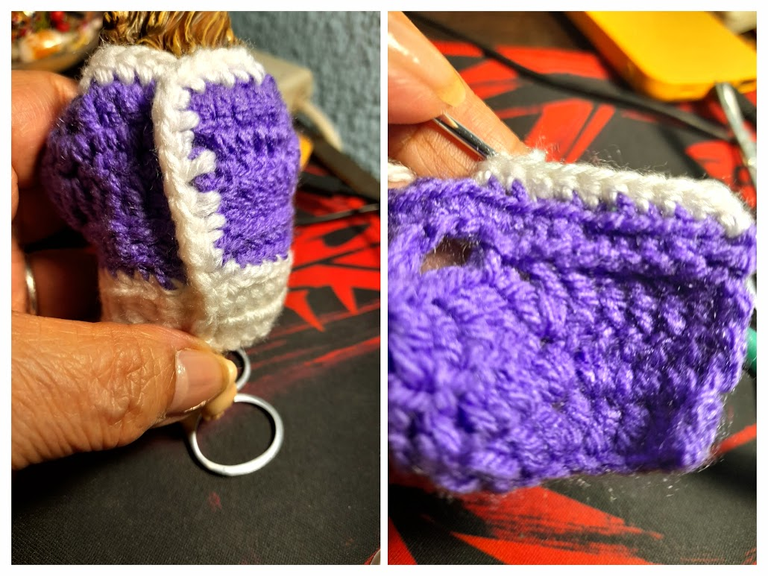
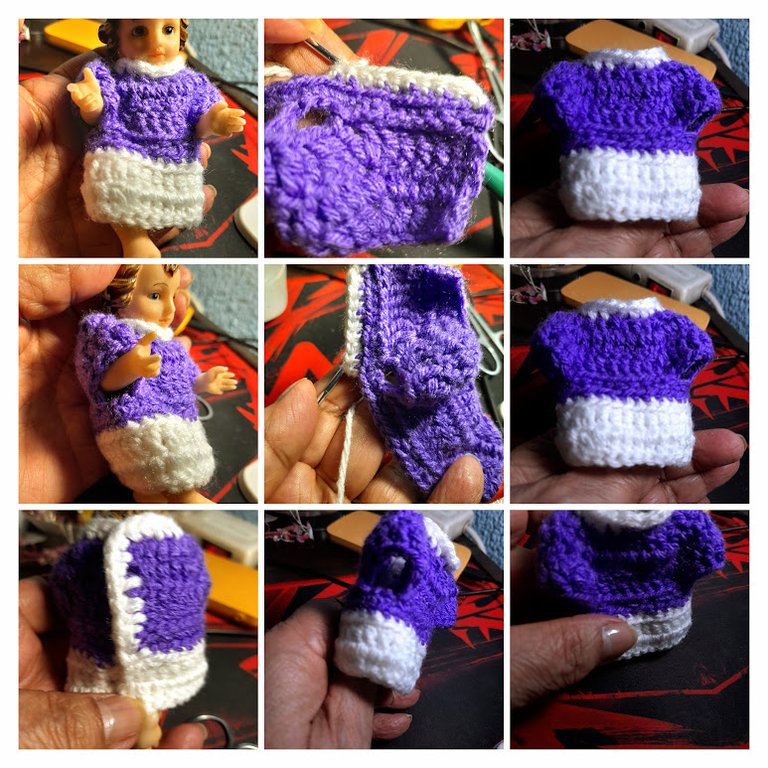
19_ Change to white yarn, or the yarn of your choice. Knit around the whole nightgown, one row with medium stitches (passing through the neck, until the end of this row).
20_ The next row, continue with two rows of double crochet, until the length of the nightgown is completed.

BERET AND SANDALS
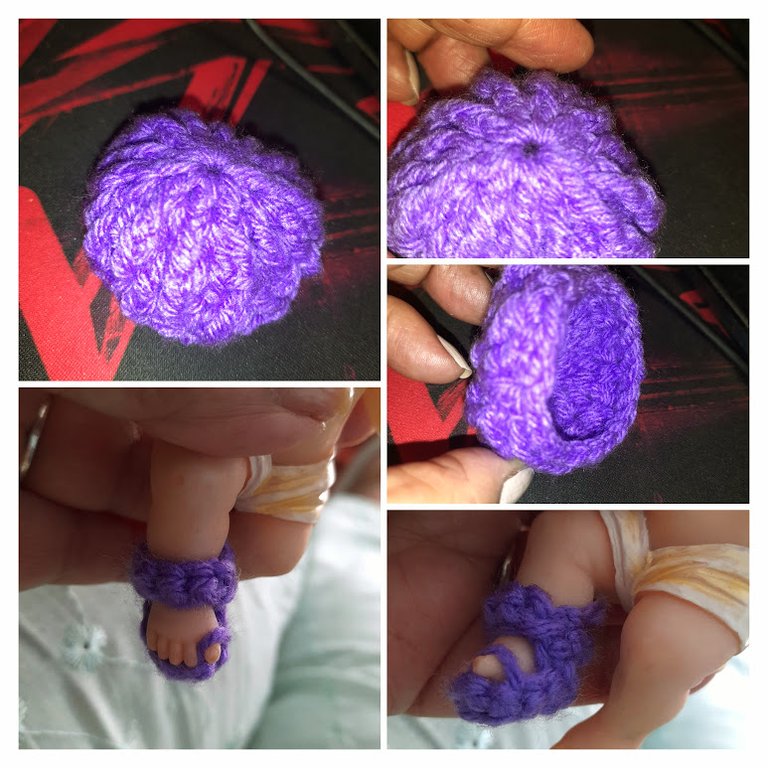
For sandals
1_ Take the measurement of each foot (4 cm).
2_ Knit four chains, with the purple 🟪🟣 yarn.
3_ Knit the template, with low stitches, and in the third round measure, until you reach the desired width.
4_ Once the template is ready, we lift three stitches in the air and insert them in one of the sides where the fingers will go, we join with a slipped stitch.
5_ In that same space, we lift three chains in the air, and we join in the opposite side with the previous one, with a slipped stitch.
6_ We go back and knit all the spaces of both chains with single crochet stitches.
7_ We measure on the child's foot and the sandals are ready.
8_ We place his little thumbs inside the chain that we will choose from the template. It will be just right (Image 8).
For the beret
1_ Inside a magic ring, we knit two chains in the air, insert, and then knit until the twelve high stitches are completed. Pull the excess yarn, to adjust the first loop, join with slip stitch and thus begin the base.
2_ Pick up three chains, insert in the same space a double crochet, and thus there will be two double crochet stitches left.
3_ We will start with the relief stitch for the next space (one loop, insert the hook underneath the next high stitch, turn and pull out the high stitch).
4_ In the next space, make two double crochet stitches together.
5_ Next a relief stitch equal to the previous one.
6_ In the next space, make two double crochet stitches together.
7 _ Next, make a relief stitch the same as the previous stitch.
8_ In the next space, make two double crochet stitches together.
9_ Next, knit a relief stitch equal to the previous one.
10 _ Continue in the same way, until you reach the last space and close with a slip stitch.
11_ Begin the next row, with an increase.
12_ Pick up a chain, insert in the same space.
13_ Pick up two high stitches, in the middle of the next two spaces.
14 _ In the next space, we make the relief stitch, we make the first relief stitch, (One loop, insert the hook under the next high stitch, turn and pull out the high stitch).
5_ So on, until you reach the end by closing the row with a slip stitch.
16_ At the end of this row, measure the beret. If it is in the correct size, proceed to decrease it to adjust it to the head.
17_ In this row we will only work with stockinette stitch until the end of the row.
18_ And to finish the last row we will work with slip stitch.
Finally, the beret should fit snugly, according to the size of your Baby Jesus' head.
In the image N° 7, the Child appears with a white beret with purple, because I liked it so much that I made him another one with those colors, for his New Year's Eve outfit.
Like the cover image, I thought it was interesting to give a magical touch to the last photo, because that's what Christmas is all about for me. Whatever happens, my favorite month of the year is still December. From the city of tango and mate, honoring Baby Jesus. I invite you to make this garment, if you have any questions you can ask in the comments, and I will answer them.
Thanks for visiting my blog!
ESPAÑOL
Cuando se acerca la Navidad, siento en mi interior un proceso de transformación e ilusión, los motivos... la preparación para la llegada del Niño Jesús. Es lo que yo llamo desde niña, el mes más bonito y mágico del año. Como católica, dedico especial atención a la imagen que tengo en casa. Todos los años, le cambio el traje, para que ella también se vista de estreno, como hacían nuestros padres en casa. Solían prepararnos para la época navideña. Teníamos nuestros estrenos, tanto para el 24 de diciembre, para recibir al Niño Jesús, como para despedir el año que se va, o año viejo.
En esta, mi primera publicación en vuestra comunidad, les mostraré cómo elaboré el traje nuevo al Niño Dios, con la técnica de crochet. Además de ser una hermosa y sencilla técnica para quienes se han dedicado a ella, también desde hace muchos siglos, es una manera de convertir los hilos en hermosas obras de arte. Creaciones que, tras los años, han trascendido de lo cotidiano a lo exclusivo. Puedo afirmar que en cada familia, siempre hay o habrá algún tejedor.
En mi caso, confieso, no soy experta, y con lo poco que he aprendido empíricamente, he podido elaborar los trajes de mi Niño Jesús, unos gorros y agarra ollas, pues siempre me gana la impaciencia, a pesar, de que también es una técnica que sirve para relajarse. Eso sí, cuando comienzo algún tejido, no lo suelto hasta ver su final. Espero poder cubrir las expectativas de este Concurso Navideño.Promocionado por C/DIYHub
Ahora, paso a explicarles el proceso del cambio de ropa para mi Niño Jesús consentido. El año pasado, su traje fue de color blanco, verde y amarillo, tal y como lo ven en la portada. Elegí, en esta ocasión, el color púrpura combinado con el blanco. Es el color del árbol Jacaranda, especie emblemática de la ciudad de Buenos Aires.
Los materiales seleccionados son:
*_ Ganchillo de 2.5 mm.( dependiendo del grueso del hilo)
*_ Hilo para tejer, color púrpura
*_ Hilo para tejer, color blanco
*_ Tijeras
*_ Cinta métrica
Imagen N.º 2
PASO A PASO
PARA EL CAMISÓN
Tomar la medida de la espalda al niño. (Lo puedes hacer con una cadeneta, o con una cinta métrica)
Al mío, le tomé y fueron 4 cm. Recuerden que cada niño Jesús es de diferente tamaño.
Montar 16 cadenas (4 X 4 = 16)
4._ Comenzar la primera vuelta tejiendo tres puntos al aire e insertarlos en el mismo punto.
5_ Continuar con tres puntos altos y en el cuarto espacio, tejer dos puntos altos y una cadena, seguida de dos puntos altos. (Este sería el primer punto para comenzar la manga.)
6_ En el siguiente espacio tejer punto sobre punto hasta completar los cuatro siguientes.
7_ En el siguiente espacio, hacer dos puntos altos, una cadena y dos puntos altos.
8_ Continuar tejiendo punto sobre punto, hasta llegar a los ocho puntos.
9_ En el siguiente espacio, tejer un punto alto, hasta hacer cuatro puntos más, y en el siguiente espacio, tejer dos puntos altos, una cadena y dos puntos altos.
10_ Continuar punto alto sobre punto, hasta llegar a los últimos cuatro espacios, para cerrar la primera vuelta, uniendo con un punto deslizado.
Segunda vuelta
1_ Comenzar la segunda vuelta con tres puntos al aire e insertarlos en su mismo espacio.
12_ Continuar con puntos altos hasta llegar al espacio donde tenemos la separación.
13_ En el centro de la separación, tejer dos puntos altos, dos cadenas y dos puntos altos.
14_ continuar igual hasta el último punto, con la diferencia de que se habrá aumentado el abanico en dos cadenas.
15 _ Hacer una última vuelta y tomar las medidas para ubicar las mangas
16_ Tejer la siguiente vuelta con solo punto medio. Y al llegar a la unión de las mangas, hacer cadenas de acuerdo a la posición de sus brazos. (*)
17 continuar con el punto medio sobre todos los espacios, hasta llegar a la otra manga y repetir conteo de cadenas de acuerdo al tamaño.
18 _ Comenzar la siguiente y última vuelta con punto deslizado, hasta el último espacio.
NOTA:En la imagen Nº 1, podrán notar que al tejer dos grupos de cuatro, y uno de ocho, se van a separar las mangas automáticamente de la espalda. Justo donde se hacen los aumentos. Es decir, tengo cuatro cm de espalda del niño. Ese lo distribuyo en cuatro hileras, dos de cuatro puntos en los laterales y la del centro con ocho puntos, que viene siendo el espaldar.
19_ Cambiar al hilo de color blanco, o el de su preferencia. Tejer al rededor del camisón completo, una hilera con puntos medios. (pasando por el cuello, hasta culminar esa vuelta.
20_ La siguiente vuelta, continuar con dos hileras de puntos altos, hasta culminar el largo del camisón.
BOINA Y SANDALIAS
Para las sandalias
1_ Tomar la medida de cada pie. (4 cm)
2_ Tejer cuatro cadenas, con el hilo 🟪🟣 púrpura.
3_ Tejer la plantilla, con puntos bajos, y a la tercera vuelta medir, hasta llegar al ancho deseado.
4_ Ya lista la plantilla, levantamos tres puntos al aire y los insertamos en uno de los laterales donde irán los dedos, unimos con un punto deslizado.
5_ En ese mismo espacio, levantamos tres cadenas al aire, y unimos en el lado opuesto con la anterior, con un punto deslizado.
6_ Regresamos y con puntos bajos, tejemos todos los espacios de ambas cadenetas.
7_ Medimos en el pie del niño y estarían listas sus sandalias.
8_ Le colocamos sus deditos pulgares, dentro de la cadena que elegiremos de la plantilla. Le va a quedar justa. (Imagen 8)
Para la boina
1_ Dentro de un arito mágico , tejemos dos cadenas al aire, insertamos, y luego tejer hasta completar los doce puntos altos. Halar el hilo sobrante, para ajustar la primera vuelta, unir con punto deslizado y así comenzar la base.
2_ Levantar tres cadenas, insertar en el mismo espacio un punto alto, y así quedarían ya dos puntos altos.
3_ Comenzaremos con el punto relieve para el siguiente espacio. (Una lazada, insertar el gancho por debajo del punto alto que sigue, das vuelta y sacas el punto alto.)
4_ En el siguiente espacio, hacer dos puntos altos juntos.
5_ Seguidamente un punto relieve igual al anterior.
6_ En el siguiente espacio, hacer dos puntos altos juntos.
7 _ Seguidamente un punto relieve igual al anterior.
8_ En el siguiente espacio, hacer dos puntos altos juntos.
9_ Seguidamente un punto relieve igual al anterior.
10 _ Continuar igualmente, hasta llegar al último espacio y cerrar con un punto deslizado.
11_ Iniciamos la siguiente vuelta, con un aumento
12_ Levantamos una cadena, insertamos en el mismo espacio
13_ Levantamos dos puntos altos, en medio de los dos siguientes espacios
14 _ En el siguiente espacio, hacemos el punto relieve, hacemos el primer punto relieve, (Una lazada, insertar el gancho por debajo del punto alto que sigue, das vuelta y sacas el punto alto.)
15_ Así sucesivamente, hasta llegar al final cerrando la vuelta con un punto deslizado.
16_ Al llegar a esta vuelta, medimos la boina, Si está en la justa medida, procedemos a disminuir para ajustarla a la cabeza.
17 _ En esta vuelta solo se va a trabajar con punto medio, hasta el final de la misma.
18_ Y para culminar la última vuelta será con punto deslizado.
Finalmente, la boina debería quedar bien ajustada, de acuerdo al tamaño de la cabeza de su niño.
En la imagen N° 7, el Niño aparece con una boina blanca con púrpura, pues me gustó tanto que le hice una otra con esos colores, para su estteno de Año nuevo.

Las fotos utilizadas en este post, fueron capturadas con mi samsung A-12.
Traductor/Translator
Editor de imágenes/Image Editor
Separador/Separator
Canal de Discord, Hive Argentina/Discord Channel, Hive Argentina
https://inleo.io/threads/numa26/re-leothreads-trbnfhpw
The rewards earned on this comment will go directly to the people ( numa26 ) sharing the post on LeoThreads,LikeTu,dBuzz.
Hola mi ciela. Gracias y mis cariños.😍🤗
Upvote recommended by @sirenahippie as part of Encouragement Program
Keep Up the good work on Hive ♦️
Agradecida @sirenahippie y @hive-185924 , por su valoración y apoyo. Saludos y cariños.😍
@numa26 you're most welcome
Qué bonito trabajo, amiga y sinceramente, admiro a las personas que tienen tanta paciencia para realizar estas manualidades tan logradas. ¡Felicitaciones!
Saludos.
Hola amigo @palabras1. Esta labor, para mí, es más que tener paciencia. Es un gratísimo placer y mi compromiso con el Niño Dios. Un abrazo en la víspera de la navidad, amigo. Saludos y cariños. 😍
My beautiful Mrs. How nice to see you here, welcome to our @diyhub community, how nice to see you participating in the contest, I hope this is the first of many more posts.
Woww I didn't know that you knit, this outfit was dreamy for the little boy Jesus, the clothes are so tiny and the design is beautiful, ainsssssss how cute, I love this. And how beautiful to see that every year you make him a new one, what a lovely gesture!
I wish you the best of luck in the contest.
Infinite blessings to you @numa26 ✨
Mi hermosa Sra. Cuanto me alegra verla por acá, bienvenida a nuestra comunidad de @diyhub, que lindo verla participar en el concurso, espero sea la primera de muchas publicaciones mas.
Woww no sabia que tejia, este trajecito le quedo de ensueño para el niñito Jesus, estan tan pequeñita la ropita y el diseño es hermoso, ainsssss que cute, esto me encanto. Y que hermoso ver que cada año le hace uno nuevo que gesto tan encantador.
Le deseo la mejor de las suertes en el concurso.
Bendiciones infinitas para usted @numa26 ✨
!DIY
https://twitter.com/Darcy1387/status/1737112766924877857
Hello my friend. The truth is that it is a work that I do as my loving commitment to the Child God. After him, comes the assembly of the crib, but as I have no crib as such, it will make a nice arrangement so that Christmas comes home with the protagonist. I will also make a little angel that I have learned. So there is still more to do. Thank you my ciela for your kind comment. A big hug and happy Christmas Eve.🎅🤶🎄
You can query your personal balance by
!DIYSTATSGracias @dayadam y @diyhub, por su gentileza. Saludos y cariños. Feliz Navidad.🎄🎄
What a beautiful crochet work dedicated especially to the baby Jesus, thank you very much for sharing this beautiful work. Welcome to the community. // Que trabajo tan lindo a crochet dedicado especialmente al niño Jesus, muchas gracias por compartir este lindo trabajo. Bienvenida a la comunidad.
Muchísimas gracias por su apreciación, y recibimiento. ¡Saludos y Feliz Navidad @diyhub!🎄
En un próximo post me gustaria verte publicar desde team-mexico para poderte ver y votar! O crossp-post lo que sea, la idea es que pueda ver tu contenido. Aquí te dejo el link https://hive.blog/trending/hive-174683
Muchísimas gracias @equipo-mexico. Lista. ya suscrita. Saludos y cariños al equipo.