Contest: DIY Christmas is Here! 🎄 Gingerbread girl cookie🎄 [esp/eng]
🎄 Feliz viernes amigos de Diyhub! 🎄
Continuando con la elaboración de mis decoraciones navideñas en esta ocasión quiero compartir con ustedes el paso a paso para hacer una linda galleta de jengibre niña, y hacer mi segunda participación en el concurso: “ 🎅DIY Christmas is Here! 🎁”
🎄 Happy Friday Diyhub friends! 🎄
Continuing with the preparation of my Christmas decorations, on this occasion I want to share with you the step by step to make a cute gingerbread girl cookie, and make my second participation in the contest: “ 🎅DIY Christmas is Here! 🎁”
Hace unos días les compartí la idea para hacer una galleta de jengibre niño y sentí que debía hacerle una compañerita, por supuesto no podía dejarlo solo así que le hice una linda galletita niña, los materiales utilizados son muy pocos, y algunos quizás los tenemos en Casa, aquí te dejo con una pequeña lista de lo que yo utilicé:
- retazo de tela polar o de cobija marrón
- Retazo de tela navideña
- Cinta escarcha roja
- Cinta de raso roja y verde
- 2 botones del color de su preferencia
- 2 pepitas negras y 1 roja
- relleno
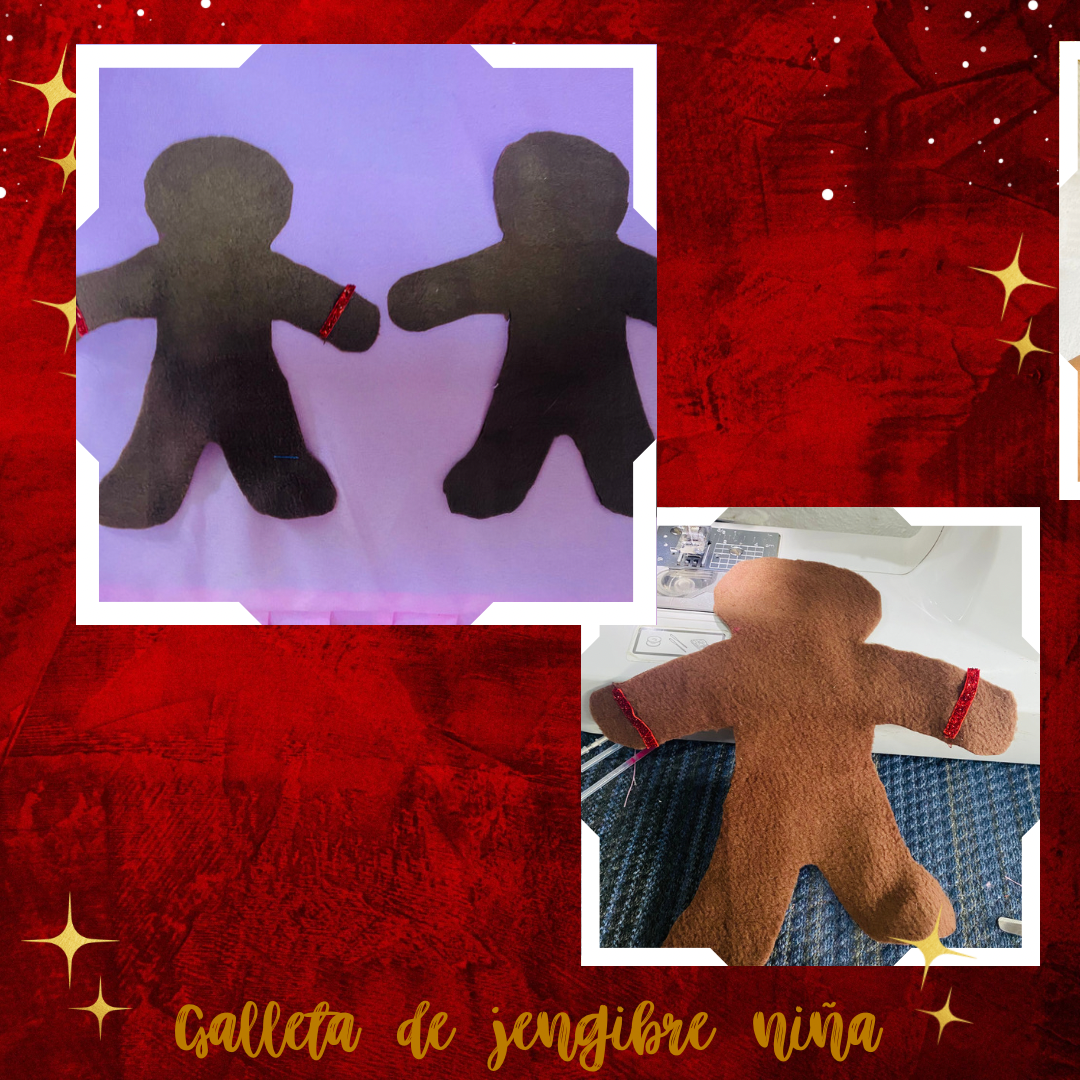
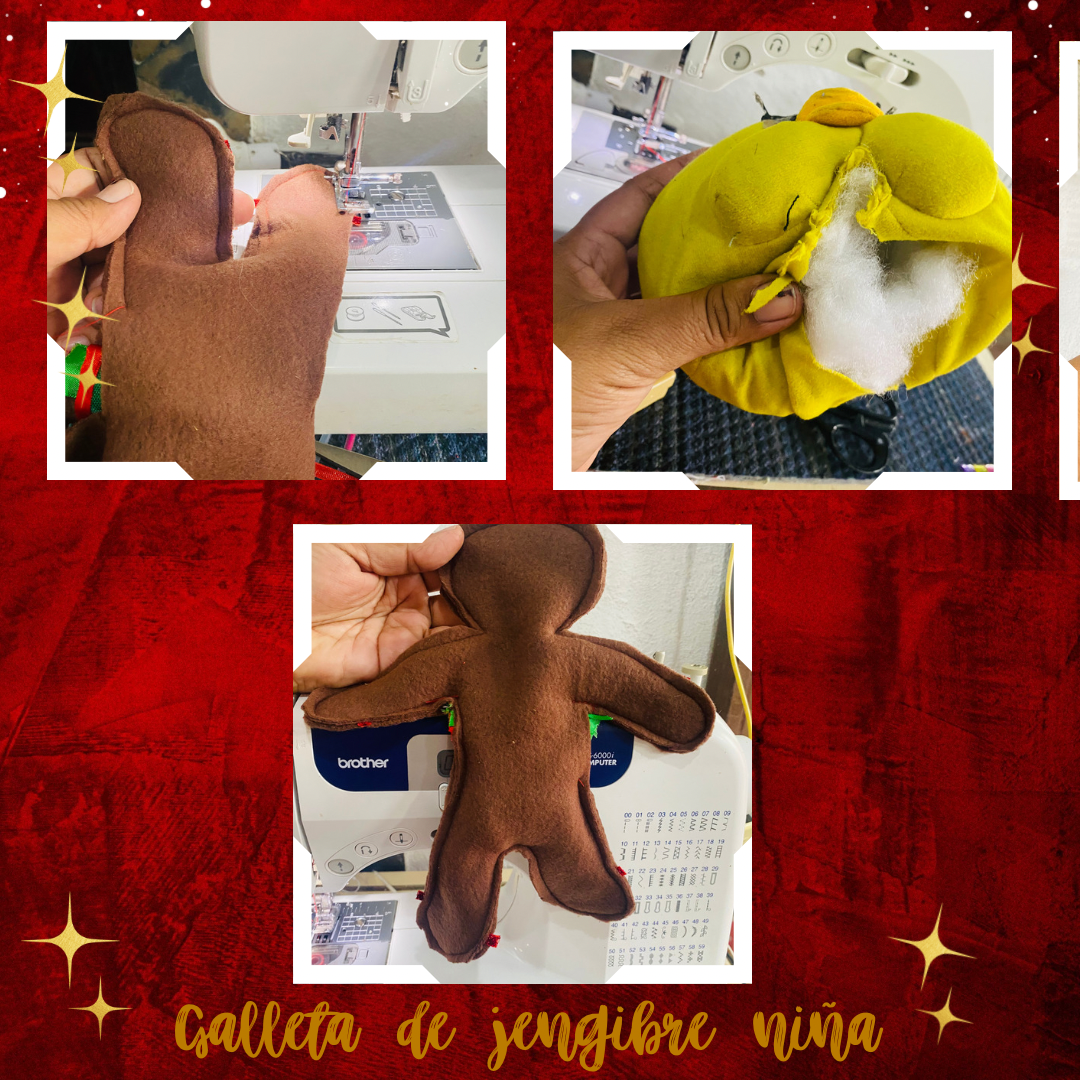
Para cortar la tela utilicé el mismo molde de mi muñequito anterior acá le dejo el Link, con la diferencia de qué a la muñequita le hice los dos brazos hacia abajo.
A few days ago I shared the idea of making a gingerbread boy cookie and I felt that I should make him a companion, of course I couldn't leave him alone so I made him a cute girl cookie, the materials used are very few, and some we may have in Home, here I leave you with a small list of what I used:
- piece of polar fabric or brown blanket
- Scrap of Christmas fabric
- Red frost ribbon
- Red and green satin ribbon
- 2 buttons of the color of your preference
- 2 black seeds and 1 red
To cut the fabric I used the same mold as my previous doll, here I leave the Link, with the difference of What did I do to the little doll's two arms down?
PASO A PASO
STEP BY STEP
La decoración se hace solo en la parte del frente, si es de tu gusto lo puedes hacer por ambas partes, el primer paso será colocarle con costura cinta en los puños, yo conseguí unas cintas escarchadas muy económicas, la ventaja de estas Decoraciones es que compras tan sólo 1 m y este te alcanzará para muchas manualidades.
The decoration is done only on the front part, if you like you can do it on both sides, the first step will be to sew ribbon on the cuffs, I got some very cheap frosted ribbons, the advantage of these Decorations is that You buy only 1 m and it will be enough for many crafts.
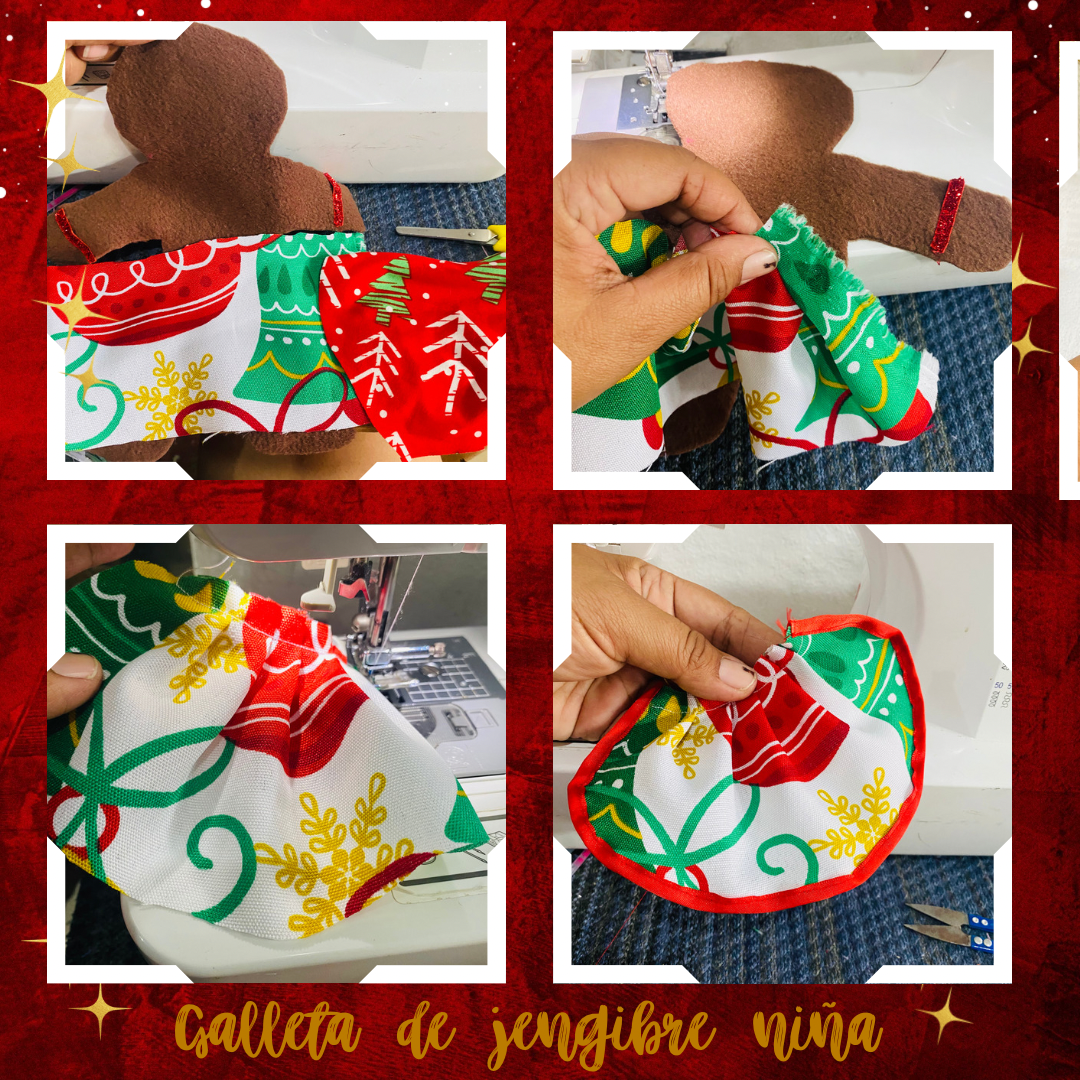
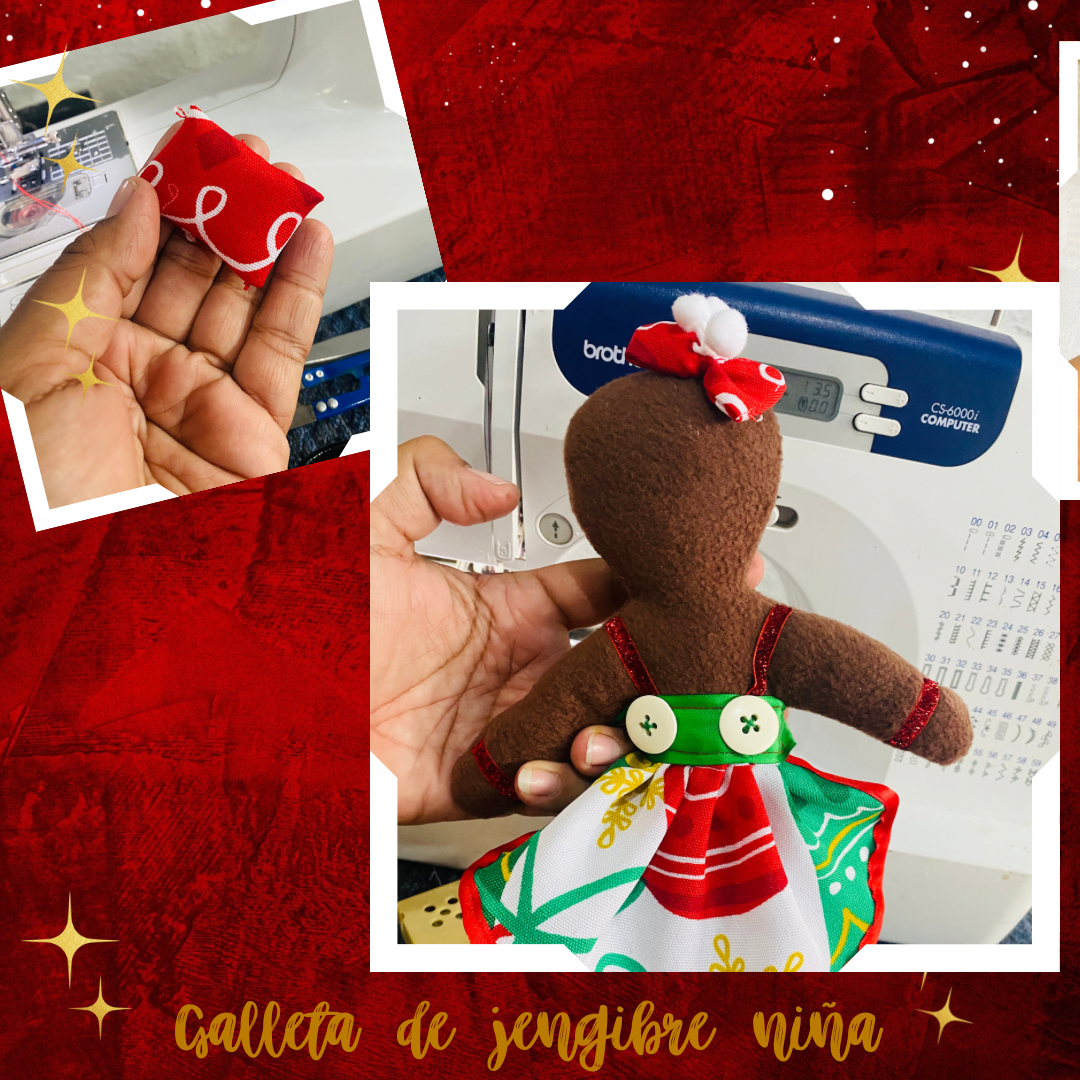
Para hacerle el vestido se necesita un retazo de tela de unos 20 cm aproximadamente de largo, lo redondeamos en las puntas, de ancho puede tener 10 cm o menos, para que quede ondulante le vamos a hacer pliegues en la parte de arriba, le pasé costura para luego fijarlo a la tela de mi muñeca, le coloqué cinta roja en las orillas.
To make the dress you need a piece of fabric approximately 20 cm long, we round it at the ends, it can be 10 cm or less wide, to make it billowy we are going to make folds at the top, I passed it sewing to then attach it to the fabric of my doll, I placed red ribbon on the edges.
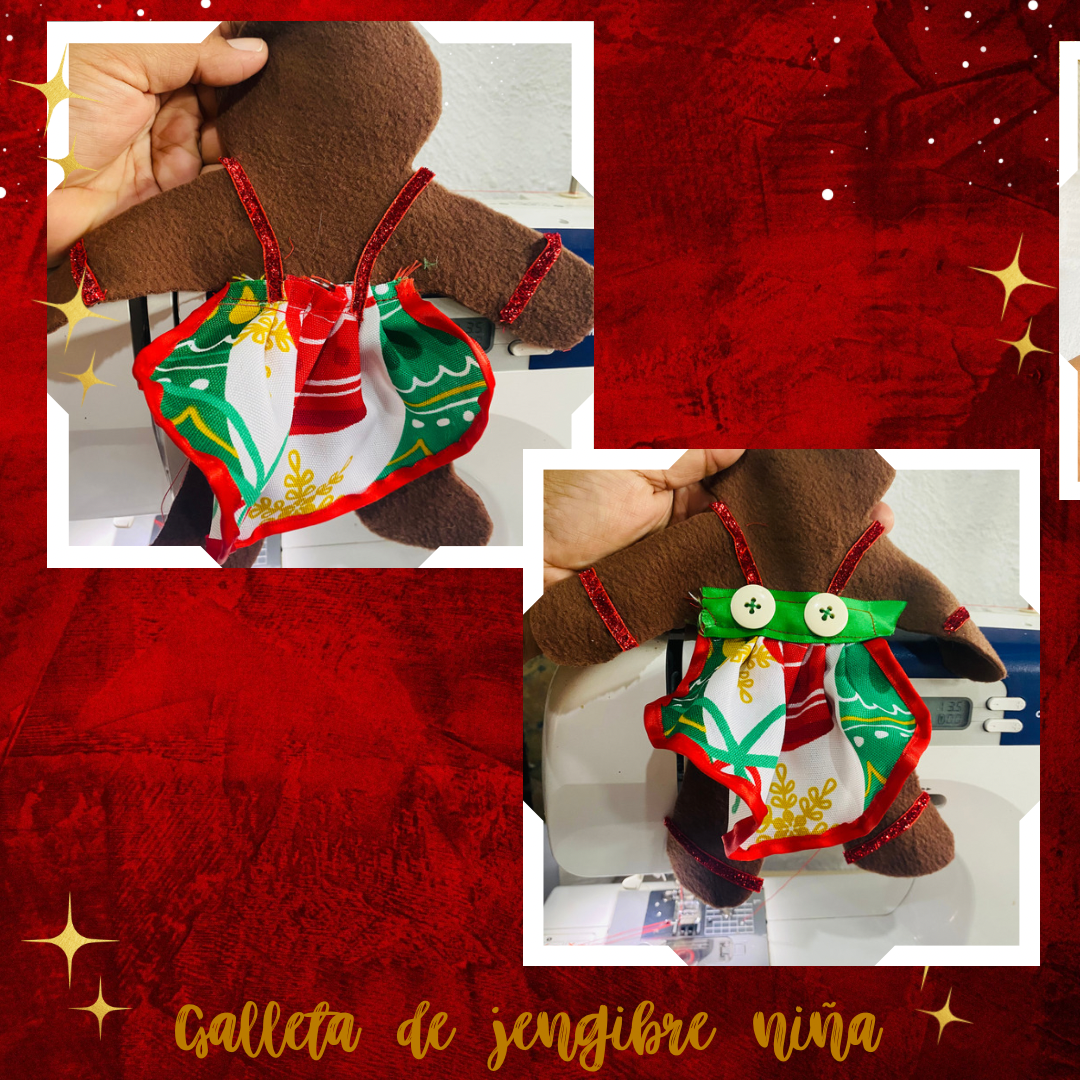
El vestido lo coseremos a nuestra muñequita, luego le coseremos dos tiras rojas para hacer especie de unos tirantes, en la cintura del vestido le colocaremos cinta verde con costura, y le fijaremos los dos botones blancos en el espacio donde va la cinta verde.
We will sew the dress to our doll, then we will sew two red strips to make some kind of straps, at the waist of the dress we will place green ribbon with sewing, and we will fix the two white buttons in the space where the green ribbon goes.
Para el siguiente paso vamos a unir ambas partes de tela, la de adelante previamente decorada y la de atrás, pasamos costura por todo el alrededor dejando un pequeño orificio para poder voltearla, al terminar la costura vamos a proceder a voltearla, luego procedí a meterle el relleno, yo utilicé relleno de un viejo peluche que tenía en casa.
For the next step we are going to join both parts of the fabric, the previously decorated front one and the back one, we sew all around leaving a small hole to be able to turn it over, when we finish the sewing we are going to proceed to turn it over, then I proceeded to put it in. For the filling, I used stuffing from an old stuffed animal I had at home.
Para la cabecita le vamos a hacer un lacito con un rectángulo de tela de 10 cm de largo por 4 de ancho se le pasa costura en los lados, se voltea y se frunce en el centro, yo le coloque unas bolitas decorativas blancas luego se lo fijamos en la cabeza.
For the little head we are going to make a little bow with a rectangle of fabric 10 cm long by 4 cm wide. We sew it on the sides, turn it over and gather it in the center. I will put some white decorative balls on it and then we will put it on the head. we look at the head.
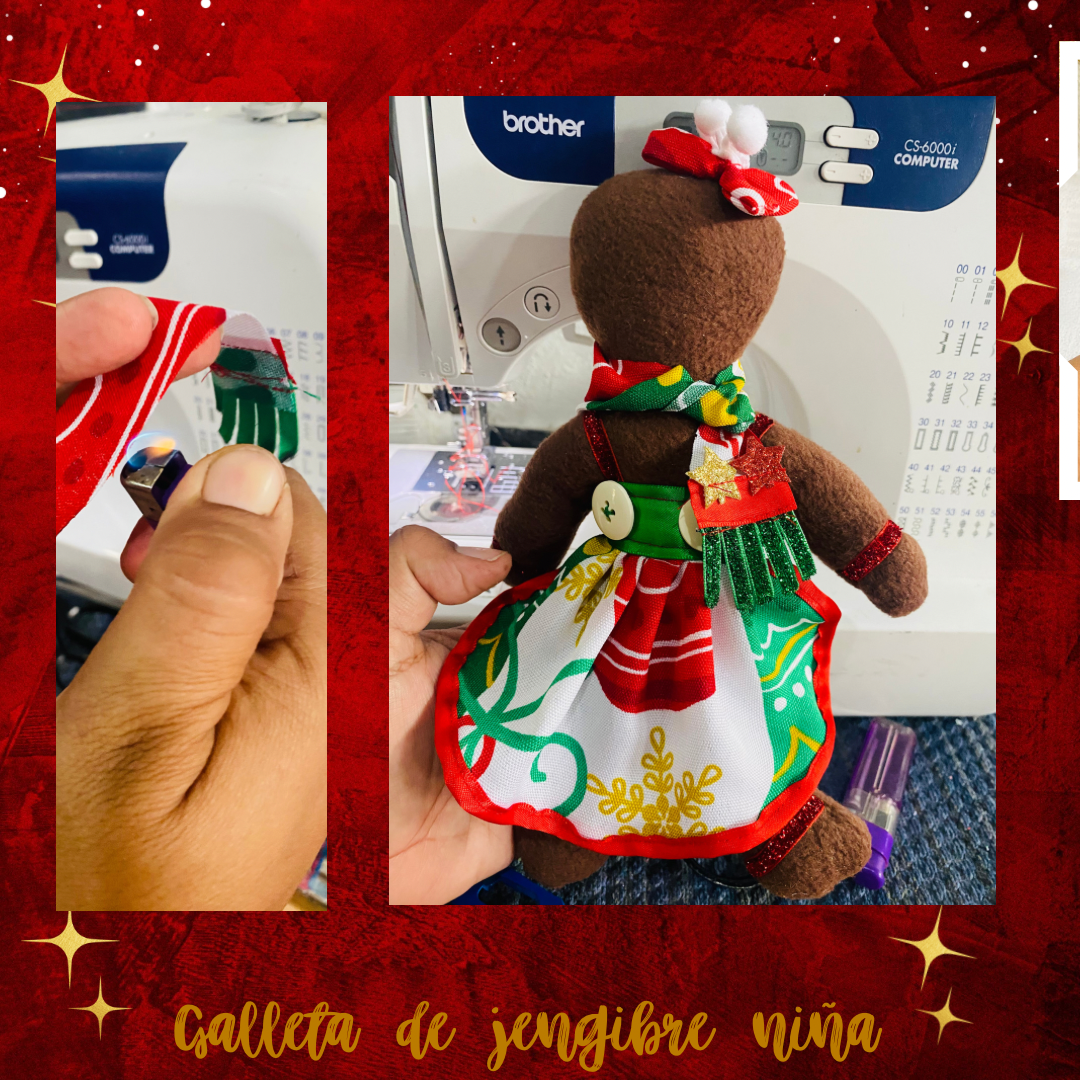
Para la bufanda cortaremos una tira de tela de 2 cm de ancha por 15 de larga , en una de las puntas le colocaremos decoraciones, yo le coloqué pequeñas tiritas de cinta escarchada verde, luego les tapé la orillas con cinta roja y le coloqué dos estrellitas escarchadas.
Con un encendedor le quemaremos las orillas a la tela para evitar que se deshilache, luego le coloqué la bufanda a la muñequita por el cuello.
For the scarf we will cut a strip of fabric 2 cm wide by 15 cm long, on one of the ends we will place decorations, I placed small strips of green frosted ribbon, then I covered the edges with red ribbon and placed two little stars on it frosty
With a lighter we will burn the edges of the fabric to prevent it from fraying, then I placed the scarf around the doll's neck.
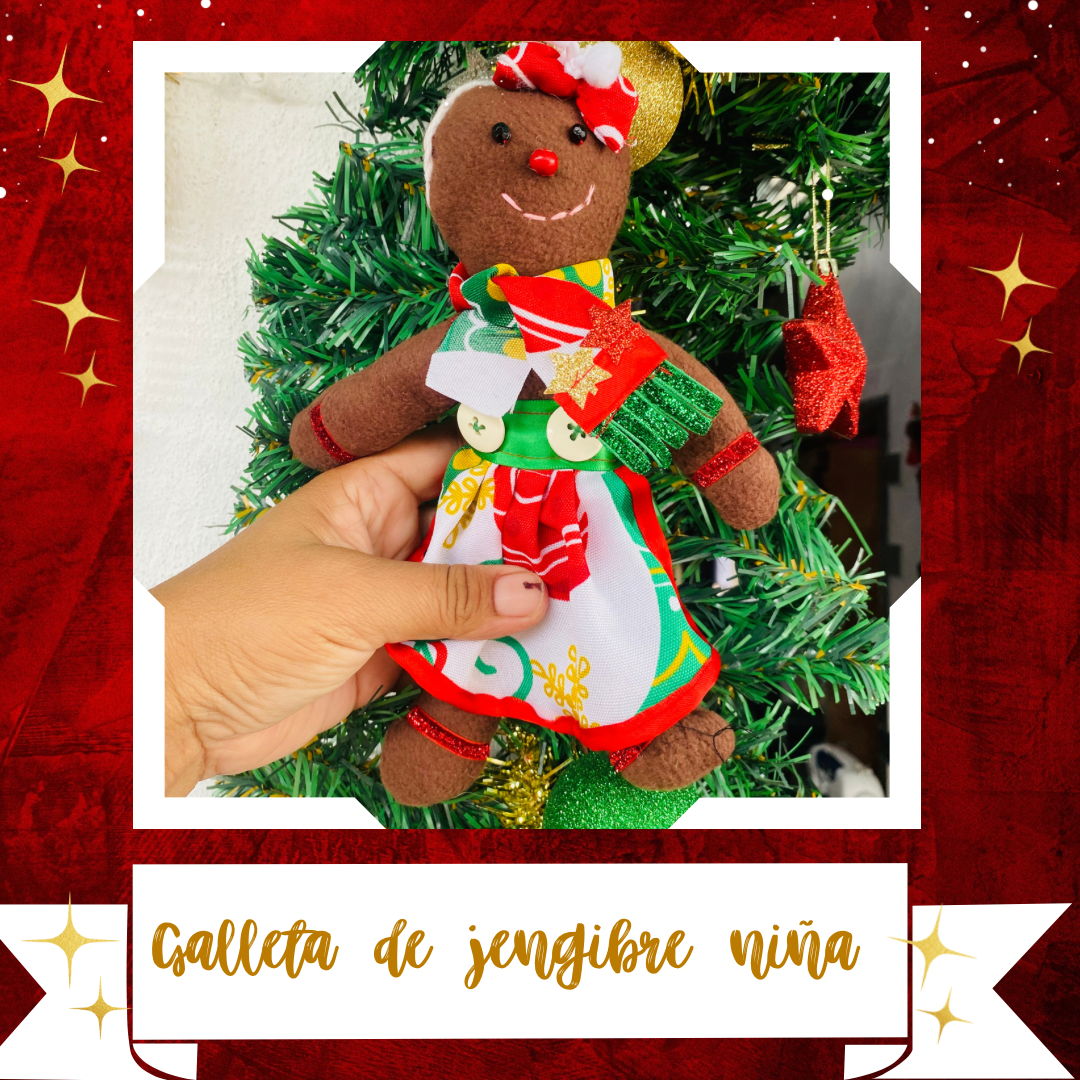
Para la cara le coloqué dos pequeñas pepitas negras como ojitos, una pepita roja en la nariz, y para la boca le hice costura con hilo rosado, con esto creí haberla terminado, pero les digo la verdad, no quede conforme ya que sentía que en su cabecita le hacía falta algo.
For the face I placed two small black seeds as eyes, a red seed on the nose, and for the mouth I sewed it with pink thread, with this I thought I had finished it, but I tell you the truth, I was not satisfied since I felt that in His little head was missing something.
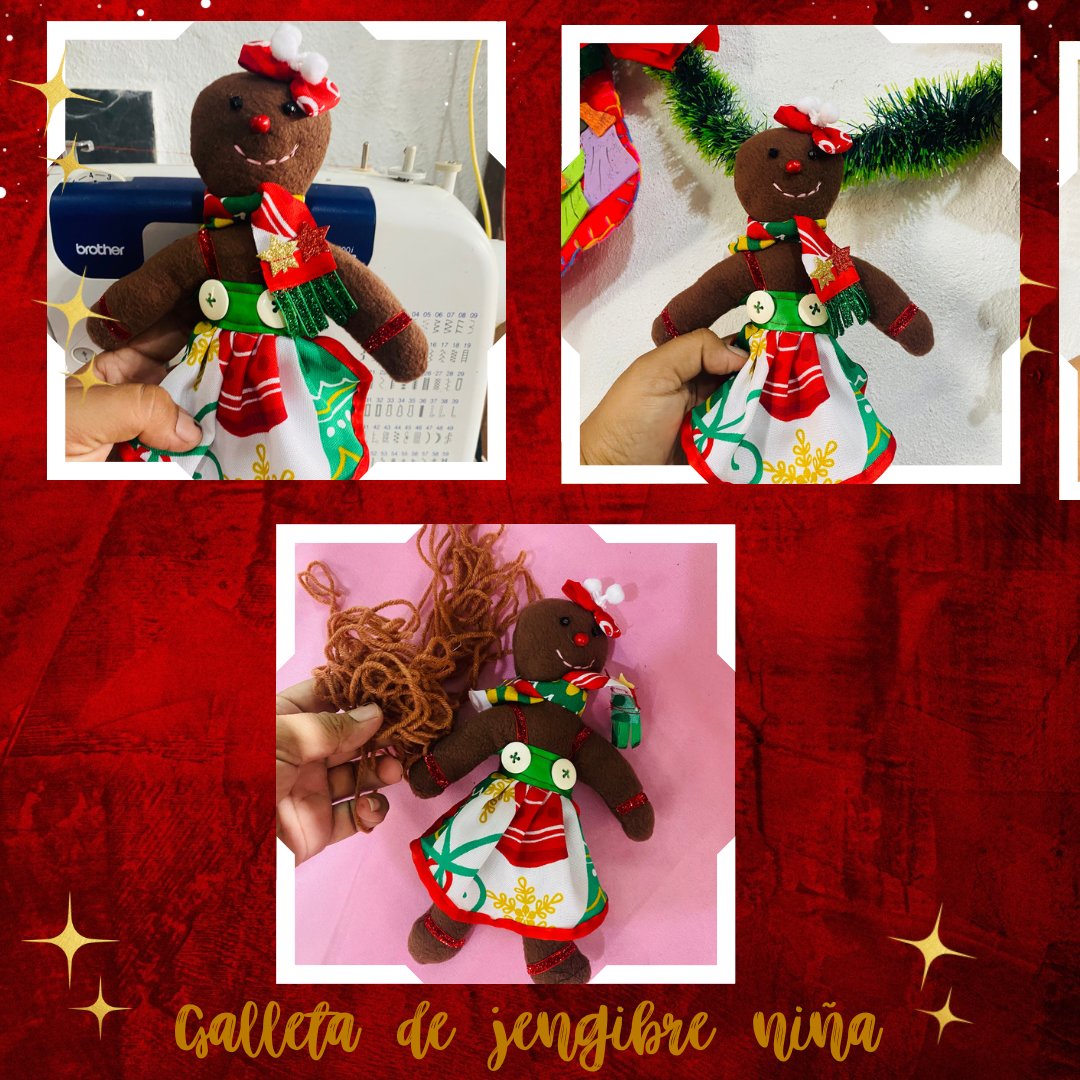
Pensé en colocarle cabello con estambre marrón, pero luego dije si es una galletita sería raro que llevase cabello, entonces decidí hacerle una costura blanca por el alrededor de su cabeza y que se distinguiera un poco y lograr que se viera un poco más femenina, y ahora si aquí está el resultado final de esta linda muñequita tipo galleta de jengibre niña, Espero les haya gustado el resultado

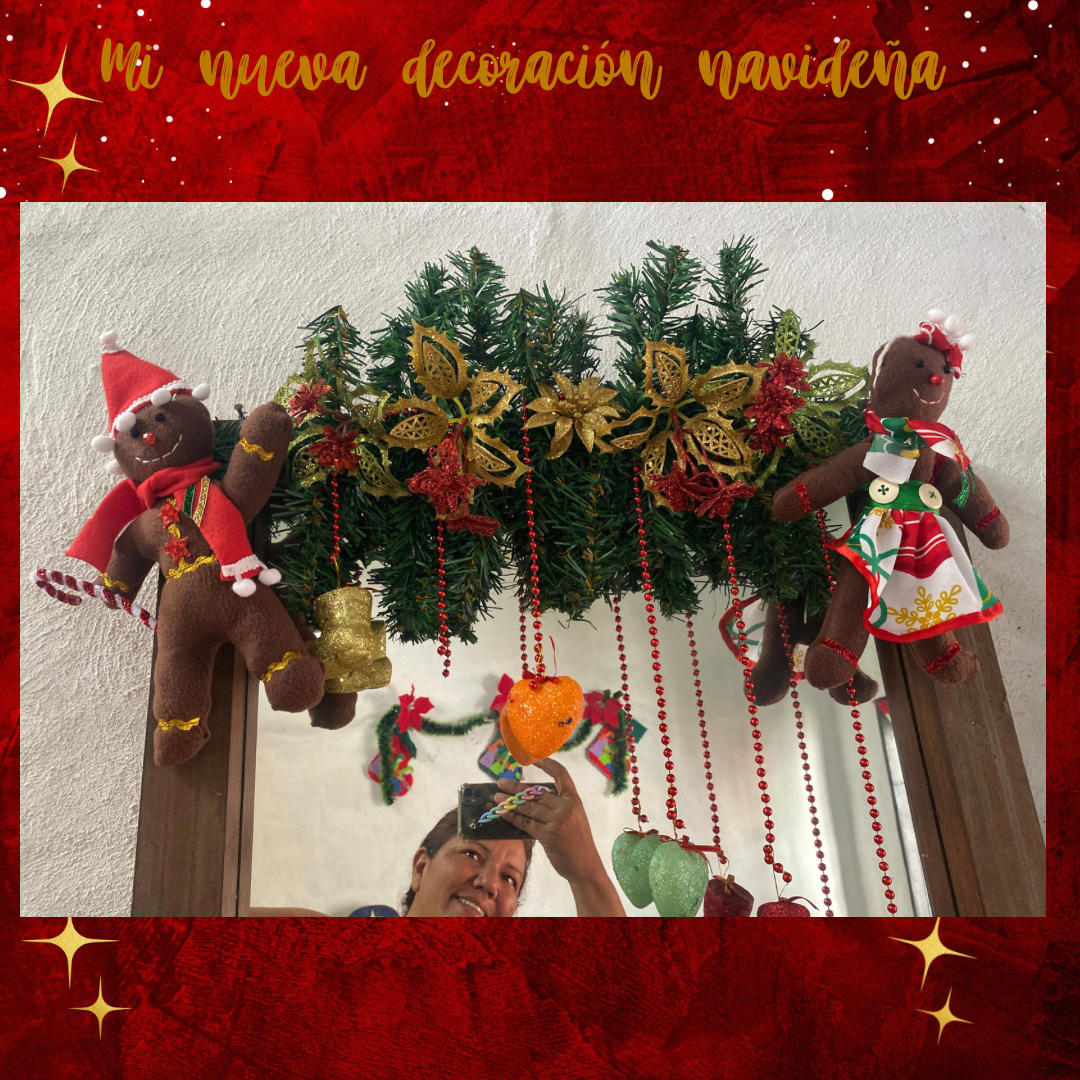
Este año ya sume una nueva decoración para mis siguientes Navidades, una linda parejita de galleticas de jengibre, el resultado me encantó, espero a ustedes les haya gustado también, me despido por hoy deseándoles muchas bendiciones y éxitos para todos, que tengan un excelente fin de semana
This year I already added a new decoration for my next Christmas, a cute pair of gingerbread cookies, I loved the result, I hope you liked it too, I say goodbye for today wishing you many blessings and success for all, may you have an excellent ending of week
las fotos aquí compartidas son de mi propiedad tomadas con mi teléfono iPhone 11 y editadas en canva
Quedó bella, los colores resaltan mucho 🤗😍
Gracias 😊
Que nivel de detalle con estas galletas de jengibre te han quedado lindas
Gracias 🥰
Que linda te quedó la muñequita, al igual que el varón, están geniales 😍
Gracias 😊
Que bonito trabajo, saludos
Gracias, saludos!
Hola @marlynmont, que muñeco tan cuchi, el vestido está genial y muy elegante, éxito en el concurso.
Saludos!
Gracias 🥰
Yay! 🤗
Your content has been boosted with Ecency Points, by @stevenson7.
Use Ecency daily to boost your growth on platform!
Support Ecency
Vote for new Proposal
Delegate HP and earn more
Thanks 😊