Magi Necrosi - Splinterlands Art Contest Week 271! [ENG/ESP]
Magi Necrosi! 💥
Hello again community! I welcome you to a new post. Today I want to share with all of you my participation in the @splinterlands art contest. I tell you that this week due to lack of time I had to make my illustration in parts, choosing Magi Necrosi as the reference character. Now I'll share with you a little bit of my creative process to make my illustration of this character, I hope you like it and thanks for stopping by!
¡Hola de nuevo comunidad! Les doy la bienvenida a un nuevo post. Hoy quiero compartir con todos ustedes mi participación para el concurso de arte de @splinterlands. Les comento que esta semana por falta de tiempo he tenido que realizar mi ilustración por partes, eligiendo como personaje de referencia a Magi Necrosi. Ahora les comparto un poco de mi proceso creativo para llevar a cabo mi ilustración de este personaje. ¡Espero les guste y gracias por pasar por aquí!

Creative Process | Proceso Creativo🛠
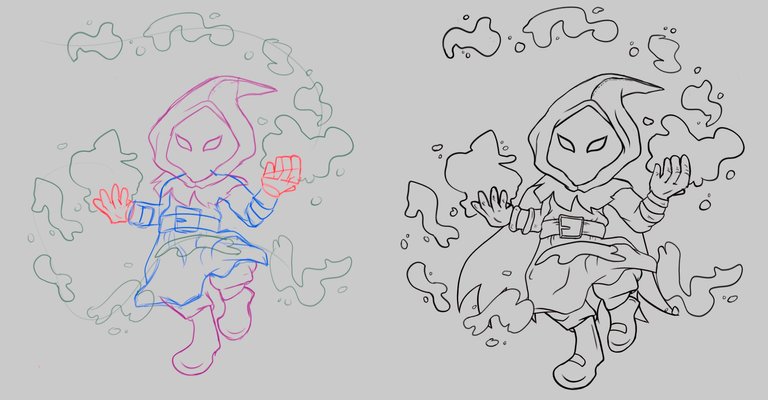
To make this character I started by making a small sketch with the design and composition. As always I used lines of different colours to place the elements more easily. Later I was cleaning and defining a bit the lines until I finished my sketch. Finally I made a lineart to finish defining the lines.
Para realizar a este personaje comencé realizando un pequeño boceto con el diseño y composición. Como siempre utilice líneas de varios colores para ubicar los elementos mayor facilidad. Posteriormente fui limpiando y definiendo un poco las líneas hasta terminar mi boceto. Por último realice un lineart para terminar de definir las líneas.

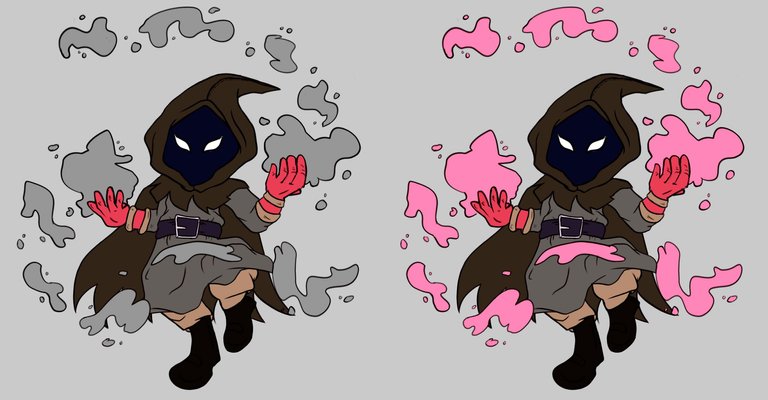
Once I had finished with my lineart I started to work on the colour application of the illustration. Before applying the colours I applied a base coat of grey to give me more control when applying the tones. I then put together a palette quite similar to my reference and started to apply it first to my character and finally to his magic power in different layers.
Una vez había terminado con mi lineart comencé a trabajar en la aplicación del color en la ilustración. Antes de aplicar los colores aplique una capa base de color gris para tener un mayor control a la hora de aplicar los tonos. Luego arme una paleta bastante similar a la de mi referencia y comencé aplicarla primero en mi personaje y por último a su poder mágico en capas diferentes.
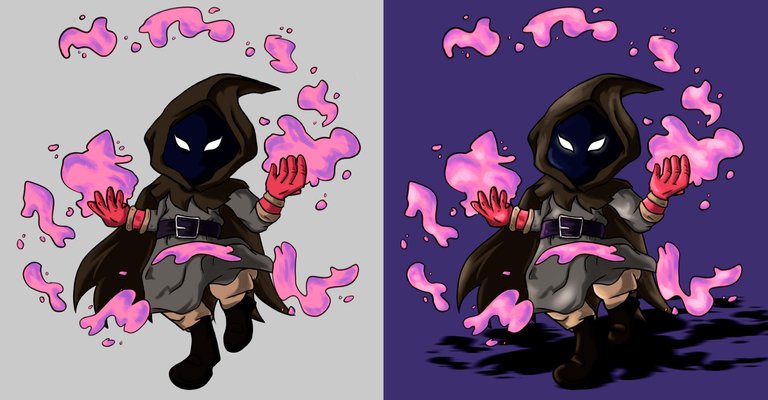
After applying my base colours, I applied the general shadows that the illustration would have. In this case I chose to use a brush with some opacity, I worked on the shadows first of the character and finally I left the shadows of his magic power. Then I applied some light with a soft brush, these I worked with only one intensity because I didn't want to make a lot of detail. Finally I made a parallel shadow and placed a violet rectangle as a background.
Después de aplicar mis colores base, aplique las sombras generales que tendría la ilustración. En este caso opte por utilizar un pincel con algo de opacidad, fui trabajando en las sombras primero del personaje y por último deje las de su poder mágico. Luego aplique algo de luz con un pincel suave, estas las trabaje con solo una intensidad ya que no quería realizar mucho detalle. Por último realice una sombra paralela y coloque un rectángulo violeta como fondo.
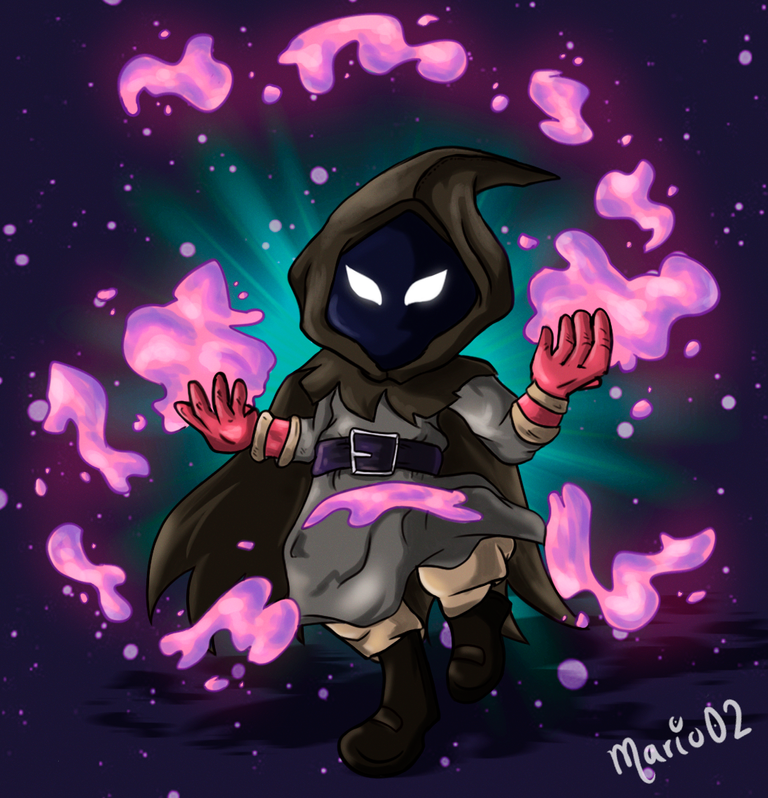
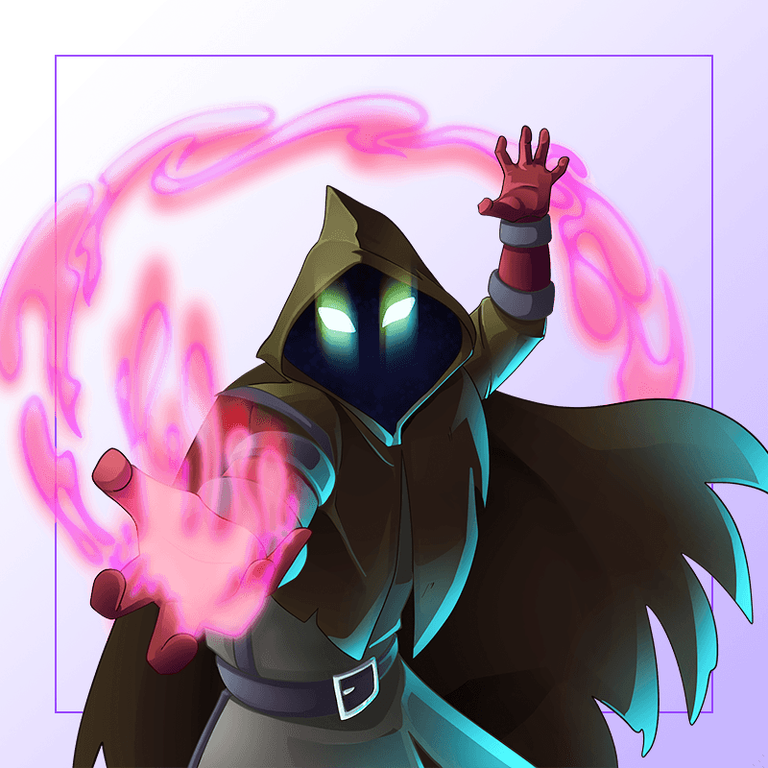
Final result of the Illustration | Resultado final de la ilustración
As a final detail I worked a bit more on the magic power of my character, I also added a light effect behind him to separate the character a bit from the background. Finally I added some more light in the eyes and some additional details in the colours of the illustration. Thank you very much for watching until the end and see you next time!
Como detalle final trabaje un poco mas en el poder mágico de mi personaje, también agregue un efecto de luz por detrás de este para separar al personaje un poco del fondo. Por último agregue algo mas de luz en los ojos y algunos detalles adicionales en los colores de la ilustración. Muchísimas gracias por ver hasta el final y hasta la próxima!
Tools Used | Herramientas Utilizadas:
- Photoshop CC versión 64 bits
- Tablet Huion H610 PRO V2
REFERENCE

The illustration and separators used in the post are my property.
Translated with DeepL (free versión)
El detalle con sombras y volumen en la onda de magia , uffff
Las manos del mago Mario como siempre jeje.
Muchas gracias por el comentario amigo mío!! 🙏
Hola querido! Veo tu paso a paso estupendo, jajaja desearia tener un boceto ordenado como el tuyo guao! yo soy un mega desastre con eso, tu diseño es super cute.
Muchísimas gracias!! Me alegra un montón que hayas pasado por aquí 🙏
Una de mis cartas favoritas, su diseño es una buena versión.