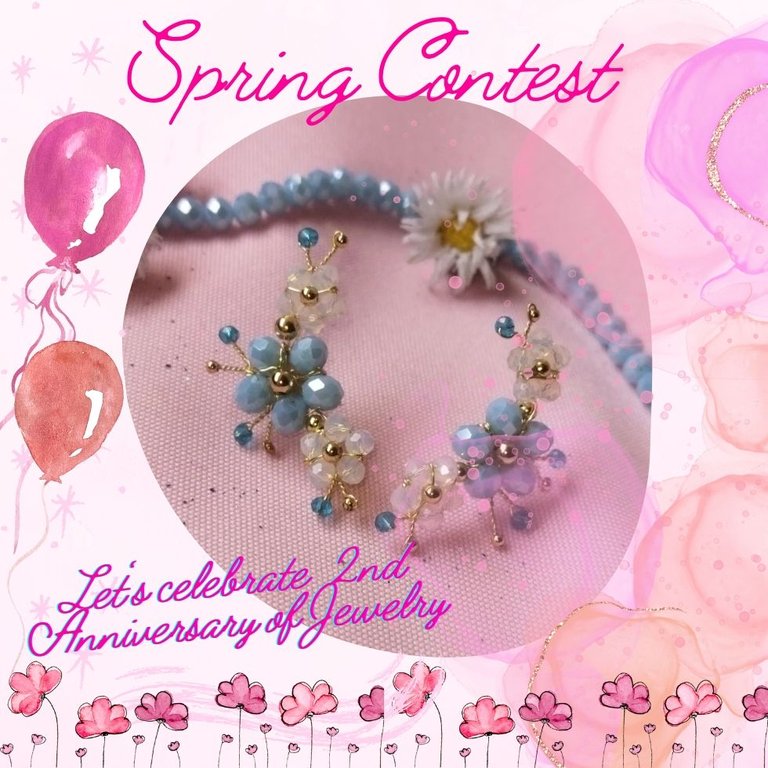
[ENG-ESP] LET'S CELEBRATE SPRING AND 2nd ANNIVERSARY JEWELRY: "EARRINGS MADE OF WIRE WITH CRYSTALS"
WELCOME TO MY BLOG
Hellooooo, hellooooooo! Greetings my appreciated jewelry creators. Spring is the most beautiful and colorful season of the year since we can see wherever we turn the number of plants with their beautiful flowers, decorating the environment and brightening the eyes of those who enjoy it. Additionally, it is the time when the Jewelry community celebrates its anniversary. So let's take advantage of commemorating this second anniversary by giving her the most beautiful flowers that our hands can create. Congratulations to all of us who make life in it every day and make it our own with all our creations.
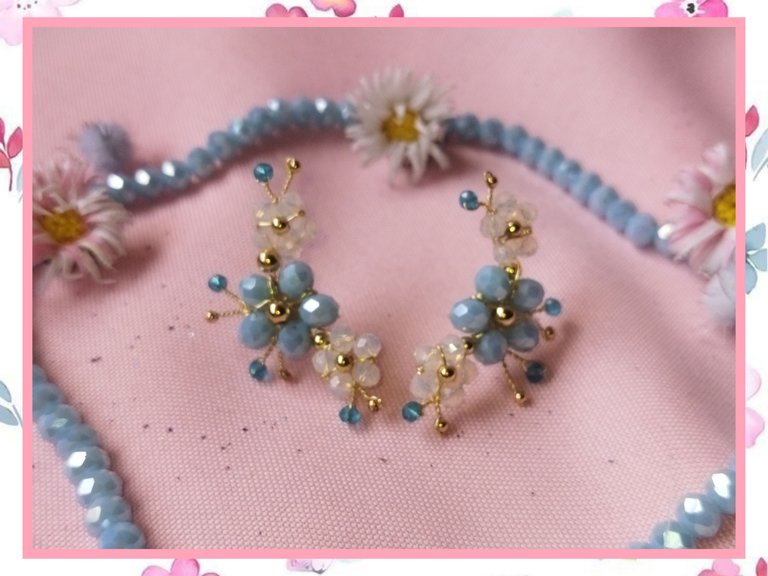
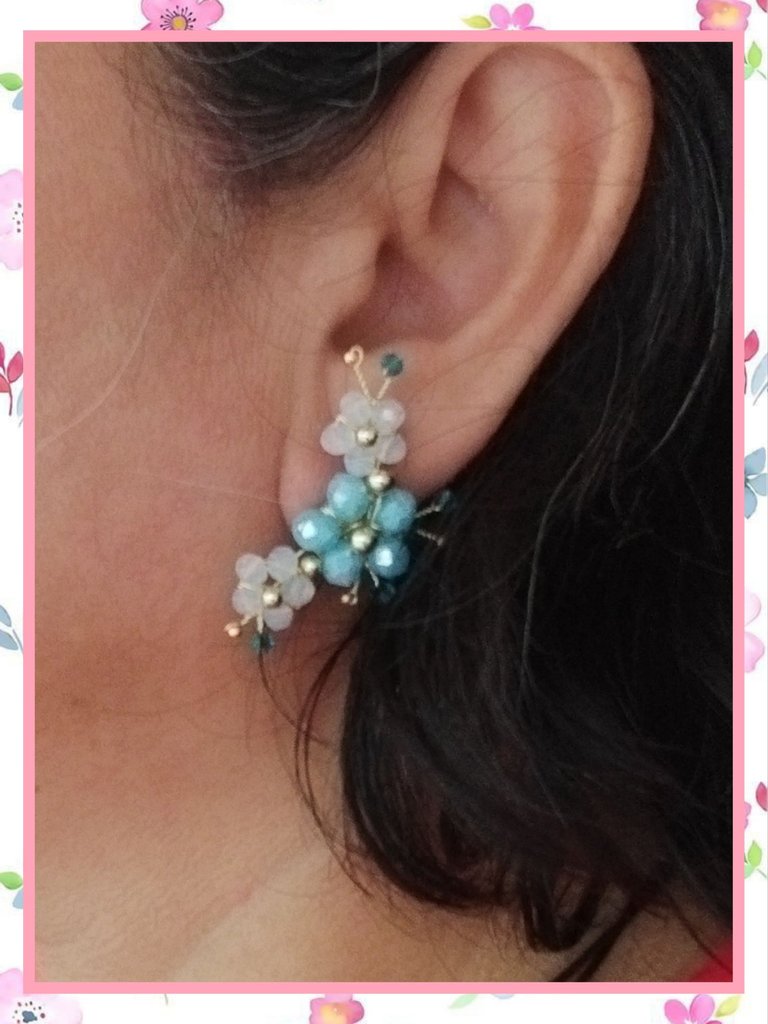
To participate in the contest I made some earrings with translucent blue and white flowers using the wire technique, with crystals Czechs and gold wire to give them that touch of elegance and distinction that the occasion deserves. I hope you like it and I take this opportunity to extend a cordial invitation to @aarolita, @agathalara and @vicmito74 to celebrate this great event. Without further ado, let's get started.
BIENVENIDOS A MI BLOG
¡Holaaaa, holaaaaa! Saludos mis apreciados creadores de bisutería. La primavera es la estación más linda y colorida del año ya que podemos observar adonde quiera que volteemos la cantidad de plantas con sus bellas flores, adornando el ambiente y alegrando la vista de quienes la disfrutan. Además, es la época en que la comunidad de Jewelry celebra su aniversario. Así que aprovechemos de conmemorar este segundo aniversario regalándole las más bellas flores que nuestras manos pueden crear. Muchas felicidades a todos los que día a día hacemos vida en ella y la hacemos nuestra con todas nuestras creaciones.
Para participar en el concurso realicé unos aretes con flores azules y blancas traslucidas aplicando la técnica del alambrismo, con cristales checos y alambre dorado para darles ese toque de elegancia y disntinción que la ocasión amerita. Espero que les guste y aprovecho para hacer una cordial invitación a @aarolita, @agathalara y a @vicmito74 a celebrar este gran acontecimiento. Sin más, comencemos.
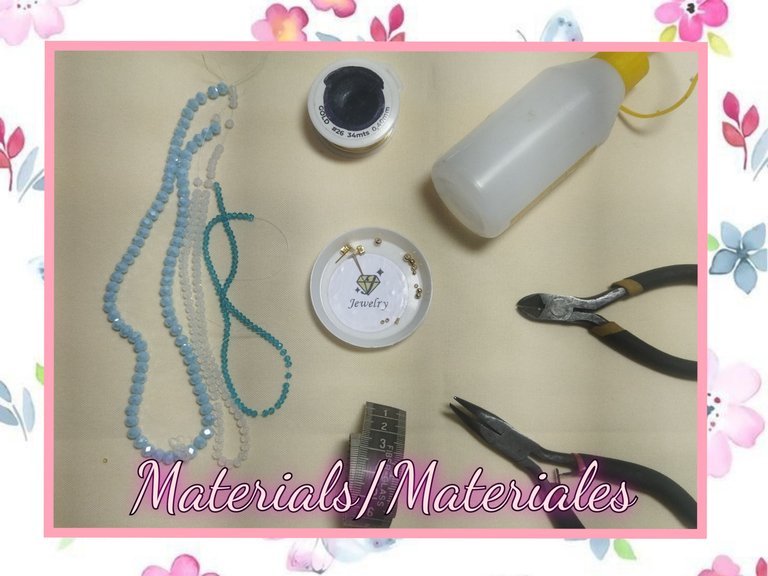
MATERIALS
- Gold wire #26
- 2 mm blue Czech crystals
- 4 mm translucent white Czech crystals
- 6 mm light blue Czech crystals
- 3 mm and 4 mm pellets
- Dots for earrings
- Measuring tape
- Jewelry tweezers
- Glue
MATERIALES
- Alambre dorado #26
- Cristales checo azul 2 mm
- Cristales checo blanco traslúcido 4 mm
- Cristales checo azul claro 6 mm
- Balines de 3 mm y 4 mm
- Topitos para aretes
- Cinta métrica
- Pinzas de bisutería
- Pegamento
STEP BY STEP // PASO A PASO
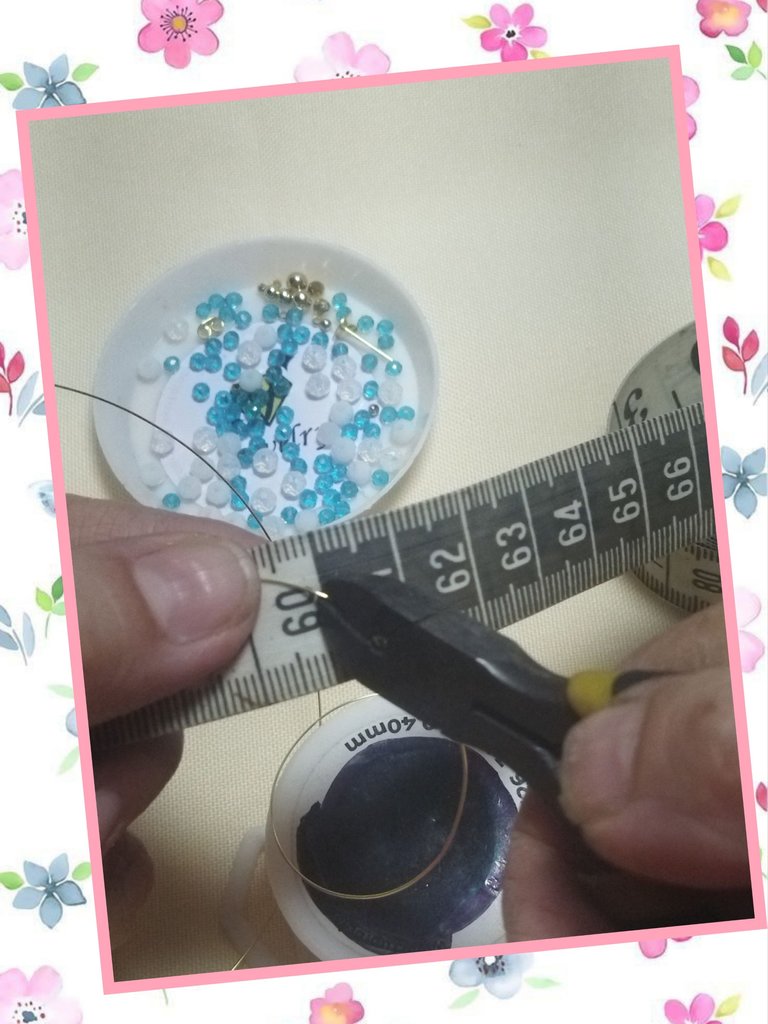
STEP #01
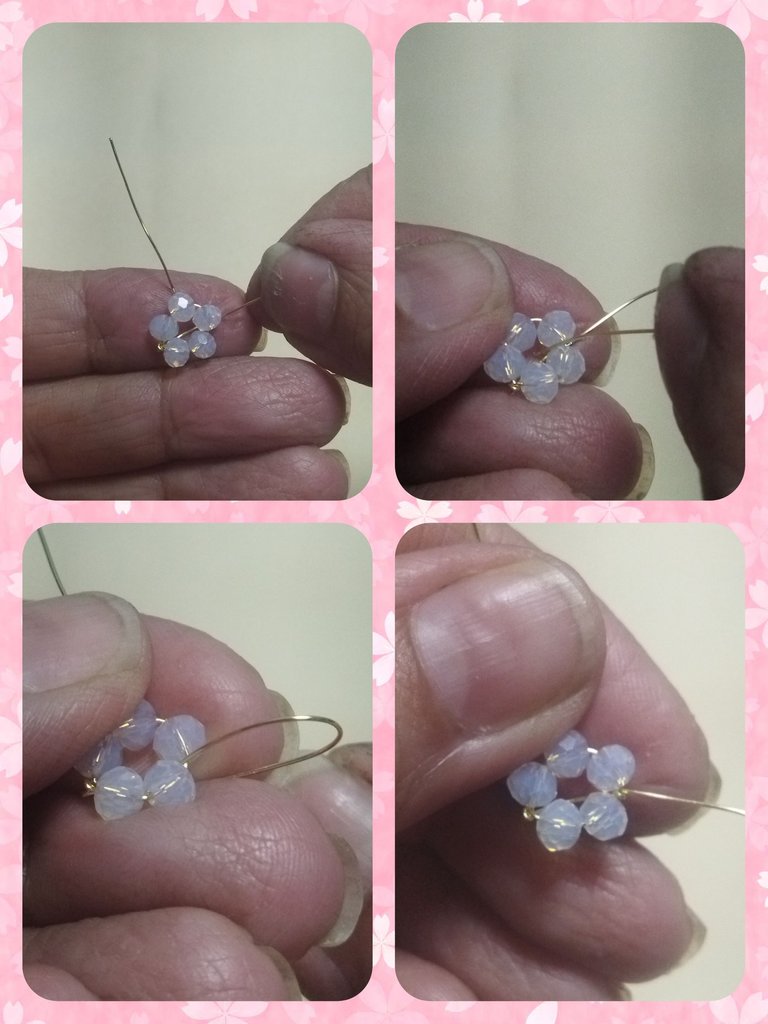
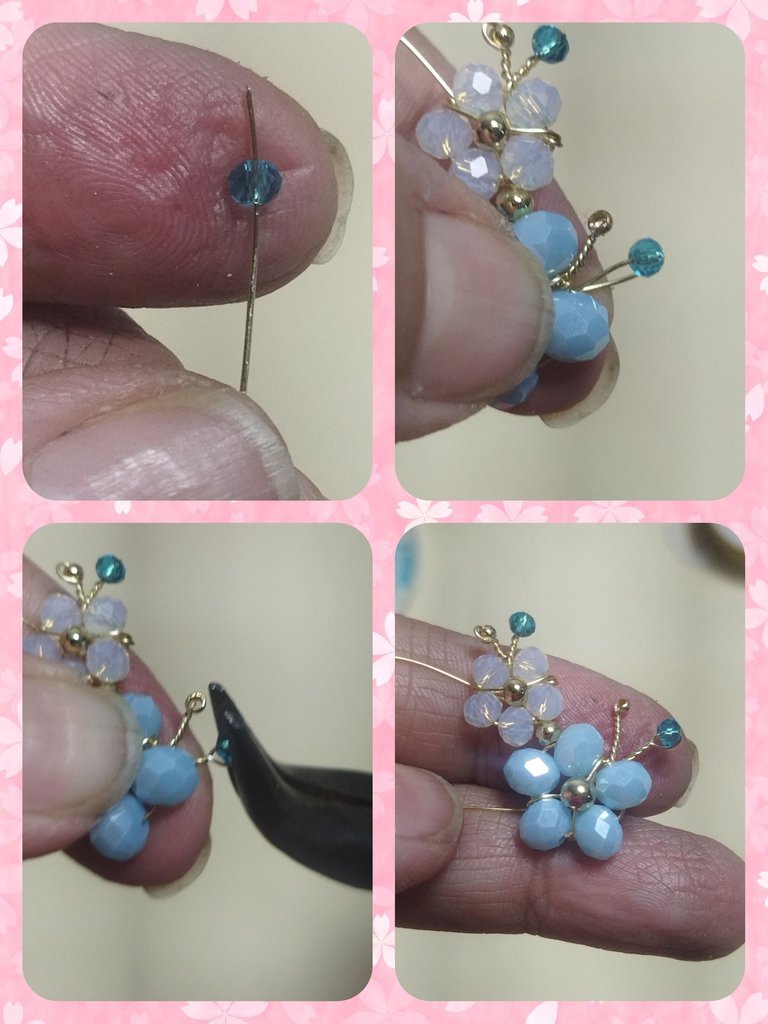
To make the earrings we are going to cut two 60 cm strands of #26 wire.
PASO #01
Para realizar los aretes vamos a cortar dos hebras de alambre #26 de 60 cm.
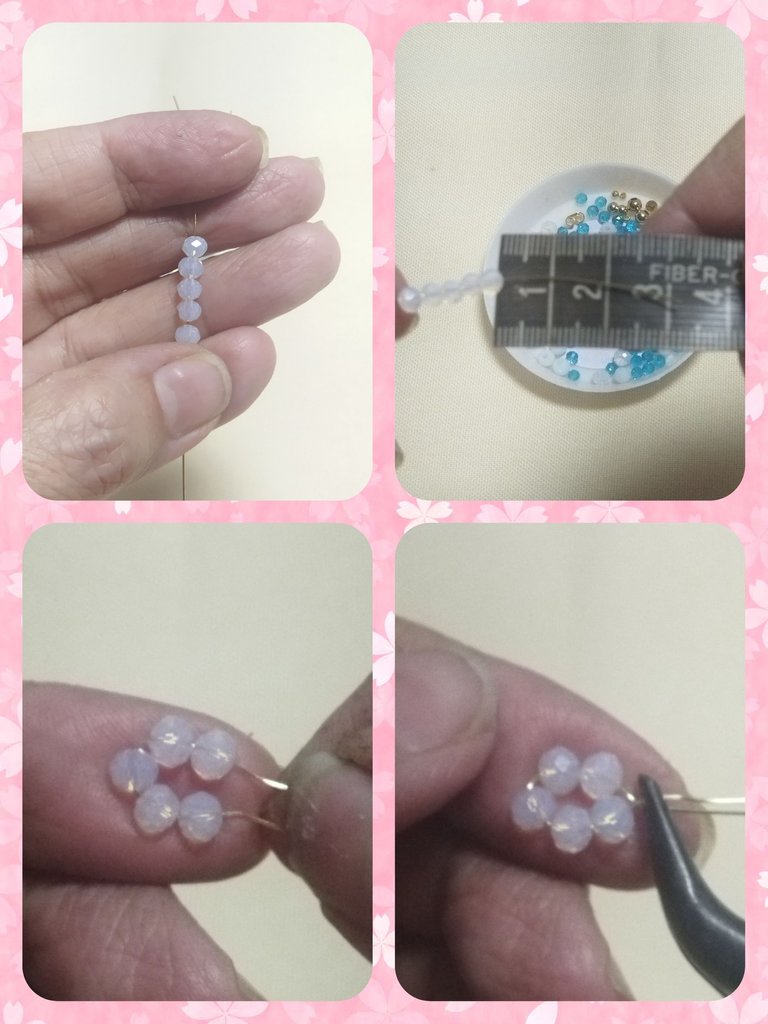
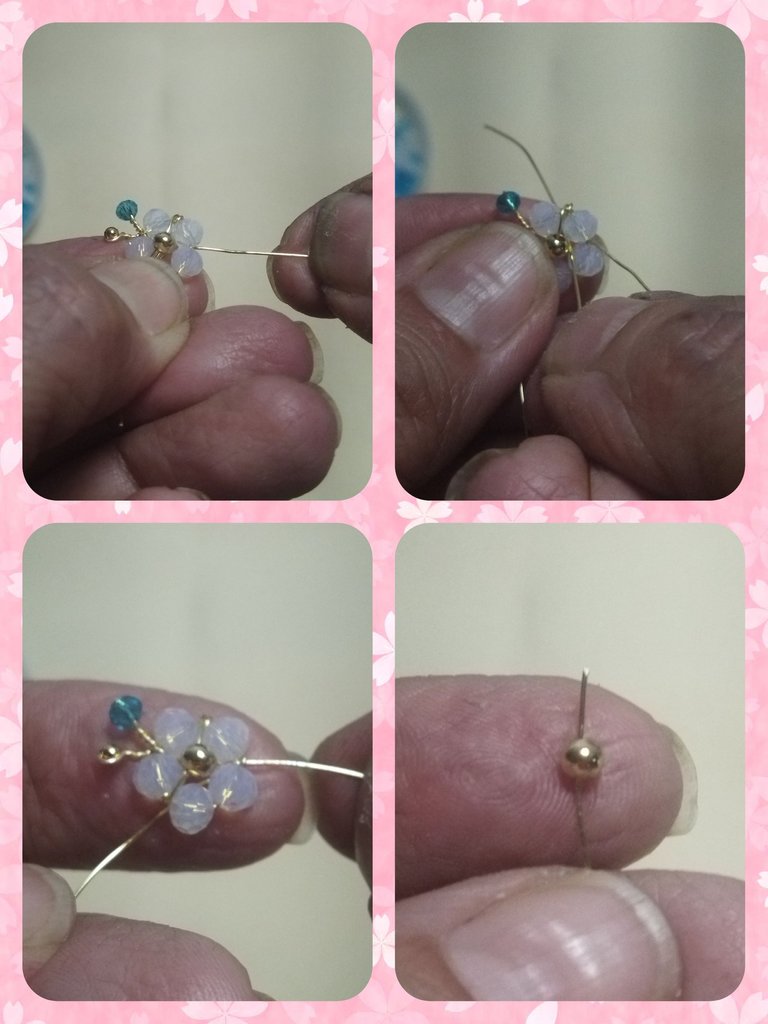
STEP #02
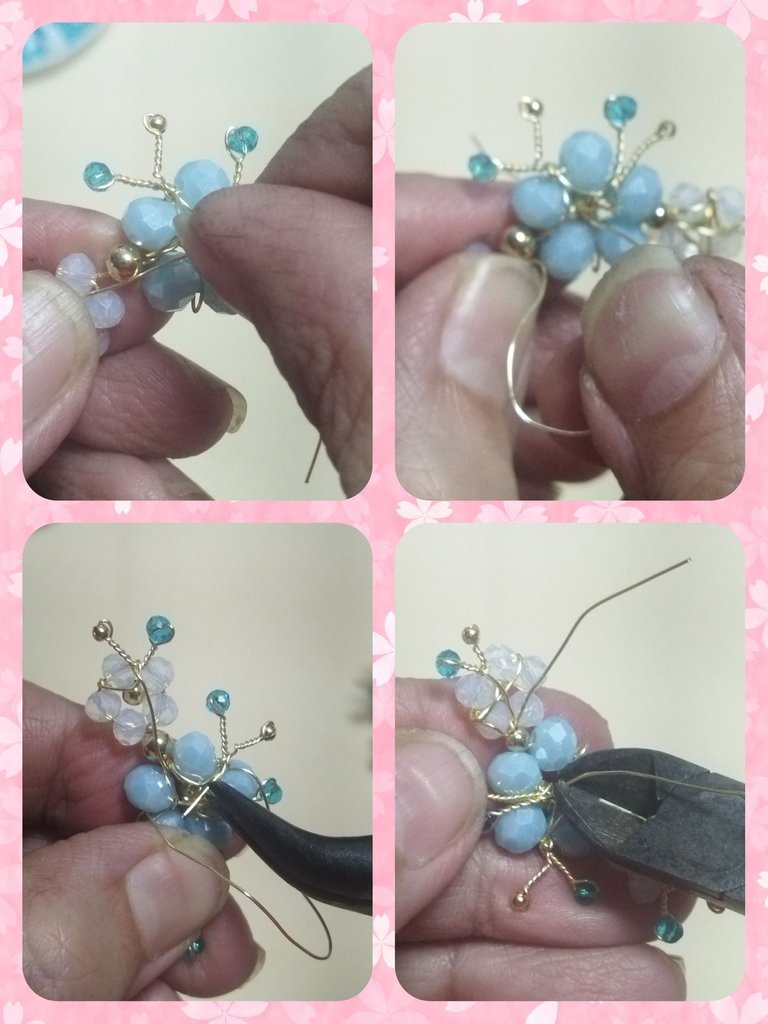
We take one of the wires and insert 5 4 mm white crystals, leaving 3 cm of wire at the beginning. We make a circle with the crystals and make a half turn with the wire, then with the flat clamp we hold the union of the wire and twist until the first flower is formed and adjusted, without pressing too much so as not to break the wire.
PASO #02
Tomamos uno de los alambres e insertamos 5 cristales blancos de 4 mm, dejando 3 cm de alambre al inicio. Realizamos un círculo con los cristales y hacemos un medio giro con el alambre, luego con la pinza plana sujetamos la unión del alambre y entorchamos hasta formar y ajustar la primera flor, sin presionar demasiado para no partir el alambre.
STEP #03
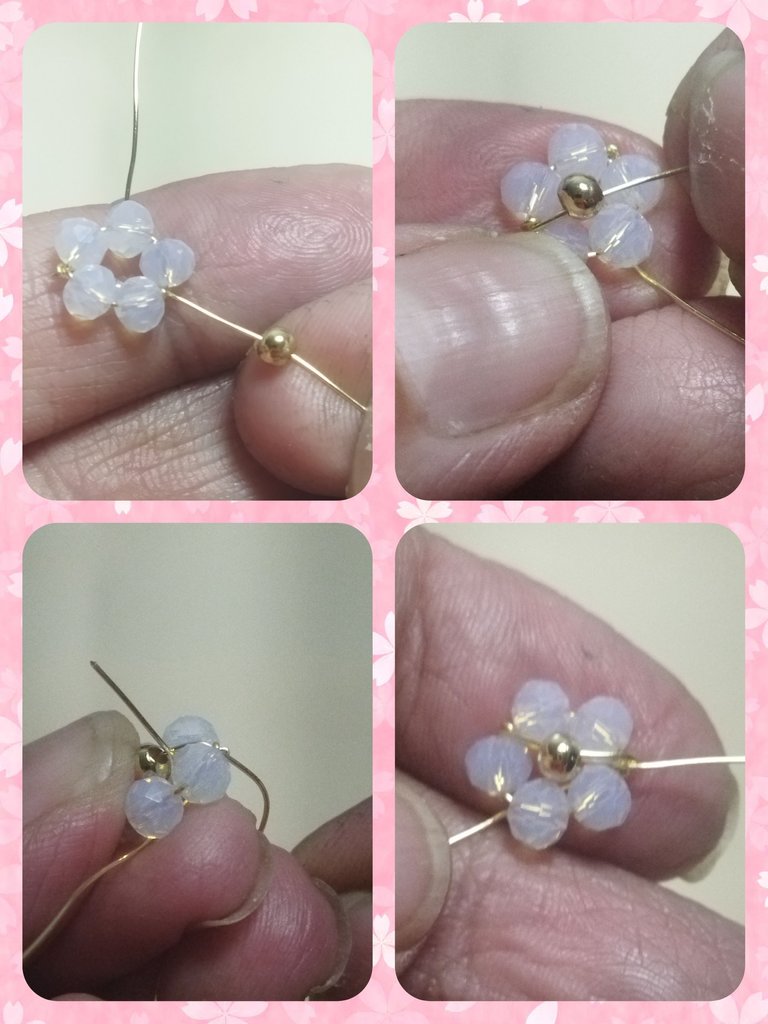
We separate the wires and start working with the longest one. We make a backward bend of the flower that is between the third crystal and the fourth crystal and we introduce the wire from the outside in and tighten it tightly.
PASO #03
Separamos los alambres y comenzamos a trabajar con el más largo. Hacemos un doblez hacia atrás de la flor que quede entre el tercer cristal y el cuarto cristal e introducimos el alambre de afuera hacia adentro y ajustamos fuerte.
STEP #04
We introduce a 3 mm pellet and take it to the center of the flower and pass the wire through the middle of the third crystal and adjust.
PASO #04
Introducimos un balín de 3 mm y llevamos al centro de la flor y pasamos el alambre por el medio del tercer cristal y ajustamos.
STEP #05
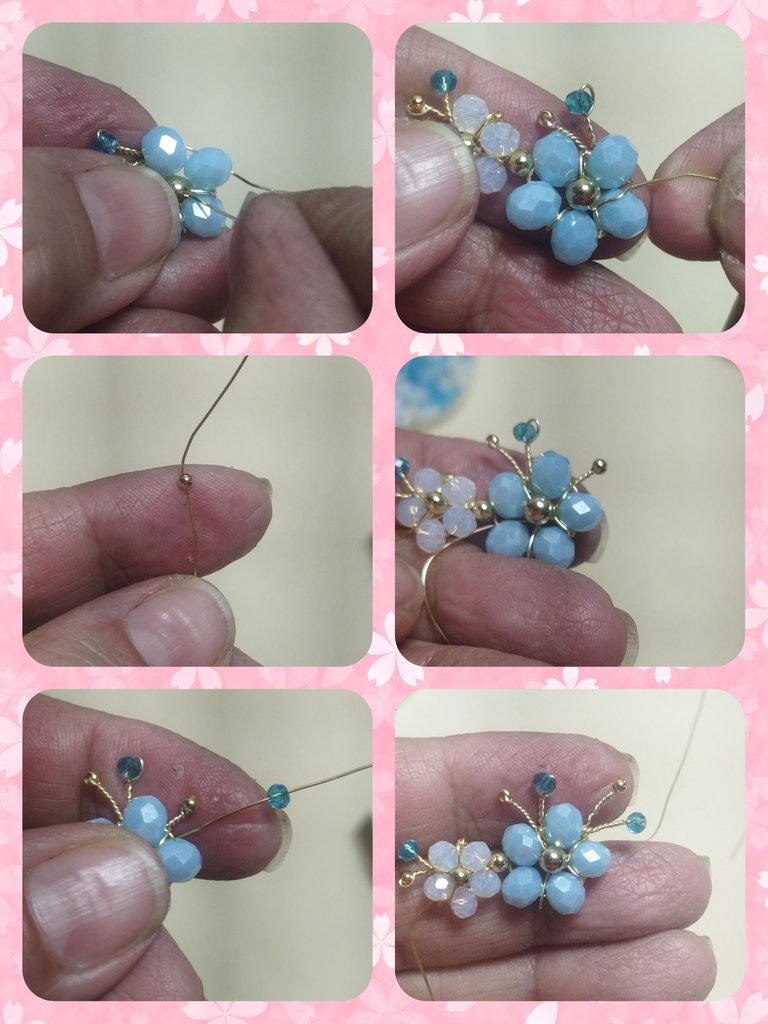
Now we will make the anthers of the flower by introducing a 3 mm blue crystal and placing it at approximately 0.60 cm and bending the wire backwards, then holding it with the flat clamp and twisting it until the crystal fits.
PASO #05
Ahora realizaremos las anteras de la flor introduciendo un cristal de 3 mm azul y colocamos a 0,60 cm aproximadamente y doblamos el alambre hacia atrás, luego sujetamos con la pinza plana y entorchamos hasta ajustar el cristal.
STEP #07
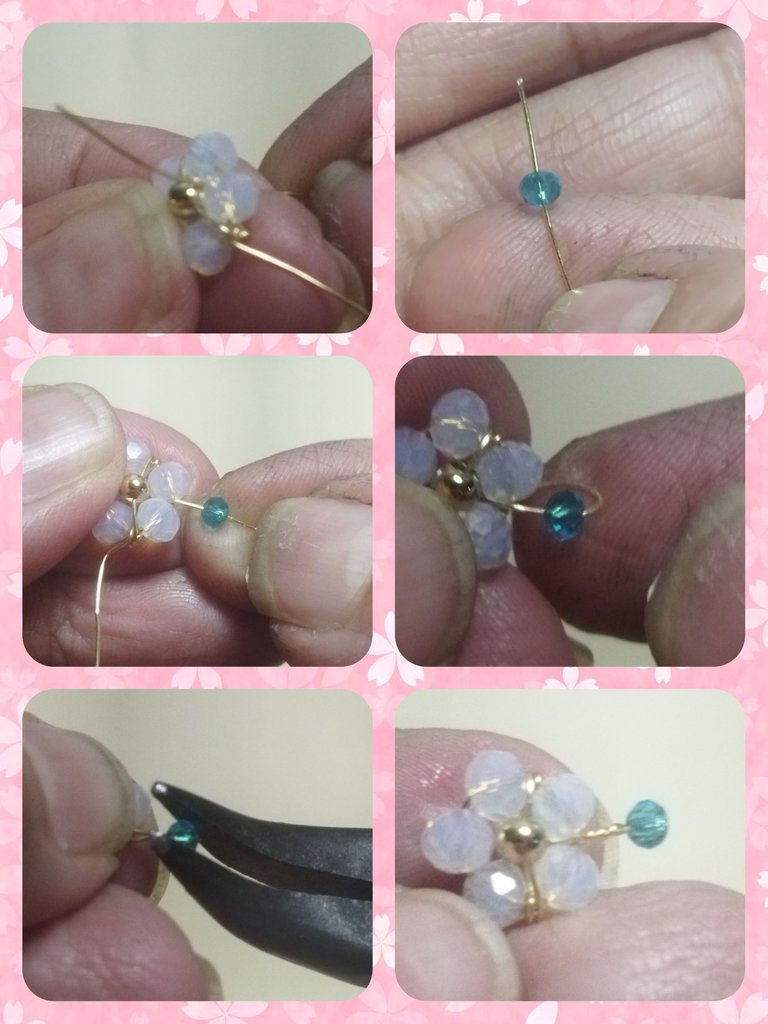
We repeat step #6 but this time we take a 3 mm pellet, which is at the height of the blue glass and we twist it.
PASO #07
Repetimos el paso #6 pero esta vez tomamos un balín de 3 mm, que quede a la altura del cristal azul y entorchamos.
STEP #08
We take the wire behind the flower and place it in the second crystal counting from the first anther, we introduce the wire from the outside in and adjust.
We take a 4 mm pellet to separate the flowers.
PASO #08
Llevamos el alambre por detrás de la flor y lo ubicamos en el segundo cristal contando desde la primera antera, introducimos el alambre de afuera hacia adentro y ajustamos.
Tomamos un balín de 4 mm para separar las flores.
STEP #09
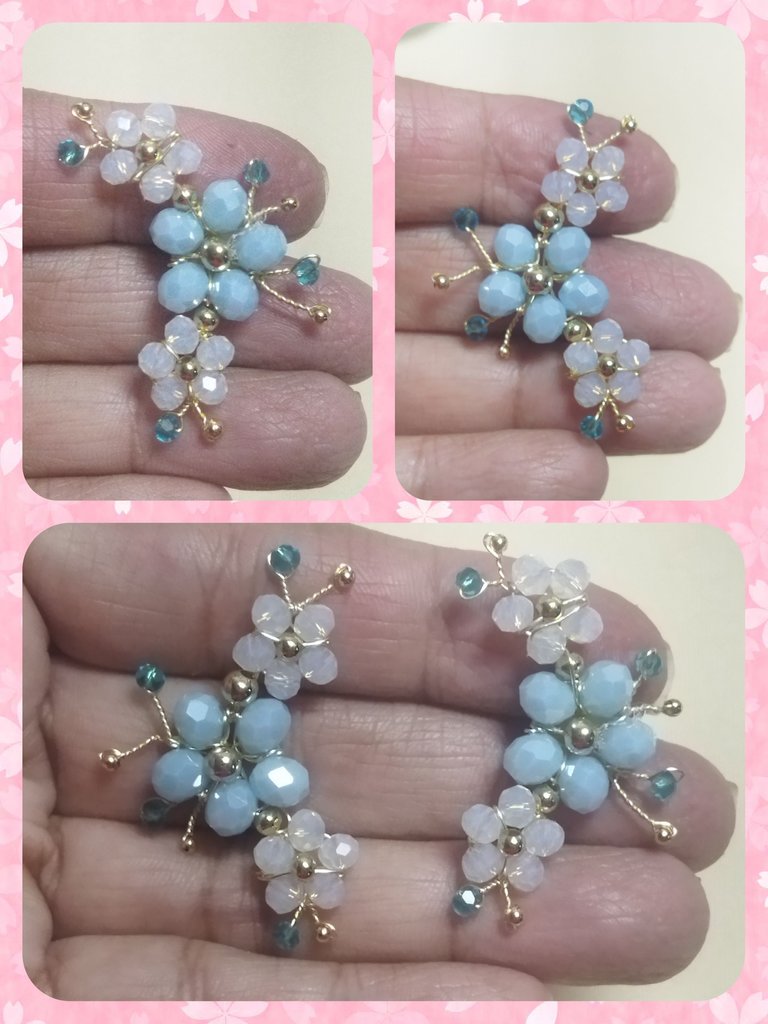
Now we will take 6 6 mm blue crystals and take them to the ball, insert the wire through the first crystal in the opposite direction and make the second flower, trying to make it as tight as possible and attached to the ball.
PASO #09
Ahora tomaremos 6 cristales azul de 6 mm y llevamos hasta el balín, introducimos el alambre por el primer cristal en sentido contrario y realizamos la segunda flor, tratando que quede lo más ajustada posible y pegada del balín.
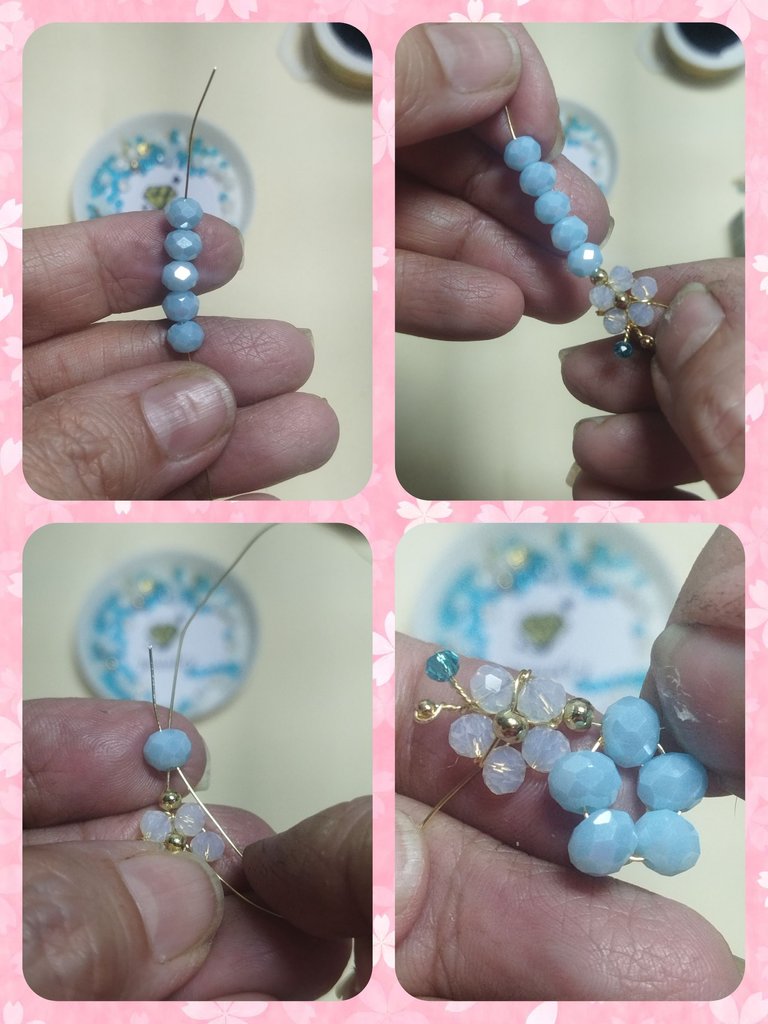
STEP #10
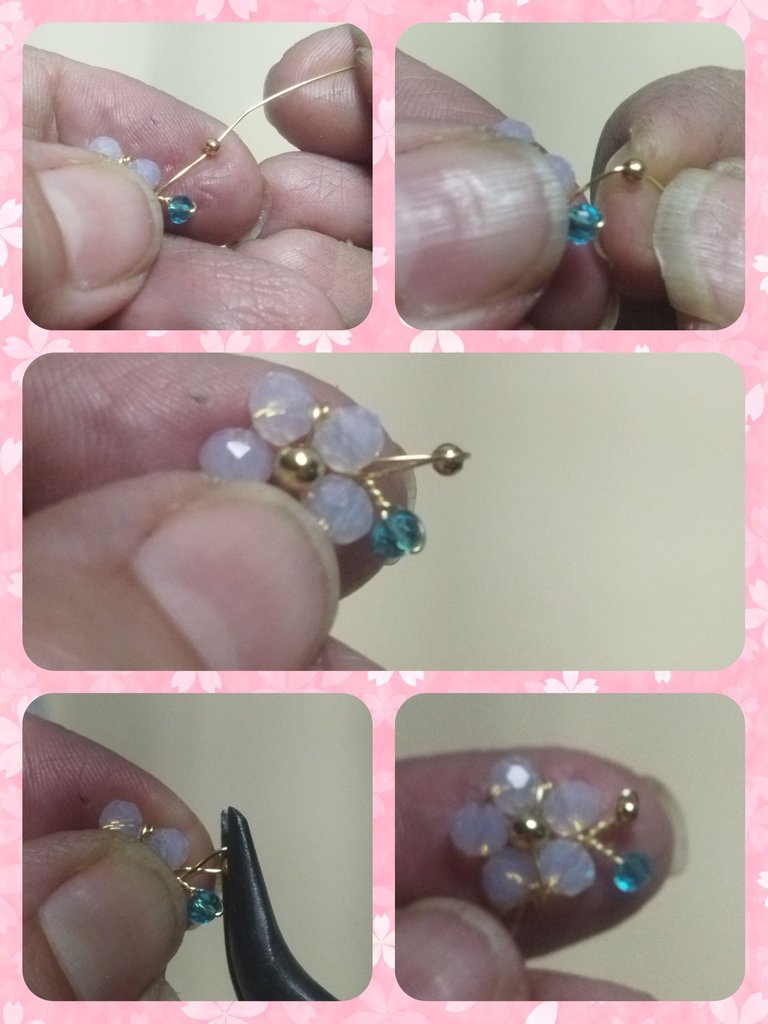
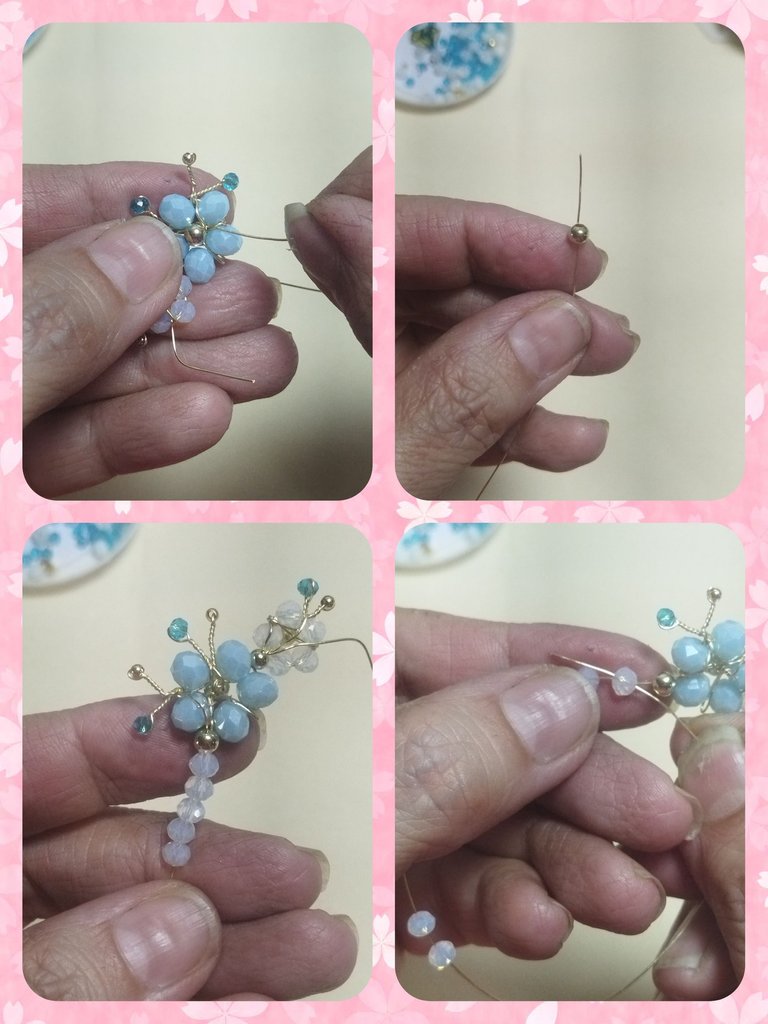
We pass the wire behind the flower and place it in the second crystal counting from the closure of the flower. We take a 4 mm ball and take it to the center of the flower and insert the wire between the two crystals and adjust the ball in the center.
PASO #10
Pasamos el alambre por detrás de la flor y lo ubicamos en el segundo cristal contando a partir del cierre de la flor. Tomamos un balín de 4 mm y llevamos al centro de la flor e insertamos el alambre entre los dos cristales y ajustamos el balín en el centro.
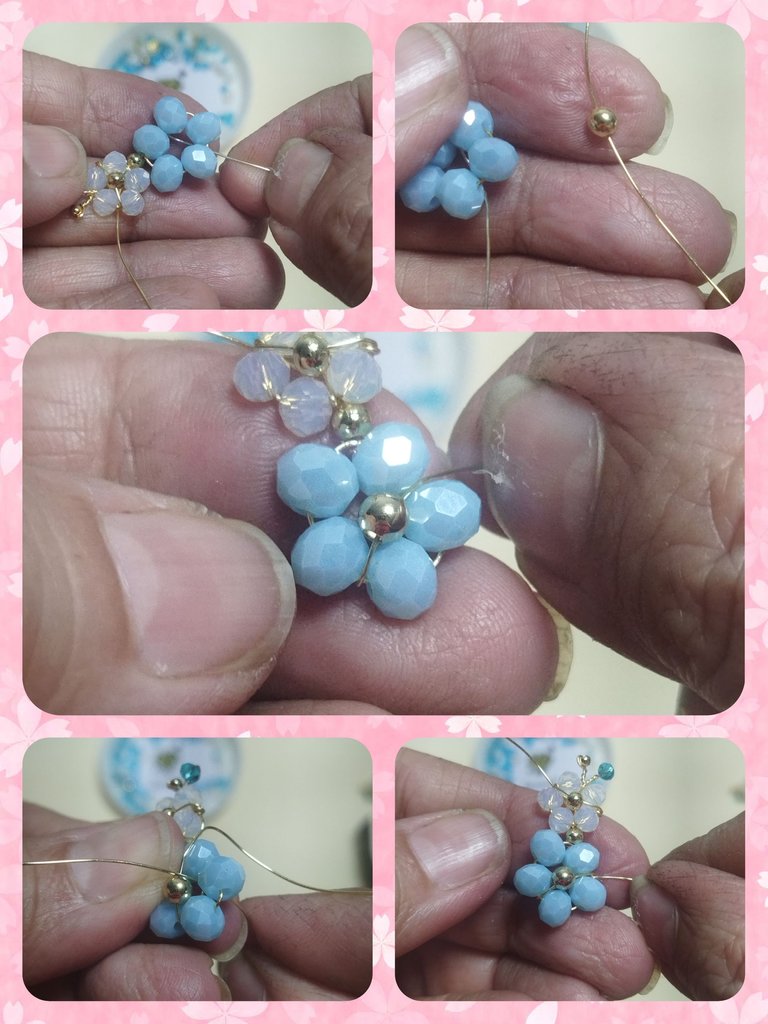
STEP #11
At that same point we are going to form the first anther by placing a 3 mm pellet, leaving 0.60 cm of distance and we twist it.
Next, we placed a 3 mm blue glass at the same level as the pellet and wound it in the same way.
PASO #11
En ese mismo punto vamos a formar la primera antera colocando un balín de 3 mm, dejando 0,60 cm de distancia y entorchamos.
Seguidamente colocamos un cristal azul de 3 mm al mismo nivel del balín e igualmente entorchamos.
STEP #12
We take the wire to the next crystal, always working from the outside in, we adjust and again form two anthers just like step #11.
PASO #12
Llevamos el alambre al cristal siguiente, siempre trabajando de afuera hacia adentro, ajustamos y nuevamente formamos dos anteras al igual que el paso #11.
STEP #13
We pass the wire through the next crystal, and take a 4 mm pellet and 5 4 mm white crystals.
We pass the wire inside the first crystal, in the opposite direction and we form the third flower.
PASO #13
Pasamos el alambre por el siguiente cristal, y tomamos un balín de 4 mm y 5 cristales blancos de 4 mm.
Pasamos el alambre por dentro del primer cristal, en sentido contrario y formamos la tercera flor.
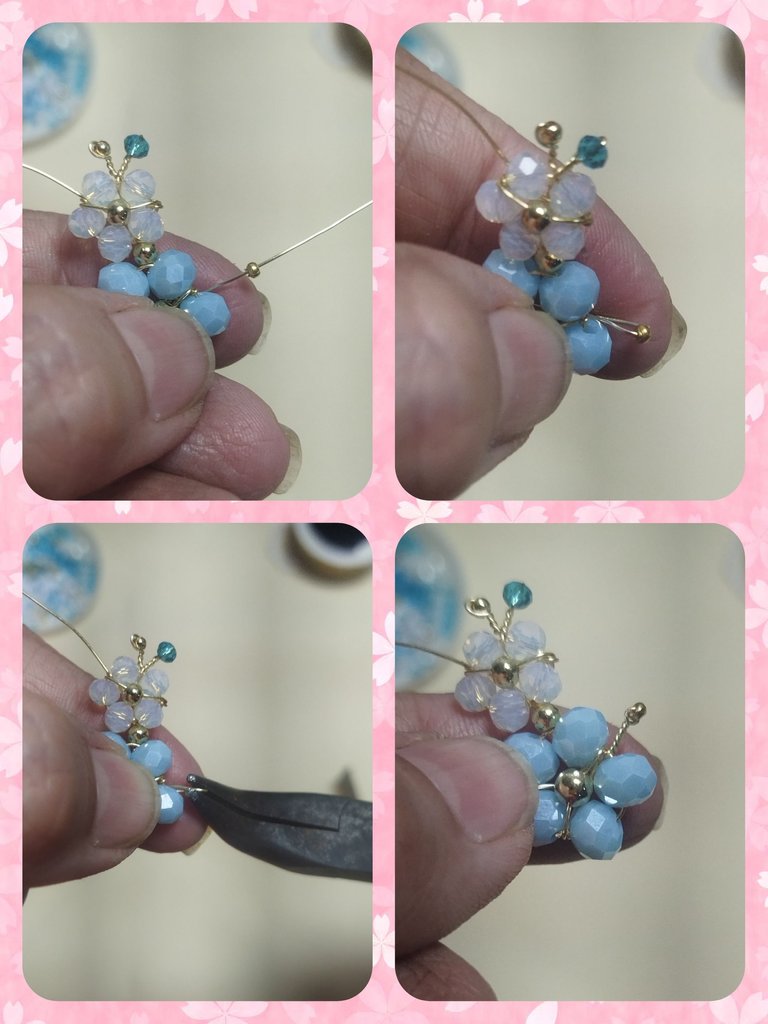
STEP #14
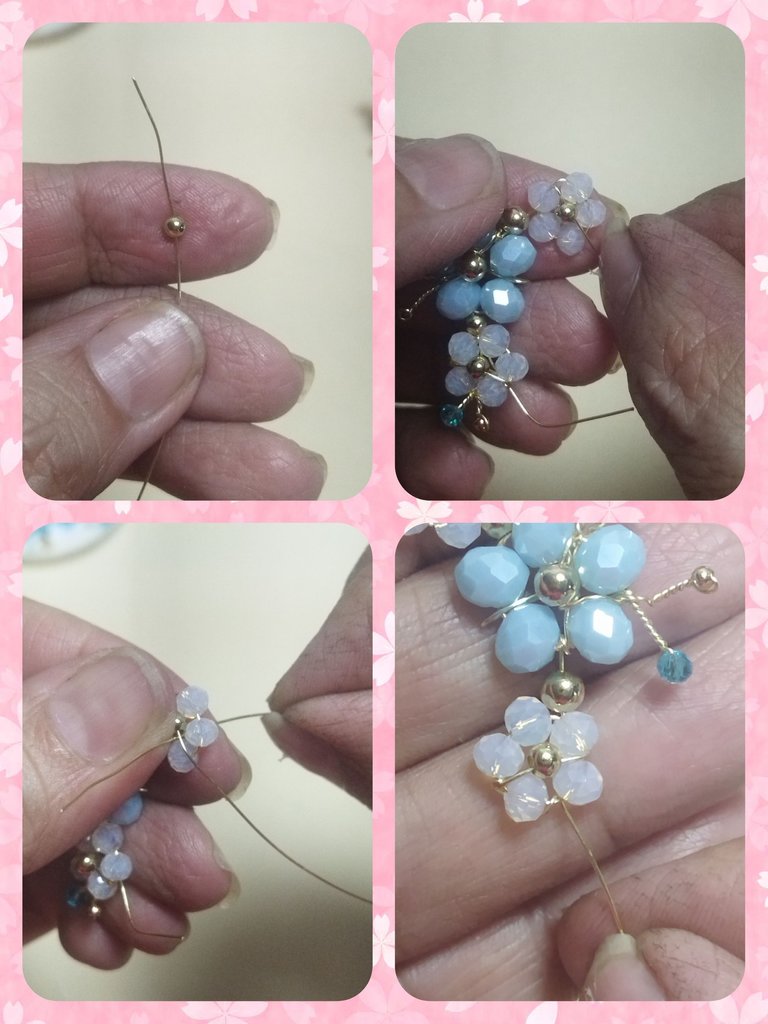
We introduce a 3 mm pellet and take it to the center of the flower, then we pass the wire between the second and third crystal and adjust.
PASO #14
Introducimos un balín de 3 mm y llevamos al centro de la flor, luego pasamos el alambre entre el segundo y el tercer cristal y ajustamos.
STEP #15
In this step we are going to make the anthers, repeating steps 6 and 7.
PASO #15
En este paso vamos a realizar las anteras, repitiendo el paso 6 y 7.

STEP #16
We pass the wire behind and place it on the blue flower, we insert it inside the flower and we twist it to finish and cut the wire.
In the same way we are going to make it with the leftover wire from the first flower we made.
PASO #16
Pasamos el alambre por detrás y colocamos en la flor azul, introducimos por dentro de la flor y realizamos un entorchado para terminar y cortar el alambre.
De igual forma vamos a realizar con el alambre sobrante de la primera flor que realizamos.
STEP #17
We make the second earring, on the back so that they look mirror-like.
PASO #17
Realizamos el segundo arete, al reverso para que queden tipo espejo.
STEP #18
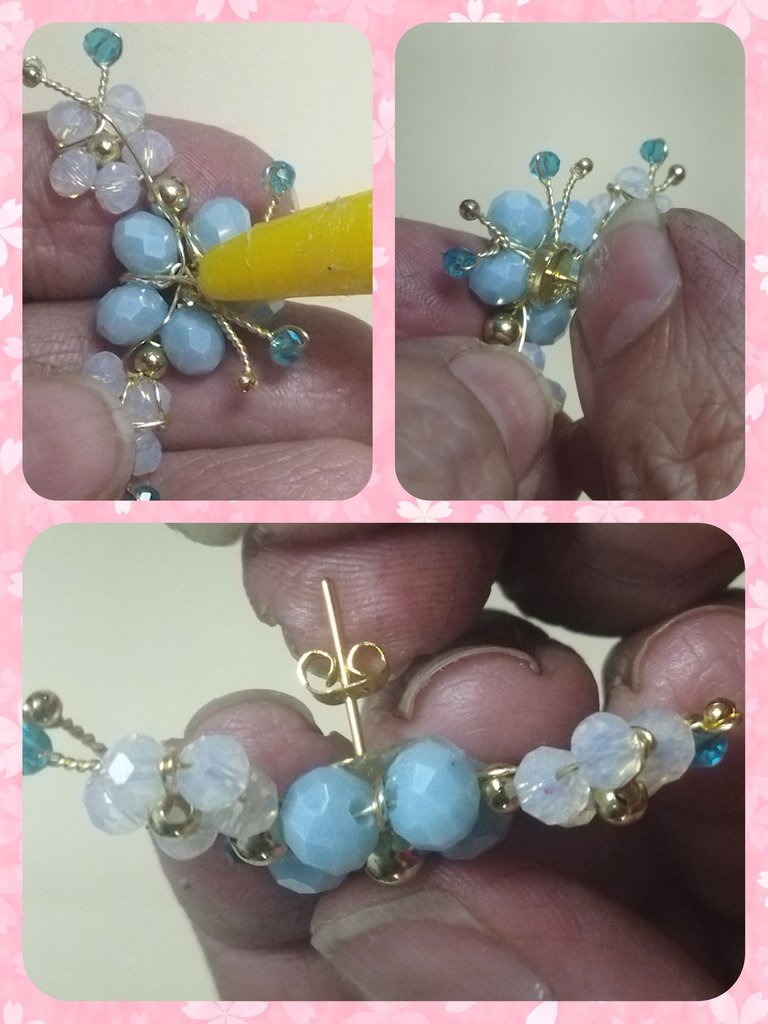
And to finish, with the glue we fix the dots, applying a small amount to the back of the central flower.
PASO #18
Y ya para culminar, con el pegamento fijamos los topitos, aplicando una pequeña cantidad por la parte trasera de la flor central.
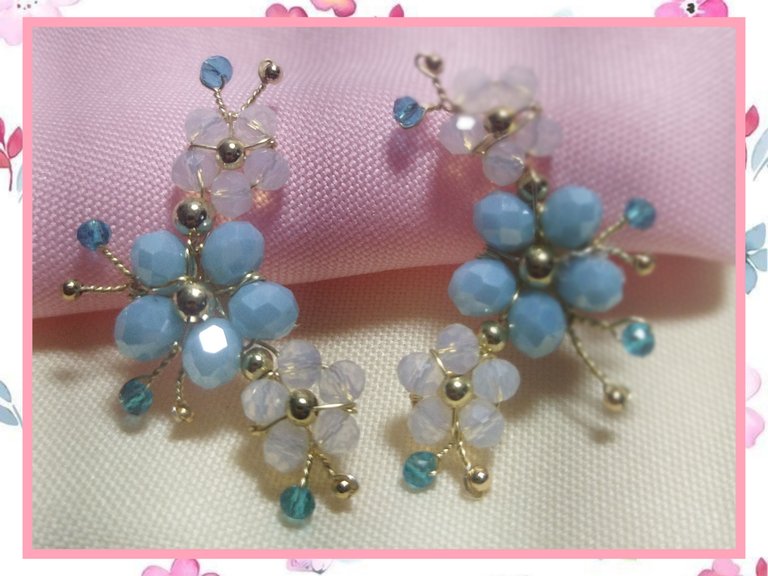
PROJECT COMPLETED
And with these beautiful earrings I celebrate spring and my second anniversary at Jewelry. Thanking everyone who has supported my content and giving well-deserved recognition to the administrator and the moderators for making us part of this community. Happy Spring and Second Anniversary JEWELRY.
PROYECTO FINALIZADO
Y con estos bellos aretes celebro la primavera y mi segundo aniversario en Jewelry. Agradeciendo a todos los que han apoyado mi contenido y dándole un merecido reconocimiento a a administradora y a los moderadores por hacernos parte de esta comunidad. Feliz Primavera y Segundo Aniversario JEWELRY.
Te ha quedado genial y lo luces muy bien. Felicidades y suerte en grande con tu entrada...hermosa primavera @linita
Gracias manita, un 🫂🫂
Te quedó muy hermoso amiga, me encanta la combinación de colores, hace unos días realice unos parecidos pero individuales, una sola florecita.
Ohg. Que delicado diseño. Felicidades!
Un trabajo definitivamente hermoso, delicado y elegante, digno de esta conmemoración especial para nuestra bella comunidad que este de 2do aniversario.
Suerte @linita
!DIY
!LADY
View or trade
LOHtokens.@dayadam, you successfully shared 0.1000 LOH with @linita and you earned 0.1000 LOH as tips. (1/3 calls)
Use !LADY command to share LOH! More details available in this post.
You can query your personal balance by
!DIYSTATSQue linda me encanta los colores que utilizaste amiga. Saludos 💕😘
Muchas gracias, también me encantó esta pieza. Aprecio tu comentario.
I have seen beautiful creative work here. Weldone dear
Hermosos aretes!!
Dios mío 😍 son demasiado hermosos..... Acabo de enamorarme de este par de zarcillos.... Te felicito... Tu trabajo es muy hermoso.
Me alegro que te gusten. Es un trabajo delicado y muy bello, me encanta trabajar con esta técnica aunque mis manitas se lamenten. Muchas gracias, por tu comentario.