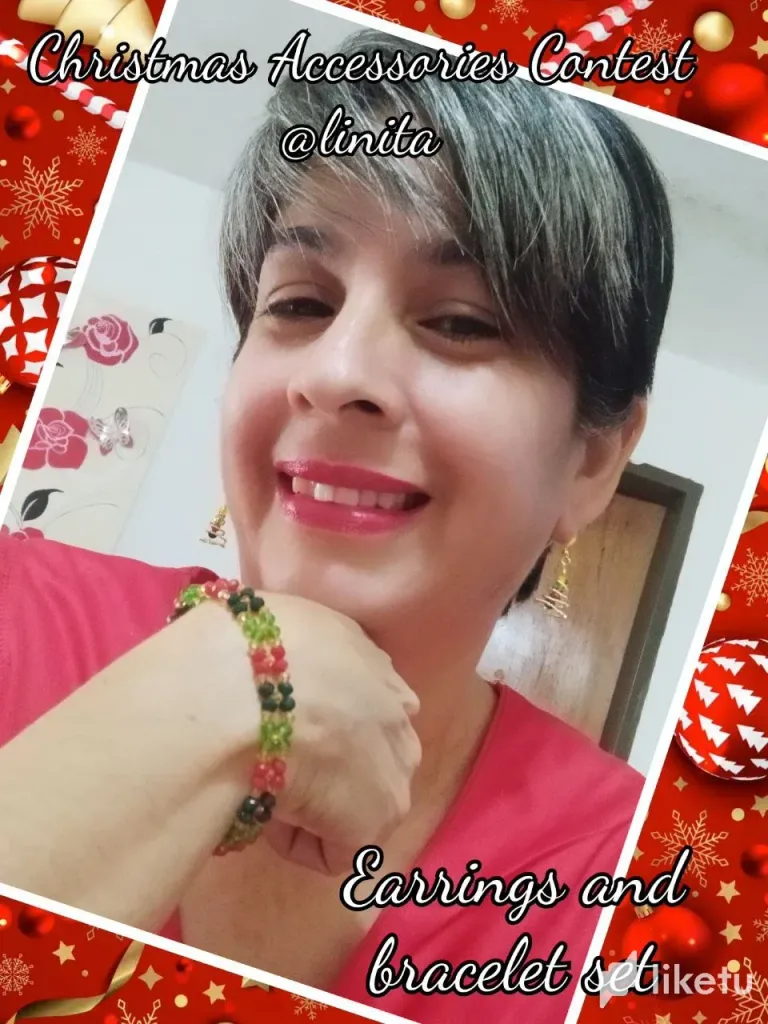
Contest: Christmas earrings and bracelet set
ESPAÑOL
BIENVENIDOS A MI BLOG
¡Holaaaa, holaaaaa! Saludos y mis respetos a los creadores de bisutería. Ya lista para participar en el concurso navideño de nuestra querida comunidad. Este es uno de los meses más movidos del año y donde las emociones están a flor de piel. El tiempo se nos hace corto y entre tantas cosas no podemos descuidar nuestra aspecto y debemos de lucir radiantes. Es por ello que realicé unos aretes sencillos y a la vez muy representativos para la ocasión y la pulsera con cristales que como saben, estos cristales son símbolo de elegancia y su brillo llama la atención. Espero les guste. Comencemos.
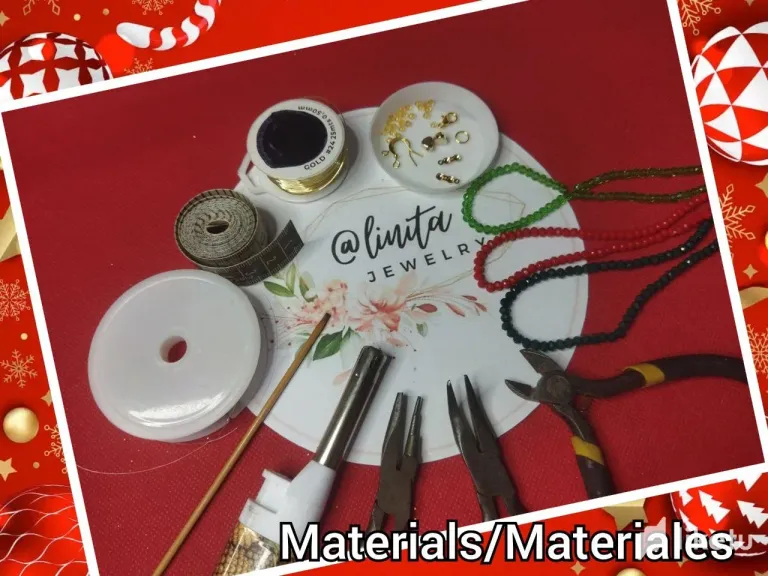
MATERIALES
- Alambre #24
- Hilo Nylon de 0.8 mm
- Cristales (rondeles)rojo de 4 mm
- Cristales (rondeles)verde oscuro de 4 mm
- Cristales (rondeles)verde claro de 4 mm
- Cristales (rondeles)amarillo de 4 mm
- Cristales (rondeles)amarillo de 2 mm
- Anzuelos para zarcillos
- Seguro pico de loro
- Aros de 5 mm
- Tapa nudos
- Palillo
- Pinzas de bisutería (corte, plana, curva, cónica)
- Cinta métrica
- Encendedor
STEP BY STEP // PASO A PASO
ARETES
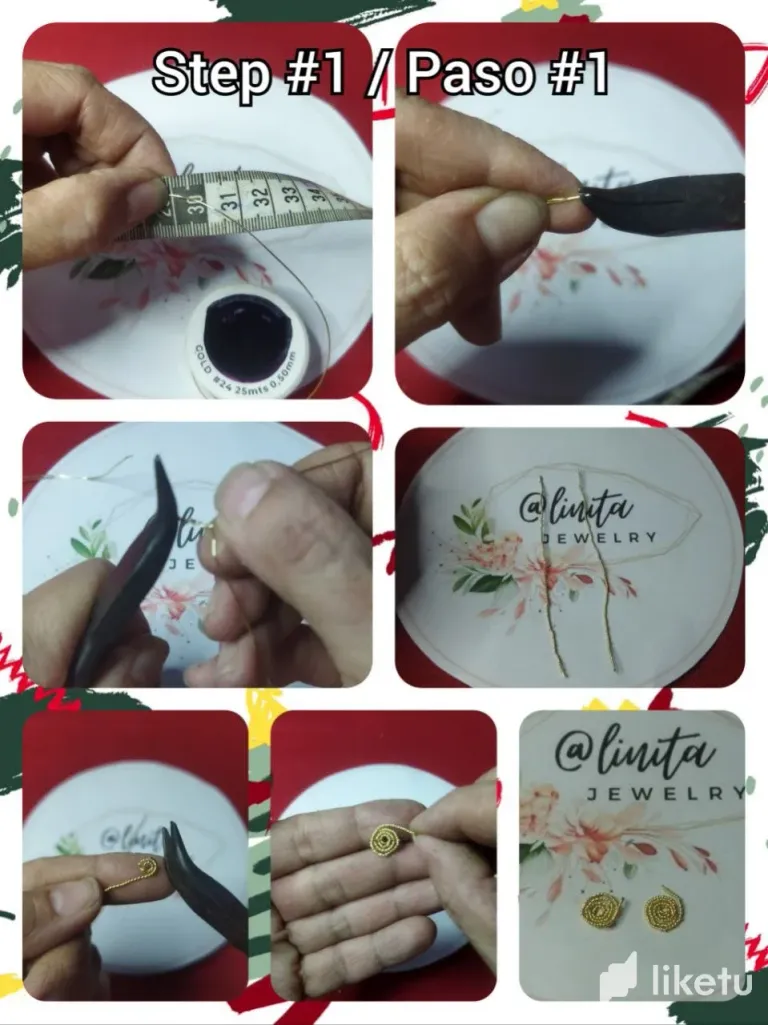
PASO #1
- Cortamos 30 cm de alambre #24, doblamos a la mitad y lo entorchamos.
- Con la pinza cónica realizamos un aro y luego con la pinza plana enrollamos en forma de espiral.
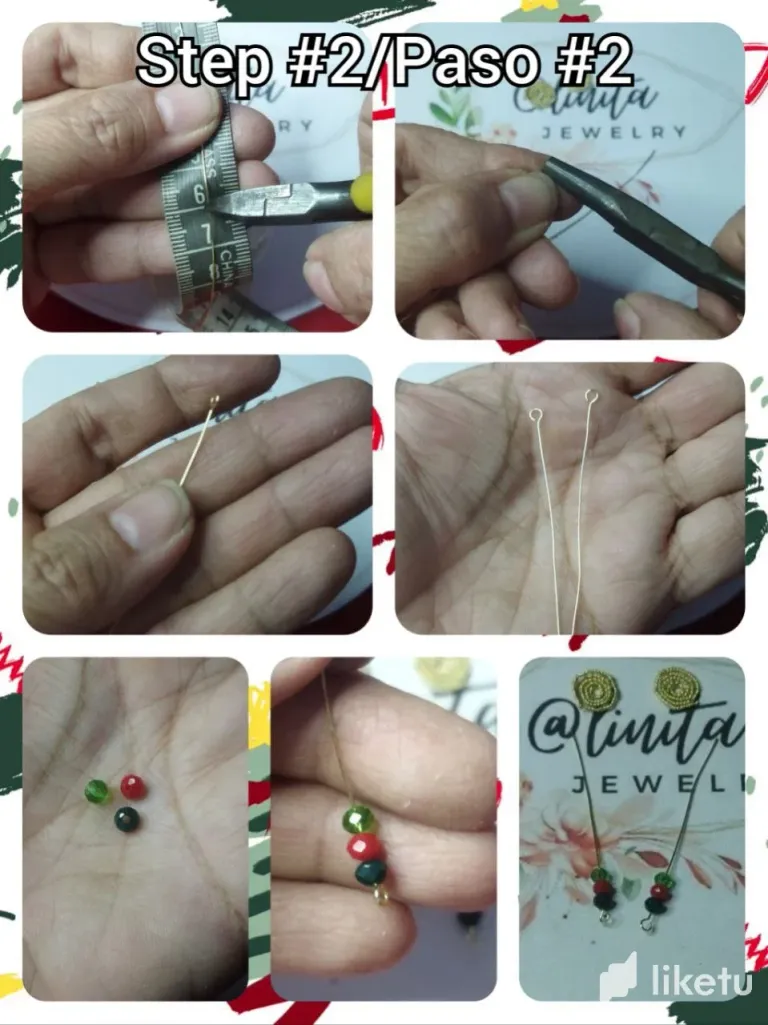
PASO #2
- Cortamos 6 cm de alambre #24 y realizamos en un extremo un aro pequeño.
- Tomamos 3 cristales de 4 mm, 1 rojo, 1 verde oscuro y 1 verde claro e introducimos dentro del alambre.
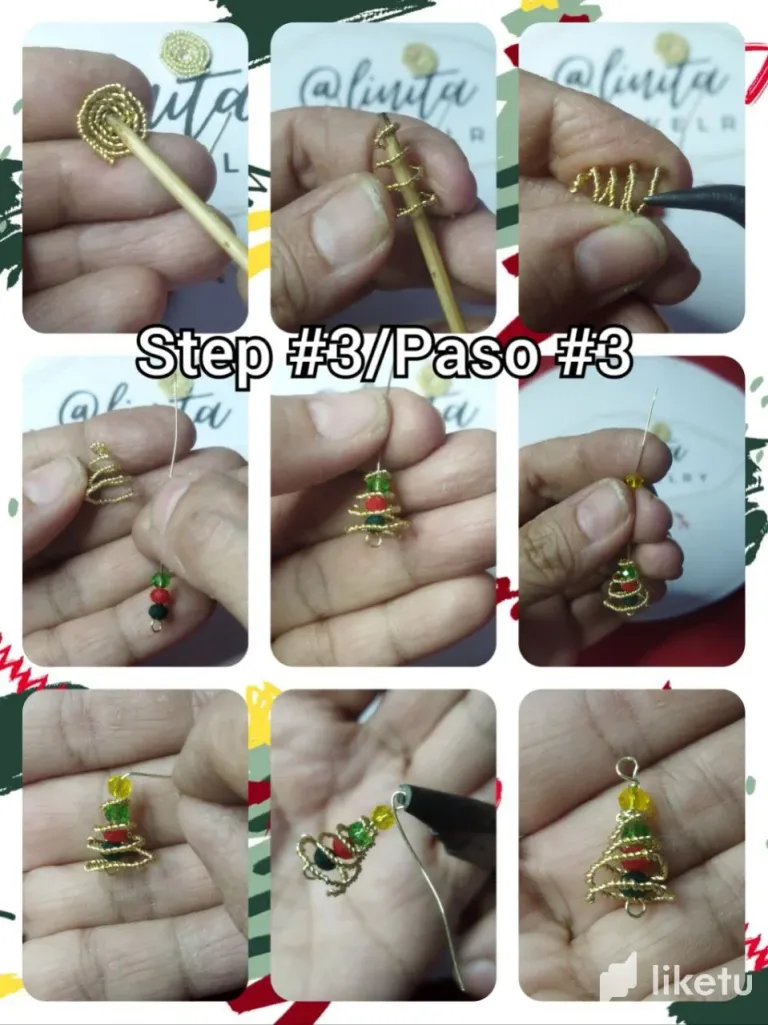
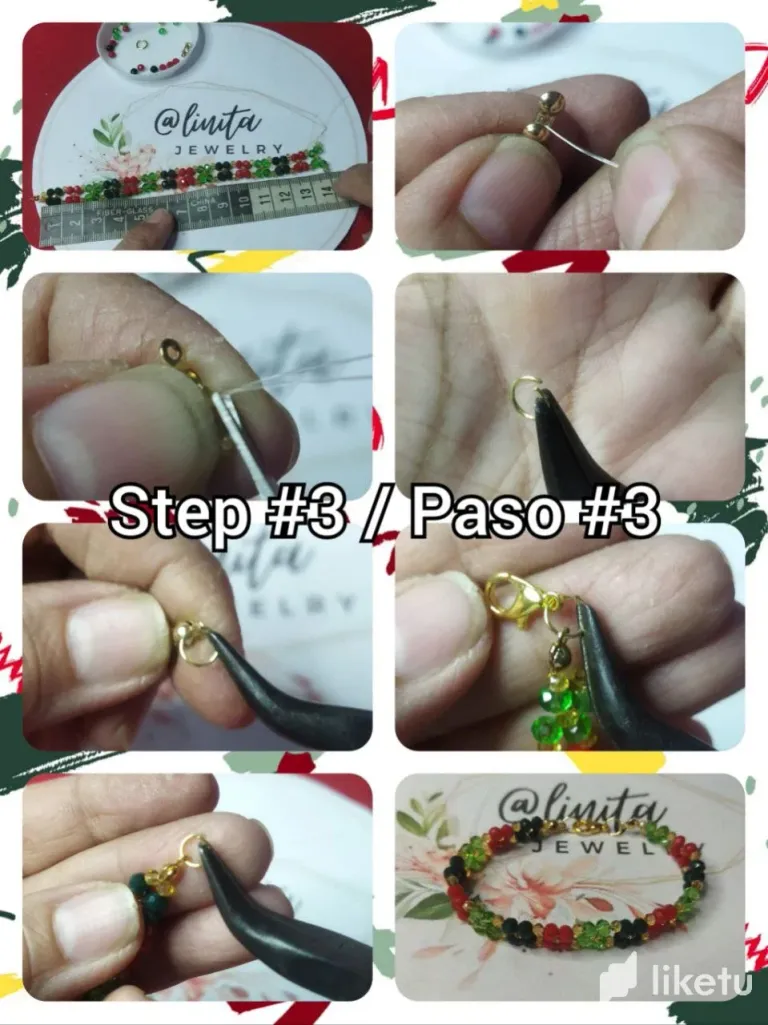
PASO #3
- Con el palillo y el espiral que realizamos en el paso # 1 formamos el cono para el árbol e introducimos por el centro el alambre y los cristales.
- Tomamos 1 cristal amarillo de 4mm y lo colocamos en el extremo superior del alambre. realizamos un doblez de 90º y con la pinza cónica hacemos una argolla pequeña y cerramos con un nudo de rosario.
- Cortamos el exceso del alambre.
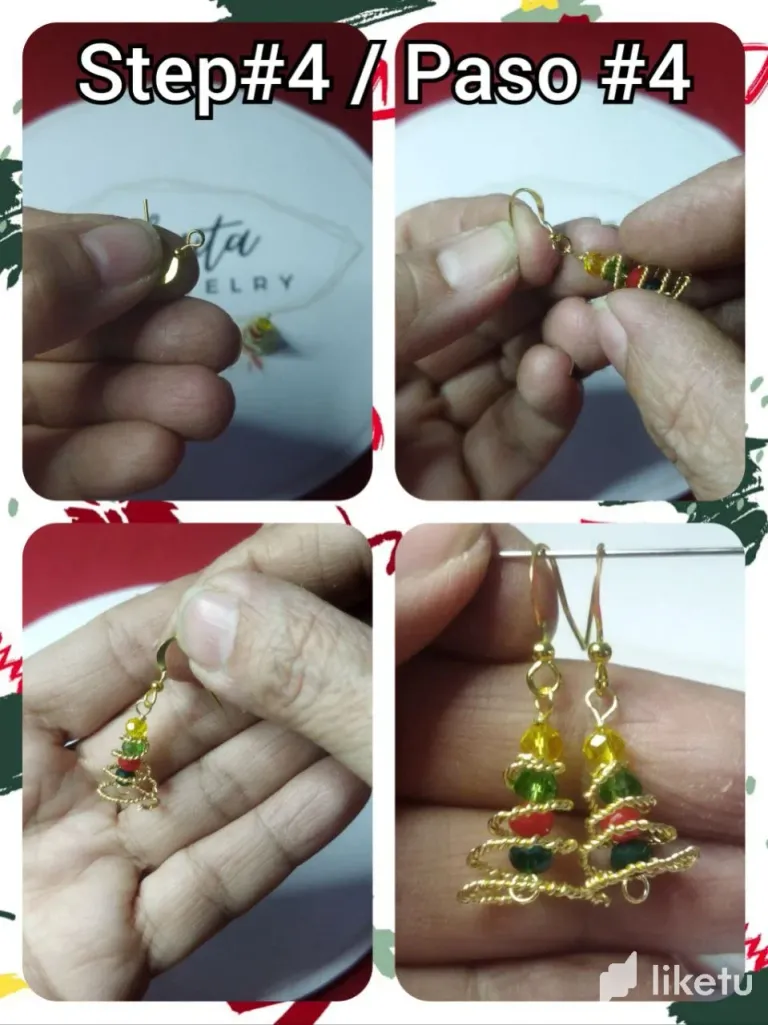
PASO #4
- Tomamos el anzuelo y abrimos con la pinza y colocamos el cono en forma de árbo. Realizamos el otro par y ya tenemos los zarcillos navideños en forma de árbol.
PULSERA
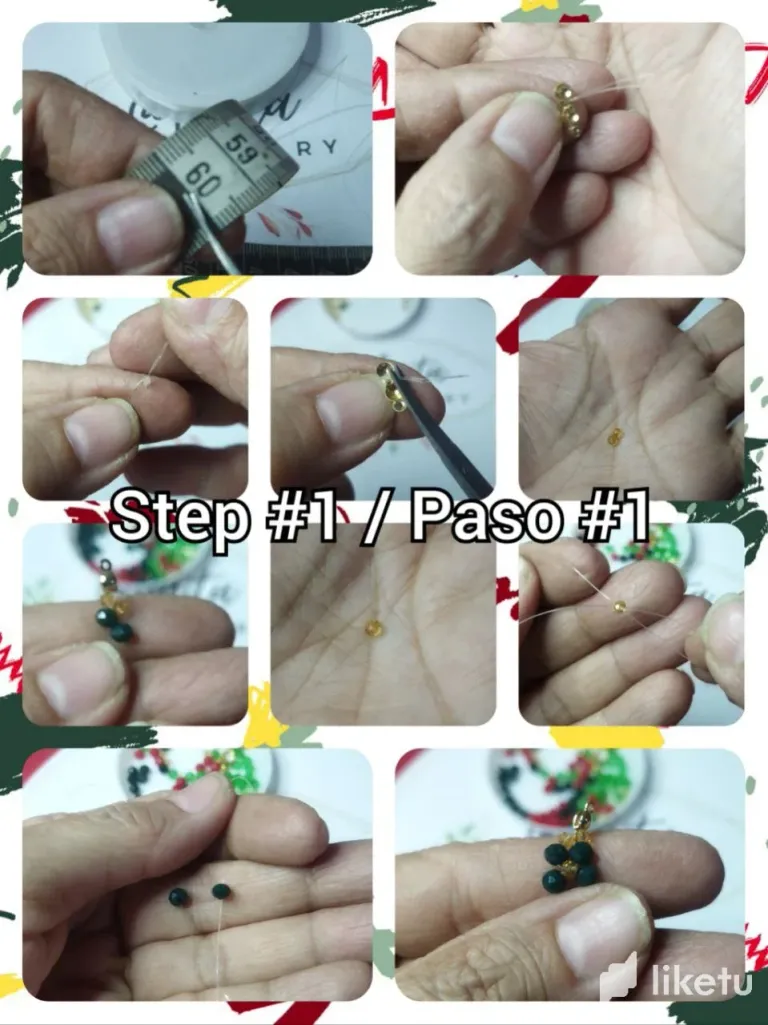
PASO #1
- Cortamos 60 cm de hilo nylon y dividimos en dos partes iguales.
- Introducimos las dos hebras por un tapa nudos. Realizamos un nudo grande y cerramos el tapanudos.
- A continuación introducimos para cada uno de los hilos un cristal amarillo de 2 mm.
- Seguidamente 2 cristales verde oscuro, un cristal por cada una de las hebras.
- Luego tomamos un cristal amarillo de 2 mm y lo pasamos por una de las hebras y luego la otra hebra la introducimos por el extremos contrario formando una X, apretamos y llevamos al inicio de la pulsera.
- Introducimos nuevamente dos cristales verdes por cada hebra y ya formamos la primera flor.
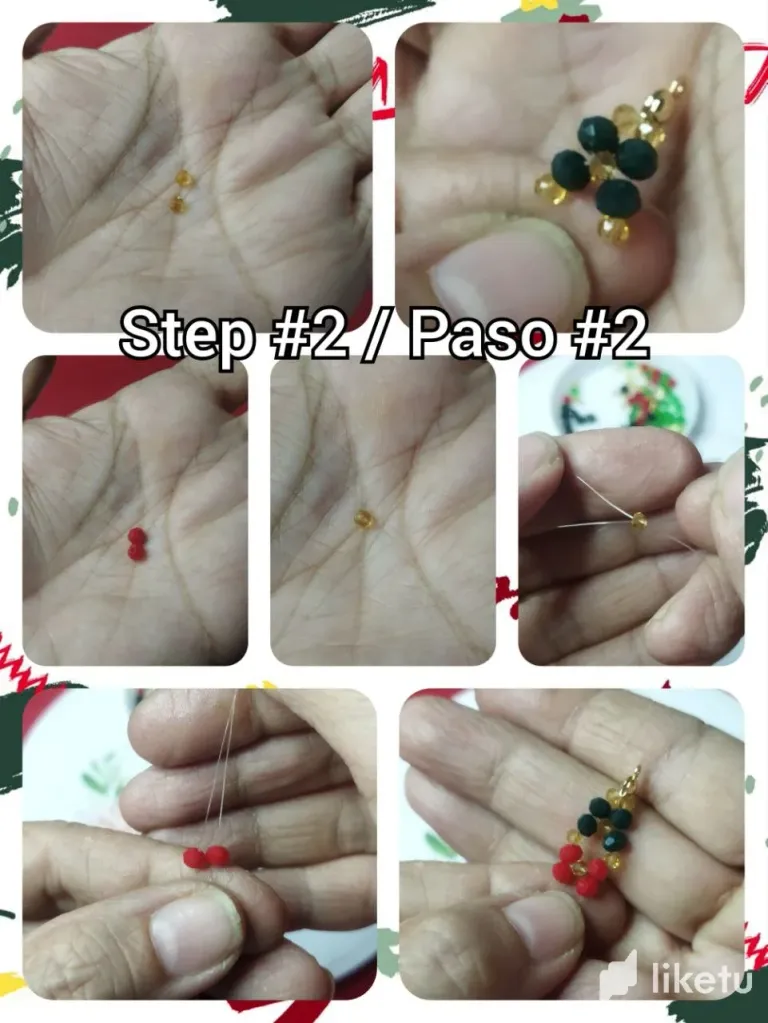
PASO #2
- Ahora formaremos una flor con los cristales rojos pero antes vamos a introducir dos cristales amarillos de 2 mm por cada hebra para separar entre sí cada flor.
- Introducimos 2 cristales rojo, un cristal por cada una de las hebras.
- Luego tomamos un cristal amarillo de 2 mm y lo pasamos por una de las hebras y luego la otra hebra la introducimos por el extremos contrario formando una X, apretamos y llevamos al inicio de la pulsera.
- Introducimos nuevamente dos cristales rojo por cada hebra y ya formamos la segunda flor.
- Colocamos dos cristales amarillos de 2 mm por cada hebra y formamos la tercera flor, al igual que las dos anteriores pero esta vez utilizaremos 2 cristales verde claro, un cristal por cada una de las hebras.
- Luego tomamos un cristal amarillo de 2 mm y lo pasamos por una de las hebras y luego la otra hebra la introducimos por el extremos contrario formando una X, apretamos y llevamos al inicio de la pulsera.
- Introducimos nuevamente dos cristales rojo por cada hebra y ya formamos la tercera flor.
PASO #3
- Continuamos formando flores en el mismo orden del paso 1, 2 y 3 hasta alcanzar 14 cm. Luego colocamos un tapa nudos, realizamos un nudo grande y cortamos el exceso de hilo.
- Tomamos un aro de 5 mm y el seguro pico de loro y lo introducimos por el tapa nudo.
- Luego en el otro extremo de la pulsera colocamos otro aro de 5 mm.
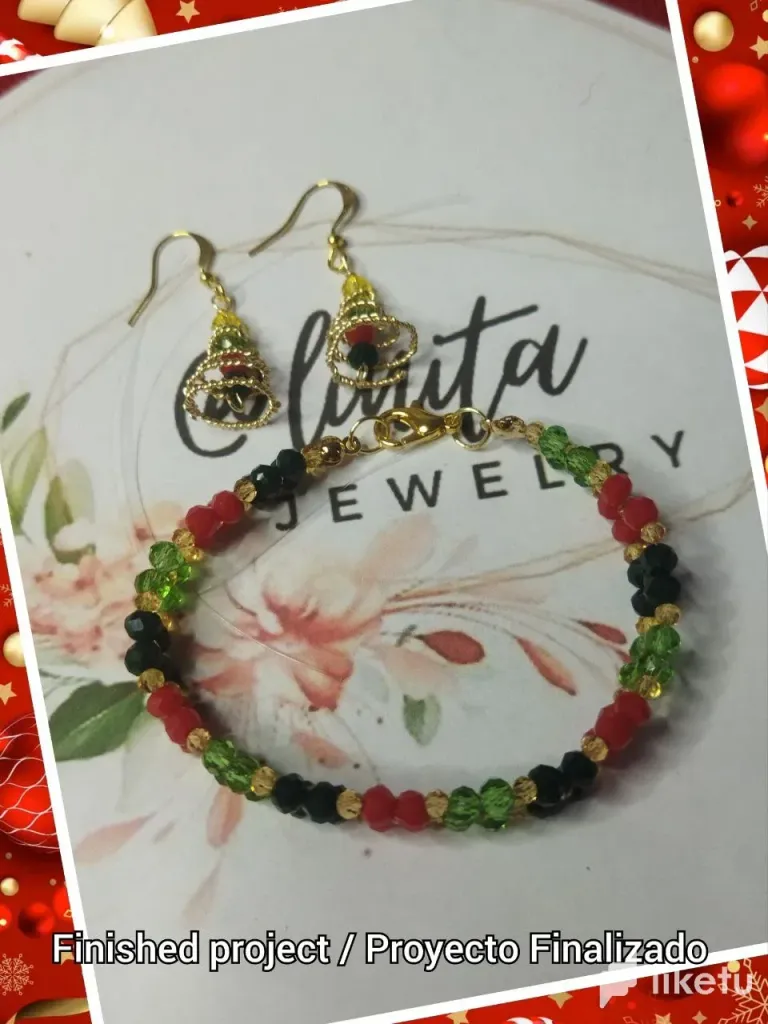
Y ya tenemos lista la pulsera navideña.
PROYECTO FINALIZADO
Lucir accesorios alusivos a las fechas navideñas está en tendencia. Así que por qué no estar a la moda? Así que invito a mis amigas @vicmito74, @agathalara y a @aarolita a participar en este concurso y mostraron cómo lucirán de lindas en estas navidades. Nos vemos en la próxima.
ENGLISH
WELCOME TO MY BLOG
Hellooooo, hellooooooo! Greetings and my respects to the jewelry creators. Ready to participate in the Christmas contest of our beloved community. This is one of the busiest months of the year and where emotions run high. Time is short and among so many things we cannot neglect our appearance and we must look radiant. That is why I made some simple and at the same time very representative earrings for the occasion and the bracelet with crystals that, as you know, these crystals are a symbol of elegance and their shine attracts attention. I hope you like it. Let's get started.
MATERIALS
- Wire #24
- 0.8 mm Nylon Thread
- 4 mm red crystals (rondels)
- 4 mm dark green crystals (rondels)
- 4 mm light green crystals (rondels)
- 4 mm yellow crystals (rondels)
- 2 mm yellow crystals (rondels)
- Hooks for tendrils
- Safe parrot beak
- 5 mm hoops
- Knot cover
- Chopstick
- Jewelry tweezers (cutting, flat, curved, conical)
- Measuring tape
- Lighter
STEP BY STEP // STEP BY STEP
EARRINGS
STEP #1
- We cut 30 cm of #24 wire, fold it in half and twist it.
- With the conical tweezers we make a ring and then with the flat tweezers we roll it in a spiral shape.
STEP #2
- We cut 6 cm of #24 wire and make a small ring at one end.
- We take 3 4 mm crystals, 1 red, 1 dark green and 1 light green and insert them inside the wire.
STEP #3
- With the toothpick and the spiral that we made in step # 1 we form the cone for the tree and insert the wire and the crystals through the center.
- We take 1 4mm yellow crystal and place it at the upper end of the wire. We make a 90º bend and with the conical clamp we make a small ring and close with a rosary knot.
- We cut the excess wire.
STEP #4
- We take the hook and open it with the clamp and place the cone in the shape of a tree. We make the other pair and we already have the Christmas tree-shaped tendrils.
BRACELET
STEP #1
- We cut 60 cm of nylon thread and divide it into two equal parts.
- We introduce the two strands through a knot cover. We make a large knot and close the knot stopper.
- Next we introduce a 2 mm yellow crystal for each of the threads.
- Next 2 dark green crystals, one crystal for each of the strands.
- Then we take a 2 mm yellow crystal and pass it through one of the strands and then we introduce the other strand through the opposite ends forming an X, we press it and bring it to the beginning of the bracelet.
- We again introduce two green crystals for each strand and we form the first flower.
STEP #2
- Now we will form a flower with the red crystals but first we will introduce two 2 mm yellow crystals for each strand to separate each flower from each other.
- We introduce 2 red crystals, one crystal for each of the strands.
- Then we take a 2 mm yellow crystal and pass it through one of the strands and then we introduce the other strand through the opposite ends forming an X, we press it and bring it to the beginning of the bracelet.
- We again introduce two red crystals for each strand and we form the second flower.
- We place two 2 mm yellow crystals for each strand and form the third flower, like the previous two but this time we will use 2 light green crystals, one crystal for each of the strands.
- Then we take a 2 mm yellow crystal and pass it through one of the strands and then we introduce the other strand through the opposite ends forming an X, we press it and bring it to the beginning of the bracelet.
- We again introduce two red crystals for each strand and we now form the third flower.
STEP #3
- We continue forming flowers in the same order as step 1, 2 and 3 until reaching 14 cm. Then we place a knot cover, make a large knot and cut the excess thread.
- We take a 5 mm ring and the secure parrot beak and insert it through the knot cover.
- Then on the other end of the bracelet we place another 5 mm hoop.
And now we have the Christmas bracelet ready.
PROJECT COMPLETED
Wearing accessories alluding to Christmas is in trend. So why not be fashionable? So I invited my friends @vicmito74, @agathalara and @aarolita to participate in this contest and they showed how cute they will look in this christmas See you next time.
For the best experience view this post on Liketu
Hola @linita 👋 te ves muy bonita en la foto. El juego de zarcillos y pulseras navideños te quedó realmente bello. Ideal para lucir todo este mes decembrino. Como los ha dicho hay que estar radiante todo el tiempo.
Te deseo mucho éxito en este concurso.
¡Felicidades! ¡Hiciste un bonito trabajo!
Nice work dear
Que bellezaaaaa @linita. Esos mini arbolitos te quedaron de maravilla, que cuchitura. El conjunto compelto esta genial. Éxitos cariño-
!DIY
You can query your personal balance by
!DIYSTATSBeautiful work, very elegant and delicate. Best wishes
Ambos accesorios quedaron hermosos. Mis favoritos son los aretes, me recuerdan un árbol de navidad y tal como lo describe son muy representativos de la temporada .
Un bello trabajo
Waooo una belleza amiga feliz tarde.
Holaaaa, muchas gracias. Me alegro que te guste 😁
Hola @linita, te quedó muy hermoso el conjunto, sobretodo el zarcillo 🎄, me encantó muchísimo, felicitaciones, muchísimo éxito en el concurso. Saludos ❤️
Ho Ho Ho! @linita, one of your Hive friends wishes you a Merry Christmas and asked us to give you a new badge!
The HiveBuzz team wish you a Merry Christmas!
May you have good health, abundance and everlasting joy in your life.
To find out who wanted you to receive this special gift, click here!
You can view your badges on your board and compare yourself to others in the Ranking
Check out our last posts:
Ya extrañaba ver tus accesorios amiga y aún más acompañados de esa sonrisa ajajja, hermoso como siempre te envío un saludo.
Holaaaa, gracias. Ya casi desocuapada para activarme al 100% 😁. Gracias por estar al pendiente. Saludos.