(ESP/ENG) HERMOSO AGARRA OLLAS NAVIDEÑO REALIZADO CON MATERIALES RECICLADOS /BEAUTIFUL CHRISTMAS POT HOLDER MADE FROM RECYCLED MATERIALS
¡Hola, hola! Hivers y linda comunidad de DIYHub, espero todos se encuentren súper bien, animados e inspirados 💟
Hoy quiero mostrarles como realice un muy BONITO AGARRA OLLAS CON MOTIVO NAVIDEÑO, y me gustaría presentarlo como mi TERCERA ENTRADA AL CONCURSO DE NAVIDAD de esta encantadora comunidad 🎅DIY Christmas is Here! 🎁
Hello, hello! Hivers and cute DIYHub community, I hope you all are super well, encouraged and inspired 💟.
Today I want to show you how I made a very CUTE POT HOLDER WITH CHRISTMAS MOTIVE, and I would like to present it as my THIRD ENTRY TO THE CHRISTMAS CONTEST of this lovely community 🎅DIY Christmas is Here! 🎁
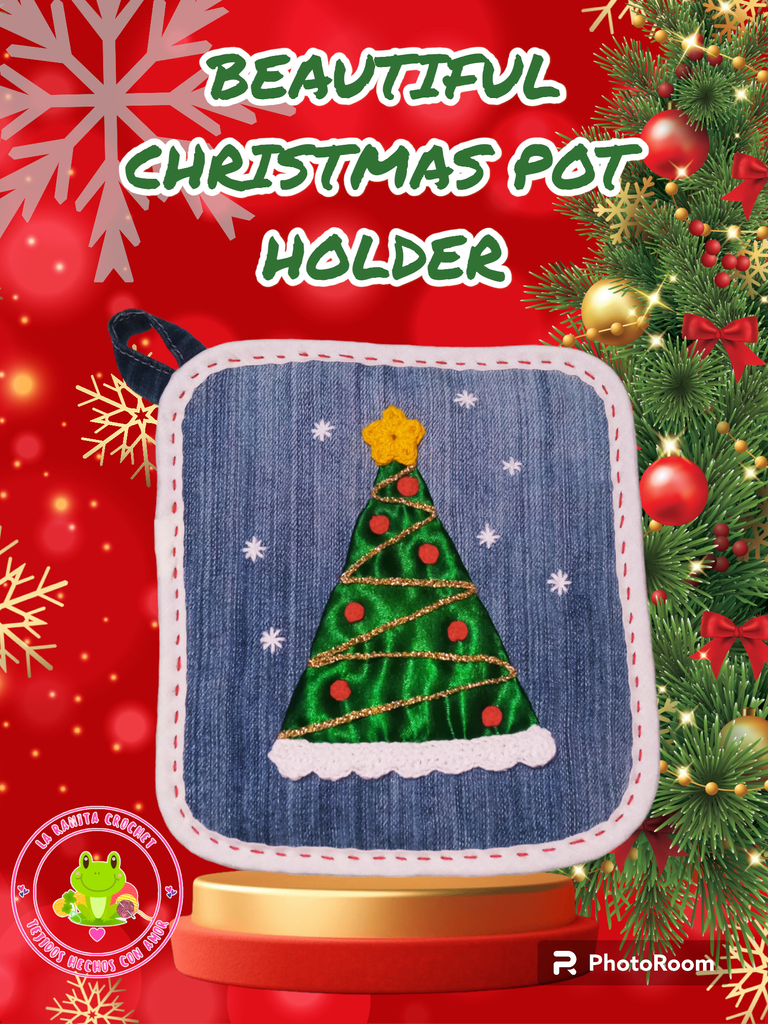
Tengo días pensando en realizar un par de nuevos agarra ollas, para darle un descanso al Michi agarra ollas jajaja… y también quiero que sean decorativos ya que estamos en navidad y en nuestra cocina no tenemos nada representativo de estas fechas, así que como soy fan de los arbolitos decidí realizarlo con un bonito aplique de tela en forma de árbol de navidad.
Para la decoración del agarra ollas utilice tela y también algunos elementos tejidos a crochet que le aportan algo de volumen y también mi toque distintivo, ya que casi todo lo que hago me gusta agregarle algo tejido a crochet jajaja….
Bueno amigos a continuación los dejo con los materiales que use y también con el paso a paso de cómo lo realice.
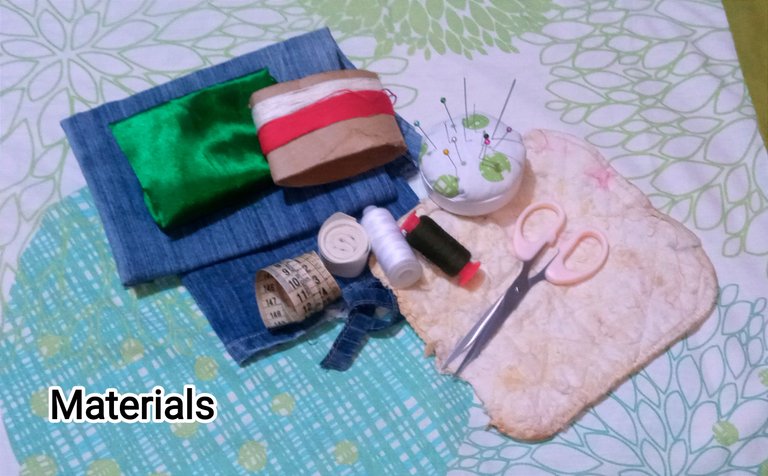
🎁 🎄 MATERIALES 🎄 🎁
- Tela de yeans de un pantalón viejo.
- El relleno de un agarra ollas viejo.
- Un pequeño retazo de tela verde.
- Sesgo blanco.
- Hilo y agujas para coser a mano.
- Hilo de algodón blanco y rojo.
- Hilo crochet dorado.
- Aguja de crochet #4.
- Guata para rellenar.
- Alfileres y tijera.
I've been thinking about making a couple of new pot holders, to give a rest to the Michi pot holder hahaha... and I also want them to be decorative since we are in Christmas and in our kitchen we have nothing representative of these dates, so as I am a fan of trees I decided to make it with a nice fabric applique in the shape of a Christmas tree.
For the decoration of the pot holder I used fabric and also some crocheted elements that give it some volume and also my distinctive touch, since almost everything I do I like to add something crocheted hahaha ....
Well friends below I leave you with the materials I used and also the step by step of how I made it.
🎁 🎄 MATERIALS 🎄 🎁
- Yeans fabric from an old pair of pants.
- The stuffing from an old pot holder.
- A small scrap of green fabric.
- White bias.
- Thread and needles for hand sewing.
- White and red cotton thread.
- Gold crochet thread.
- Crochet needle #4.
- Wadding for stuffing.
- Pins and scissors.
🎁 🎄 ABREVIATURAS DE LOS PUNTOS A UTILIZAR 🎄 🎁
- Pa: punto alto.
- Pad: punto alto doble.
- Pb: punto bajo.
- Cad: cadeneta.
- Am: anillo mágico.
- Pd: punto deslizado.
🎁 🎄 PASO A PASO 🎄 🎁
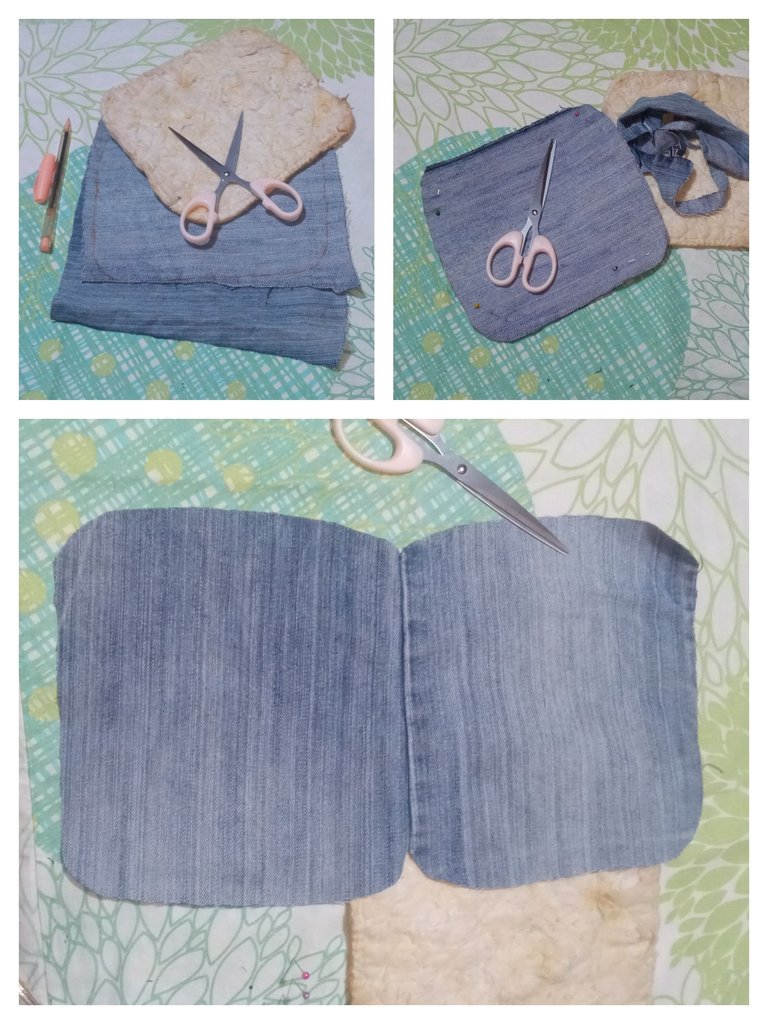
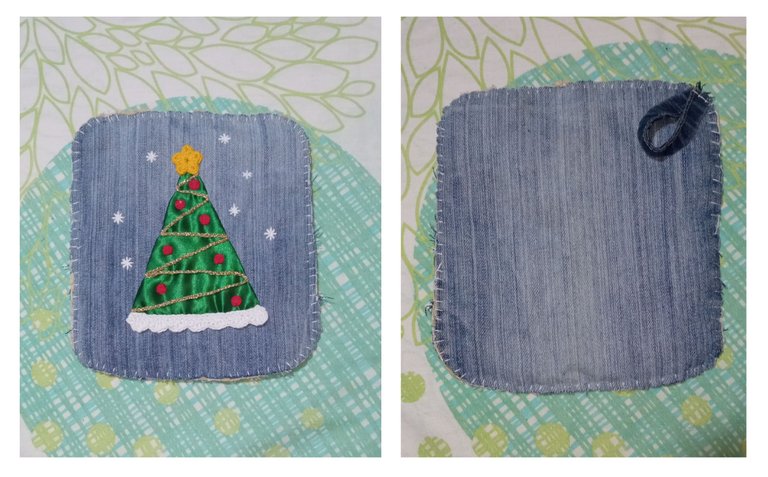
1) Para iniciar lo que hice fue marcar en la tela de yeans la forma del relleno del viejo agarra ollas y luego cortar la tela, que aunque se ve feo es solo porque la tela que tenía antes se había quemado por todas partes y el relleno quedo manchado pero es realmente de muy buena calidad y por eso lo guarde para reutilizarlo. Debemos tener dos piezas iguales para cubrir ambas caras del agarra ollas.
🎁 🎄 ABBREVIATIONS OF THE POINTS TO BE USED 🎄 🎁
- dc: double crochet.
- trc: triple crochet.
- sc: single crochet.
- ch: chain stitch.
-Mr: magic ring. - sl st: slipped stitch.
🎁 🎄 STEP BY STEP 🎄 🎁
1) To start what I did was to mark on the yeans fabric the shape of the filling of the old pot holder and then cut the fabric, which although it looks ugly is only because the fabric I had before had burned all over and the filling was stained but it is really very good quality and that's why I kept it to reuse it. We must have two equal pieces to cover both sides of the pot holder.
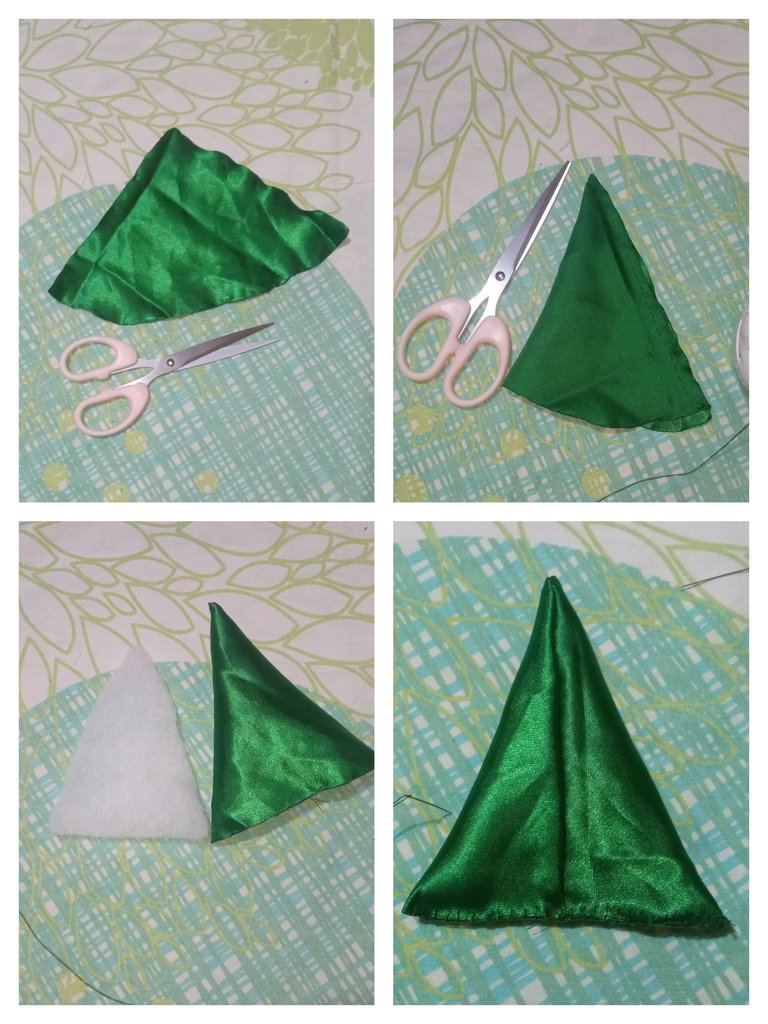
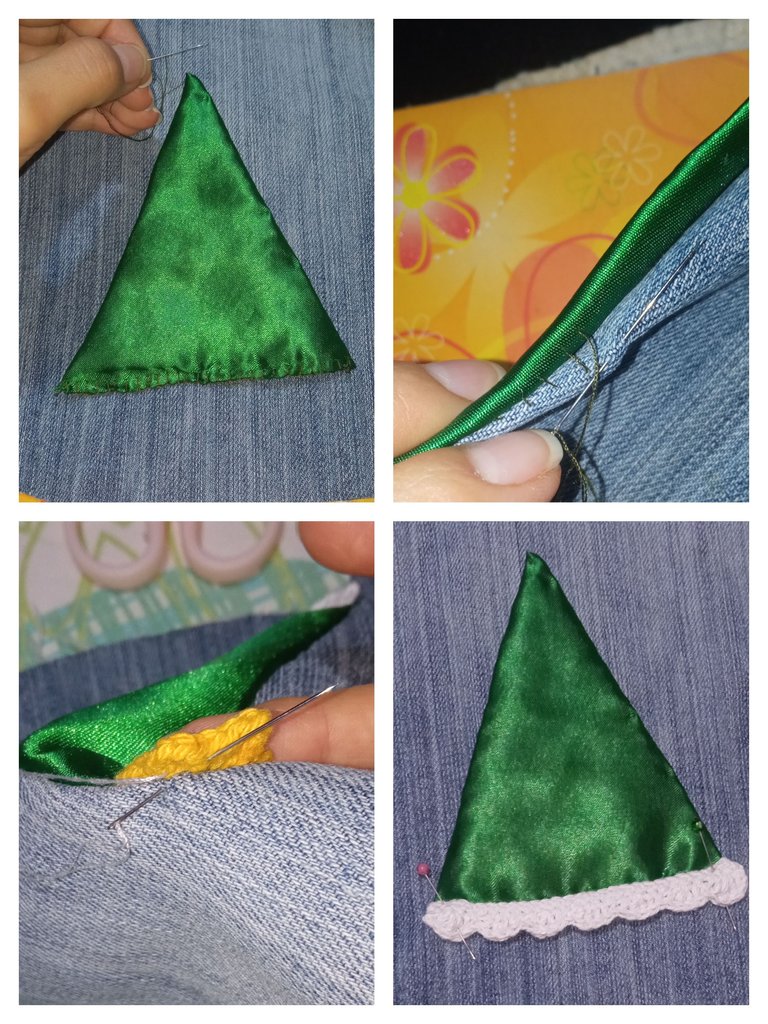
2) Lo que sigue es realizar el pequeño pino con que decoraría el agarra ollas, y lo realice con un pequeño retazo de tela verde, la tela la corte como si fuera a formar un cono con ella, y seguidamente uní los extremos y los cosí con una puntada sencilla del lado revés de la tela, le di la vuelta y corte la parte de abajo para dejarla recta.
Después con un pequeño trozo de guata cortado en forma triangular rellene la pieza para darle un poco de volumen, y para culminar cerré la abertura con una puntada simple.
2) What follows is to make the small pine tree that would decorate the pot holder, and i made it with a small piece of green fabric, cut the fabric as if it were going to form a cone with it, and then I joined the ends and sewed them with a simple stitch on the reverse side of the fabric, I turned it over and cut the bottom to leave it straight.
Then with a small piece of wadding cut in a triangular shape I stuffed the piece to give it some volume, and to finish I closed the opening with a simple stitch.
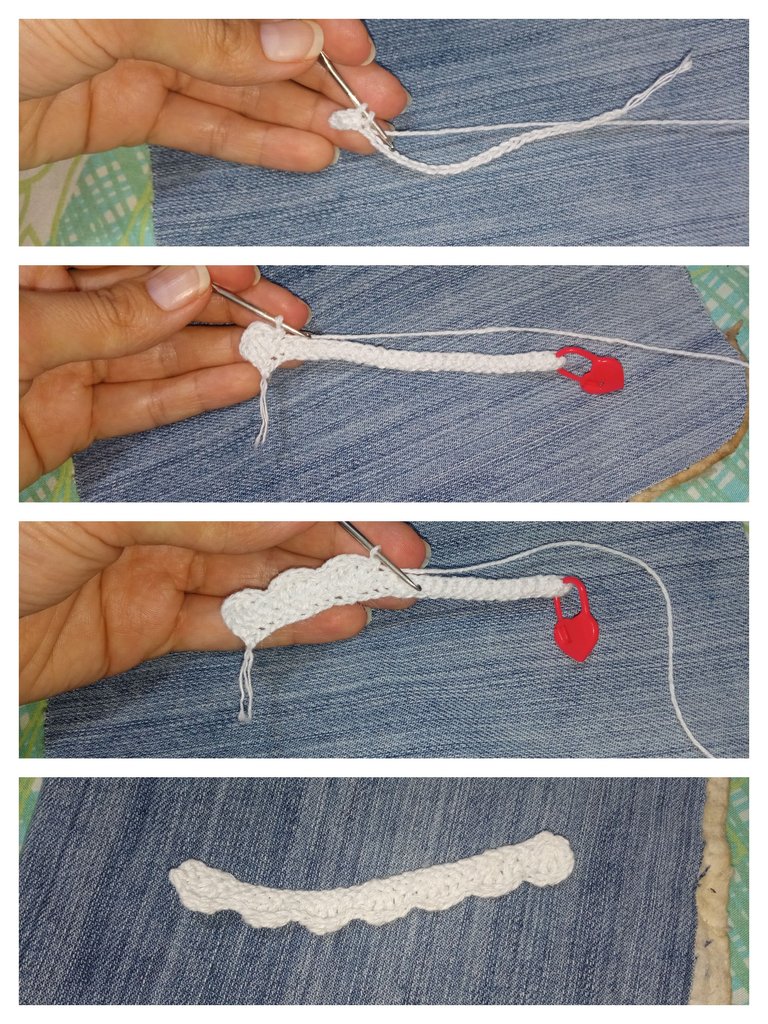
3) Ahora con el hilo de algodón blanco le hice un pequeño borde tejido al pino en la base para simular la nieve, lo que hice fue tejer una cadeneta que cubriera por completo la base del pino, en este caso fueron de 28 puntos cadena, la siguiente vuelta fue toda de puntos bajos, en total fueron 28 puntos bajos, y para finalizar en la última vuelta inicie tejiendo 1 punto cadena y continué realizando la siguiente secuencia (1 Pa, 2Pad, 1Pa, 1Pb) 7 veces.
3) Now with the white cotton yarn I made a small woven border to the pine tree at the base to simulate snow, what I did was to knit a chain stitch that completely covered the base of the pine tree, in this case there were 28 chain stitches, the next round was all single crochet, in total there were 28 single crochets, and to finish in the last round I started knitting 1 chain stitch and continued doing the following sequence (1Dc, 2Pad, 1Dc, 1Pa, 1Pb) 7 times.
4) Seguidamente procedí a pegar el arbolito a una de las piezas de yeans cociéndolo con una puntada invisible, para que el acabado sea lo más prolijo posible, y luego cosí al pie del arbolito el borde que tejí anteriormente que simula la nieve.
4) Then I proceeded to glue the tree to one of the pieces of yeans, sewing it with an invisible stitch, so that the finish is as neat as possible, and then I sewed to the foot of the tree the border that I knitted previously, which simulates snow.
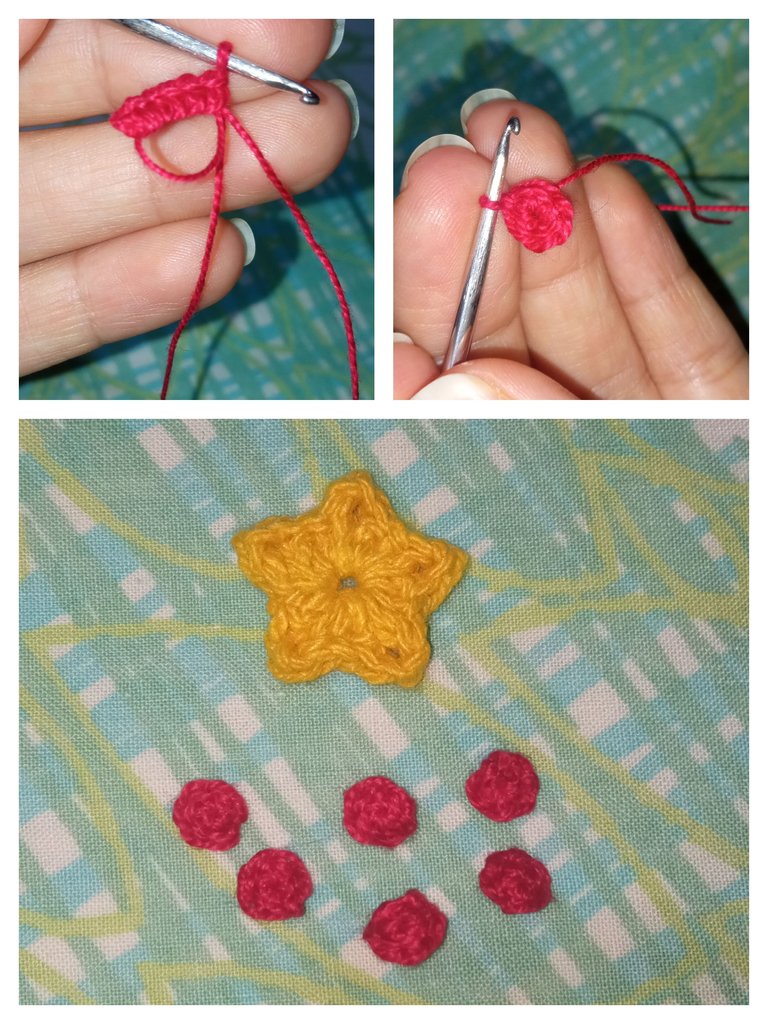
5) Para decorar el arbolito utilice una mini estrella tejida que tenía guardada y también tejí unas mini “esferas” rojas, las cuales son simplemente 6 puntos bajos tejidos dentro de un anillo mágico y cerrando la vuelta con 1 punto deslizado, en total realice 7 “esferas”. Todos los adornitos los pegue con costura.
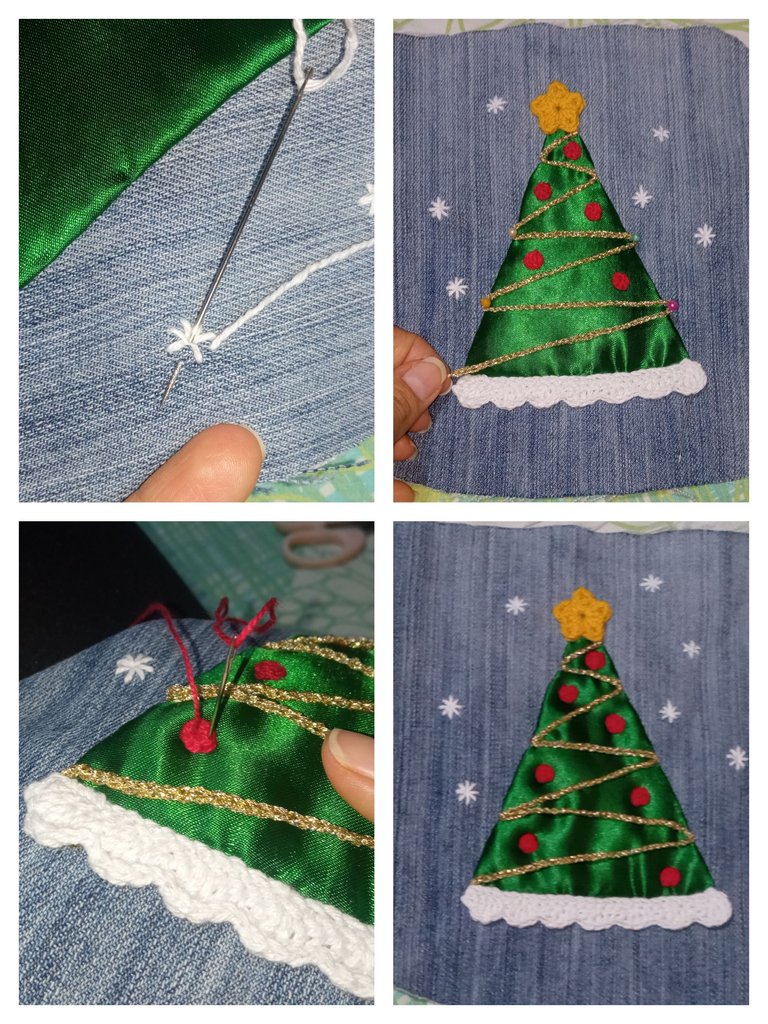
También tejí una cadeneta con hilo dorado lo suficientemente larga para que semejara ser una guirnalda para el arbolito, la verdad no conté cuantos puntos cadena realice jajaja… simplemente coloque alfileres en los puntos donde doblaría la mini guirnalda y a medida que tejía la cadeneta iba midiéndola en el pino. También borde unos pequeños copos de nieve con hilo de algodón blanco ubicados al azar en la tela de yeans.
5) To decorate the tree I used a mini knitted star that I had saved and I also knitted some red mini "spheres", which are simply 6 low stitches knitted inside a magic ring and closing the round with 1 slipped stitch, in total I made 7 "spheres". All the ornaments were attached with stitching.
I also knitted a chain stitch with golden thread long enough to look like a garland for the tree, I didn't really count how many chain stitches I made hahaha... I simply placed pins in the points where I would fold the mini garland and as I was knitting the chain stitch I was measuring it on the pine tree. I also embroidered some small snowflakes with white cotton yarn randomly placed on the yeans fabric.
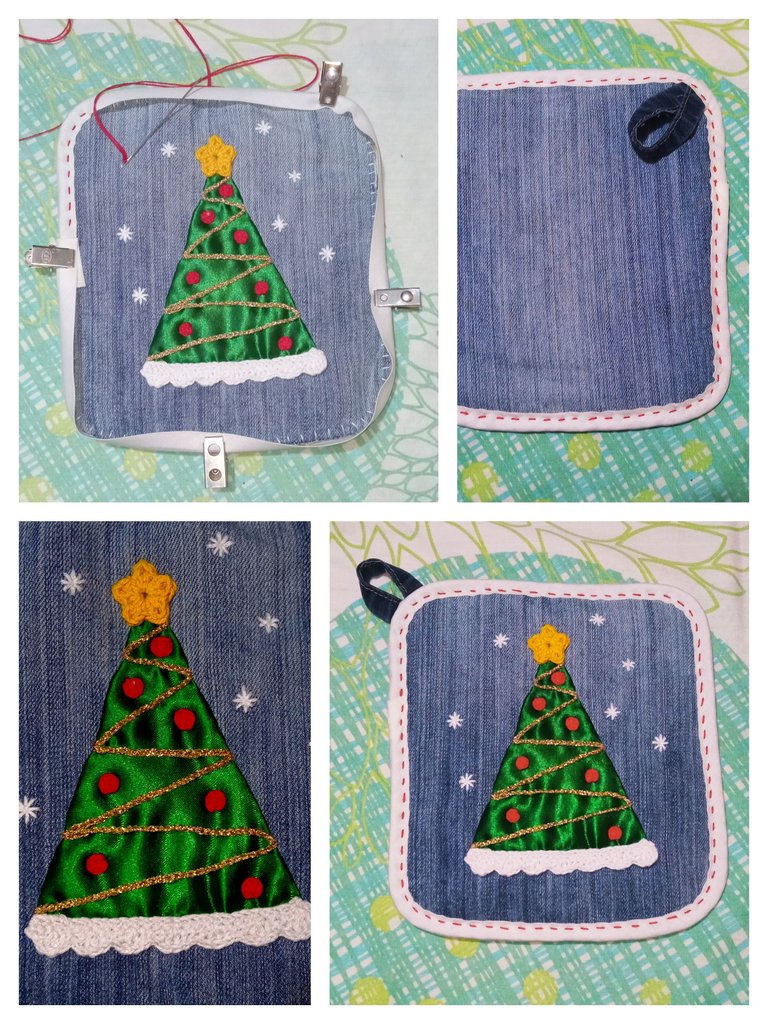
6) Ya para finalizar uní las 2 piezas de yeans con el relleno y le hice una puntada simple por todo el borde, y luego coloque el sesgo cosido con hilo crochet rojo y una aguja grande, este paso fue un poco lento de realizar ya que entre las dos capas de tela de yeans y el relleno del agarra ollas hacían una capa bastante gruesa y se hacía complicado pasar la aguja pero igual continué cosiendo y me encanto el resultado.
6) Finally I joined the 2 pieces of yeans with the stuffing and made a simple stitch around the edge, and then I placed the bias sewn with red crochet thread and a large needle, this step was a little slow to perform because between the two layers of yeans fabric and the filling of the pot holder made a fairly thick layer and it was complicated to pass the needle but I continued sewing and I loved the result.
Me gustaría contarles que mi mamá regreso de su viaje y eso me tiene muy contenta porque ya tenía 8 meses sin abrazarla ni compartir con ella, ella estaba visitando a mis hermanos ya que tenía casi 5 años sin verlos pues ellos emigraron a otros países, su retorno fue un poco inesperado y precipitado ya que regreso antes de la fecha planificada debido a que mi abuela enfermo repentinamente, pero gracias a Dios ya está mejor y mi mama regreso a nuestra casa hace 2 días y estuvo muy entusiasmada viéndome hacer el agarra ollas y me dio varias ideas de como decorarlo, y quedo enamorada del resultado, tanto que ahora dice que no quiere usarlo ni que lo usen porque lo pueden quemar jajaja….
I would like to tell you that my mom came back from her trip and that makes me very happy because I had already 8 months without hugging her or sharing with her, she was visiting my brothers since she had almost 5 years without seeing them because they emigrated to other countries, her return was a little unexpected and precipitated since she came back before the planned date because my grandmother suddenly got sick, but thank God she is better now and my mom came back to our house 2 days ago and she was very excited to see me making the pot holder and she gave me several ideas on how to decorate it, and she was in love with the result, but thank God she is better now and my mom came back to our house 2 days ago and she was very enthusiastic watching me making the pot holder and gave me several ideas on how to decorate it, and she was in love with the result, so much that now she says she doesn't want to use it or be used because they can burn it hahaha..... .
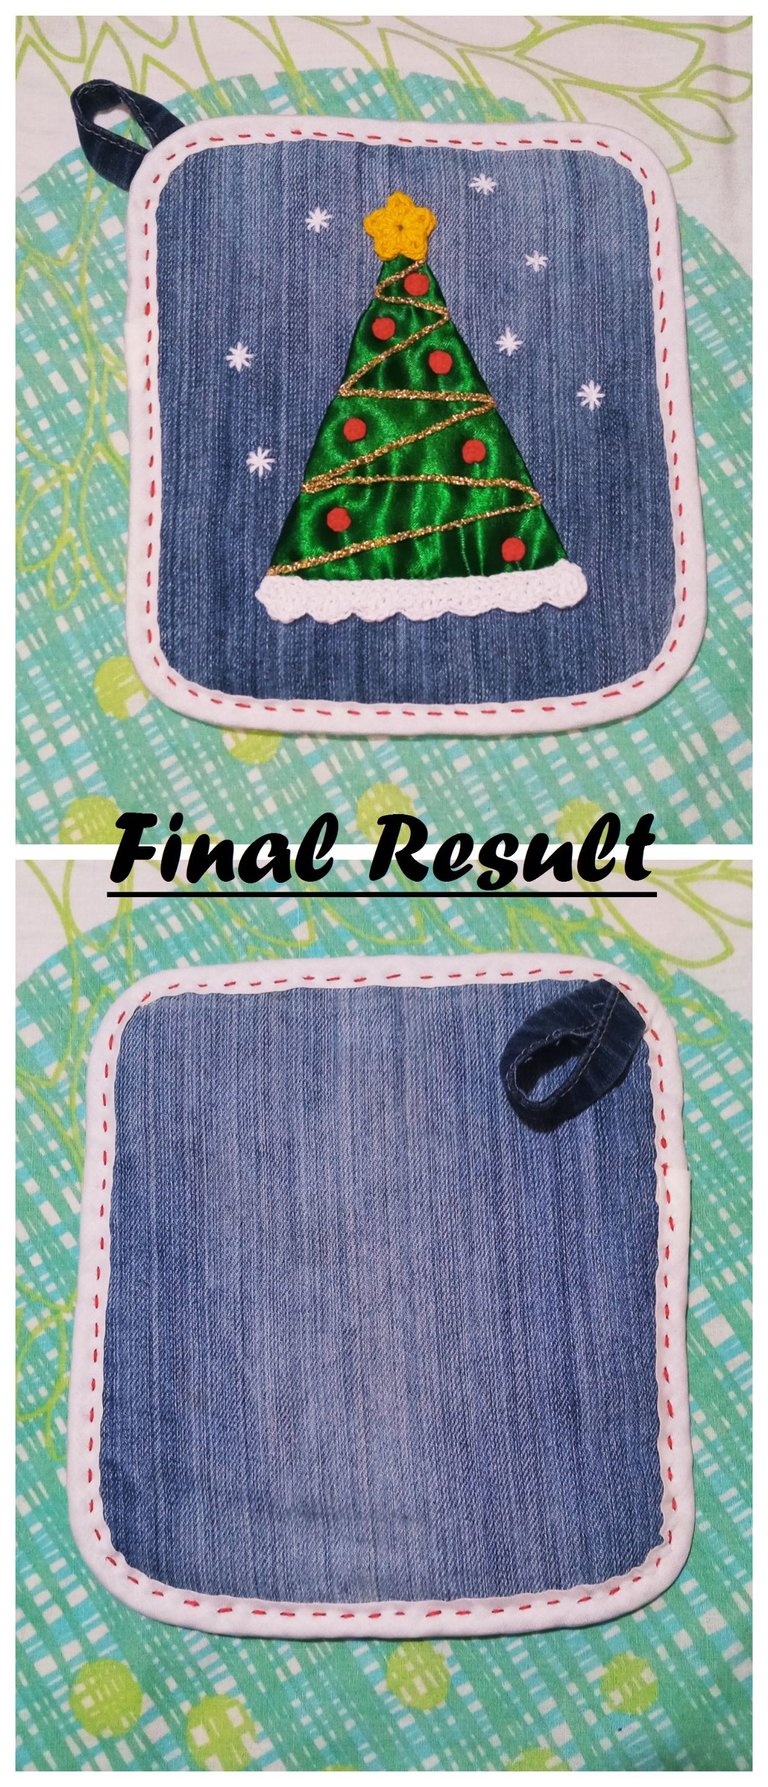
BUENO AMIGOS DESEO LES HAYA GUSTADO TANTO COMO A MÍ EL RESULTADO FINAL DE ESTE HERMOSO AGARRA OLLAS NAVIDEÑO, ESPERO SUS BONITOS COMENTARIOS Y/O VOTOS, ASÍ ME MOTIVAN PARA SEGUIR COMPARTIENDO MIS CREACIONES CON USTEDES, YO ESTARÉ FELIZ DE RESPONDER TODOS SUS COMENTARIOS SEAN FELICES Y QUE LA MUSA DE LA CREATIVIDAD NUNCA LOS ABANDONE!
¡GRACIAS POR VISITAR MI BLOG!
Se despide de ustedes con mucho cariño su amiga Nathalie @laranitacrochet
WELL FRIENDS I HOPE YOU LIKED AS MUCH AS I DID THE FINAL RESULT OF THIS BEAUTIFUL CHRISTMAS POT HOLDER, I HOPE YOUR NICE COMMENTS AND / OR VOTES, SO MOTIVATE ME TO CONTINUE SHARING MY CREATIONS WITH YOU, I WILL BE HAPPY TO ANSWER ALL YOUR COMMENTS BE HAPPY AND THAT THE MUSE OF CREATIVITY NEVER LEAVES YOU!
THANK YOU FOR VISITING MY BLOG!
Your friend Nathalie @laranitacrochet bids you a fond farewell.
*Todas las fotografías utilizadas en la publicación son propiedad de la autora.
*Las fotografías fueron tomadas y editadas con mi REDMI 9 y con la App FotoRoom.
*La traducción la hice en https://www.deepl.com/es/translator
*All photographs used in this publication are property of the author.
*The pictures were taken and edited with my REDMI 9 and the FotoRoom App.
*The translation was done at https://www.deepl.com/es/translator
Que bonito 😊✨
Gracias 😊🤗
Muy linda la agarradera. Están muy buenas para sujetar la bandeja de hornear galletas.
😁🤗 Muchas gracias!!! Y si son excelentes para sujetar las bandejas al sacarlas del horno, la tela de yeans es excelente porque porque aporta más resistencia al calor que las telas que normalmente tienen las agarraderas.
Wow..really nice work..how incredible and beautiful. I like the way how you make star.. Christmas cap was look nice. Nice decoration.. Thank you to share with us.
Thank you very much really! 😁🤗🎄 MERRY CHRISTMAS!
Congratulations, your post has been upvoted by @dsc-r2cornell, which is the curating account for @R2cornell's Discord Community.
Enhorabuena, su "post" ha sido "up-voted" por @dsc-r2cornell, que es la "cuenta curating" de la Comunidad de la Discordia de @R2cornell.
Thanks for the support! 🤗🎄
WOW! Nice work , your so creative and it looks so beautiful.
Thank you very much! 😁🤗🎄 MERRY CHRISTMAS! 🎄