(ESP/ENG) COLGANTE NAVIDEÑO PARA PUERTAS TEJIDO A CROCHET (HO-HO-HO) /CROCHETED CHRISTMAS DOOR HANGER (HO-HO-HO)
¡Hola, hola! Hivers y linda comunidad de DIYHub, espero todos se encuentren súper bien, animados e inspirados 💟
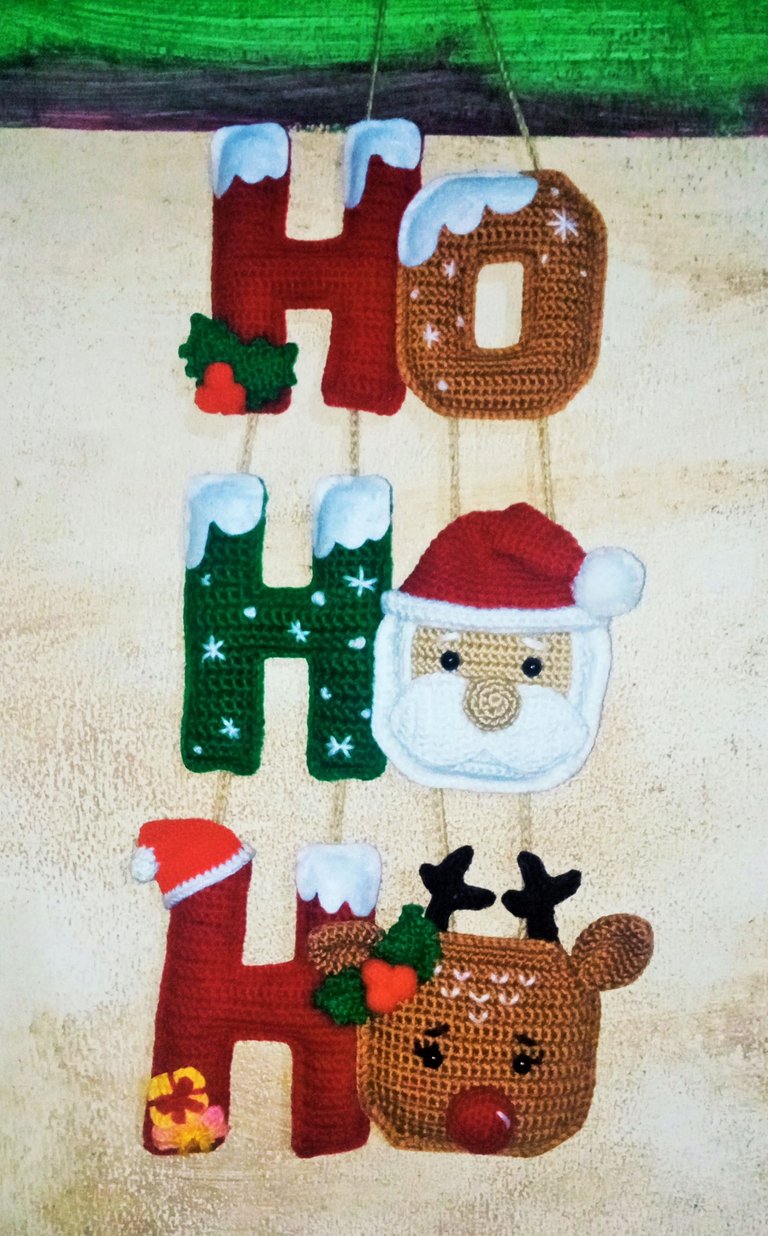
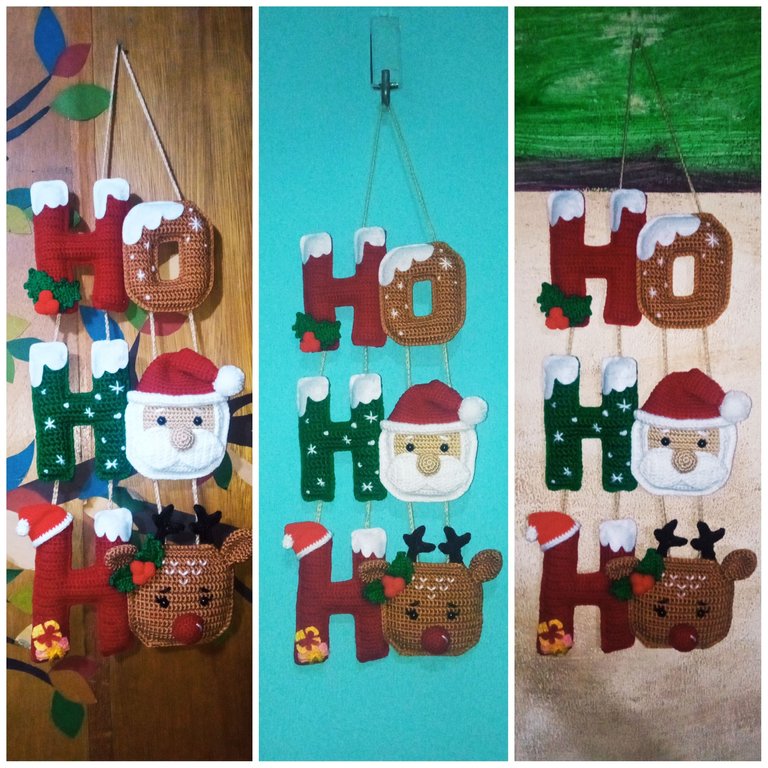
Hoy quiero mostrarles como realice un HERMOSISIMO COLGANTE NAVIDEÑO PARA PUERTAS TEJIDO A CROCHET, y me gustaría presentarlo como mi CUARTA ENTRADA AL CONCURSO DE NAVIDAD de esta encantadora comunidad 🎅DIY Christmas is Here! 🎁
Hello, hello! Hivers and cute DIYHub community, I hope you all are super well, encouraged and inspired 💟.
Today I want to show you how I made a BEAUTIFULLY CROCHETTED CHRISTMAS DOOR HANGING, and I would like to submit it as my FOURTH ENTRY TO THE CHRISTMAS CONTEST of this lovely community 🎅DIY Christmas is Here! 🎁.
Este adorno me lo mostro mi mama y me gustó tanto que quise realizarlo, así que es un regalo para mi mama ya que a ella le encanto.
Este proyecto lo inicie el 25 de noviembre, pero lo pospuse varias veces debido a los quehaceres del hogar, también por hacer otros proyectos y por motivos de salud, ya que tenía torticolis y no podía pasar mucho tiempo tejiendo, pero justo hoy lo termine.
Este adorno fue todo un reto ya que no tenía un patrón para tejerlo, así que la gran parte del trabajo fue muy lenta ya que tenía que ir tejiendo y destejiendo varias veces hasta dar con la forma exacta de lo que tenía que tejer, y al mismo tiempo fui haciendo el patrón, y hoy se los presentaré.
Bueno amigos a continuación los dejo con los materiales que use y también con el paso a paso de cómo lo realicé.
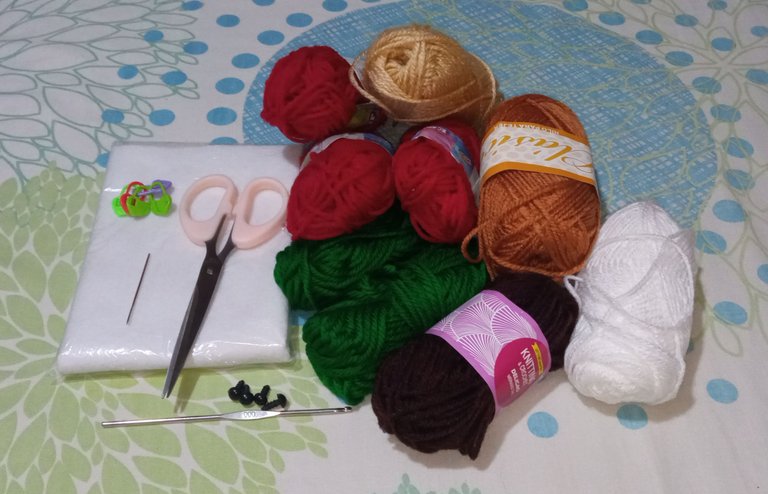
🎁 🎄 MATERIALES 🎄 🎁
- Estambres o lanas color blanco, caramelo, verde, piel, marrón y rojo.
- Hilo crochet rojo.
- Aguja de crochet #1 y 000.
- Guata para rellenar.
- Fieltro blanco.
- 2 pares de ojos de seguridad de 8mm.
- Marcadores de puntos.
- Aguja lanera.
- Alfileres y tijera.
This ornament was shown to me by my mom and I liked it so much that I wanted to make it, so it is a gift for my mom because she loved it.
I started this project on November 25, but I postponed it several times due to household chores, also to do other projects and for health reasons, as I had torticollis and could not spend much time knitting, but just today I finished it.
This ornament was quite a challenge since I didn't have a pattern to knit it, so most of the work was very slow since I had to knit and unknit several times until I found the exact shape of what I had to knit, and at the same time I was making the pattern, and today I will present it to you.
Well friends below I leave you with the materials I used and also with the step by step of how I made it.
🎁 🎄 MATERIALS 🎄 🎁 🎁
- Stamens or wool colored white, caramel, green, skin, brown and red.
- Red crochet thread.
- Crochet needle #1 and 000.
- Wadding for stuffing.
- White felt.
- 2 pairs of 8mm. safety eyes.
- Stitch markers.
- Wool needle.
- Pins and scissors.
🎁 🎄 ABREVIATURAS DE LOS PUNTOS A UTILIZAR 🎄 🎁
- Am: anillo mágico.
- Pd: punto deslizado.
- Pb: punto bajo.
- Cad: cadeneta.
- Pa: punto alto.
- Pma: punto medio alto.
- Aum. : aumento.
- Dism. : disminución.
🎁 🎄 PASO A PASO 🎄 🎁
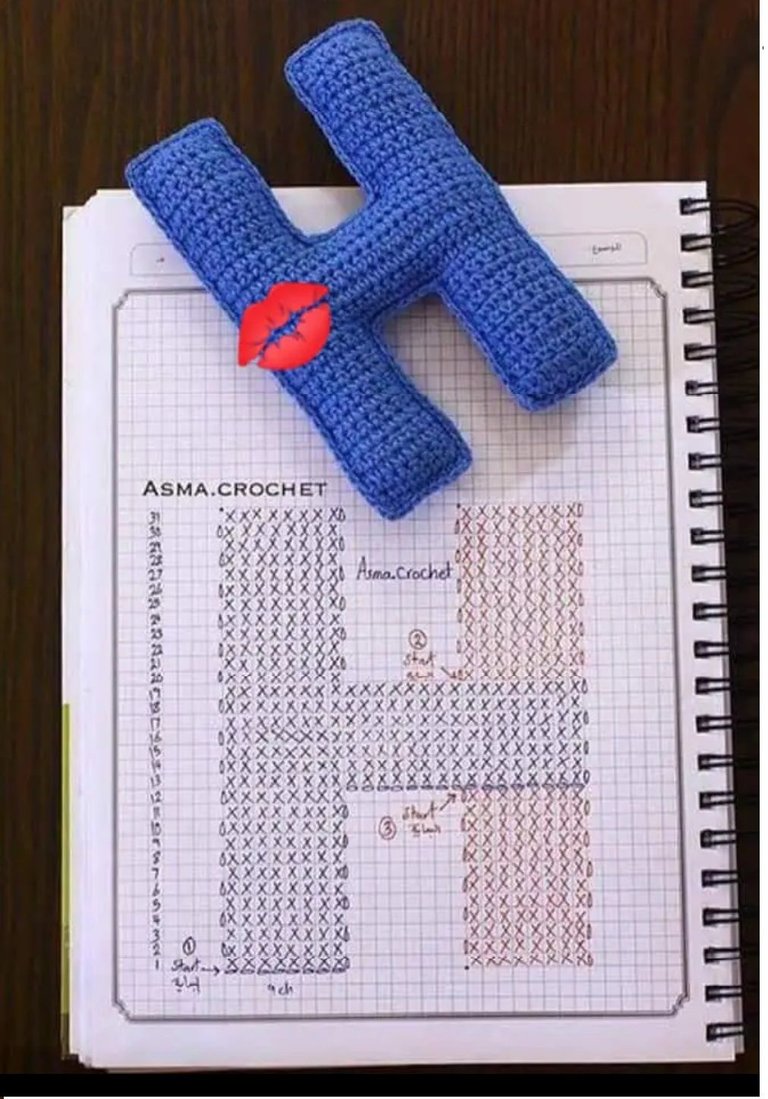
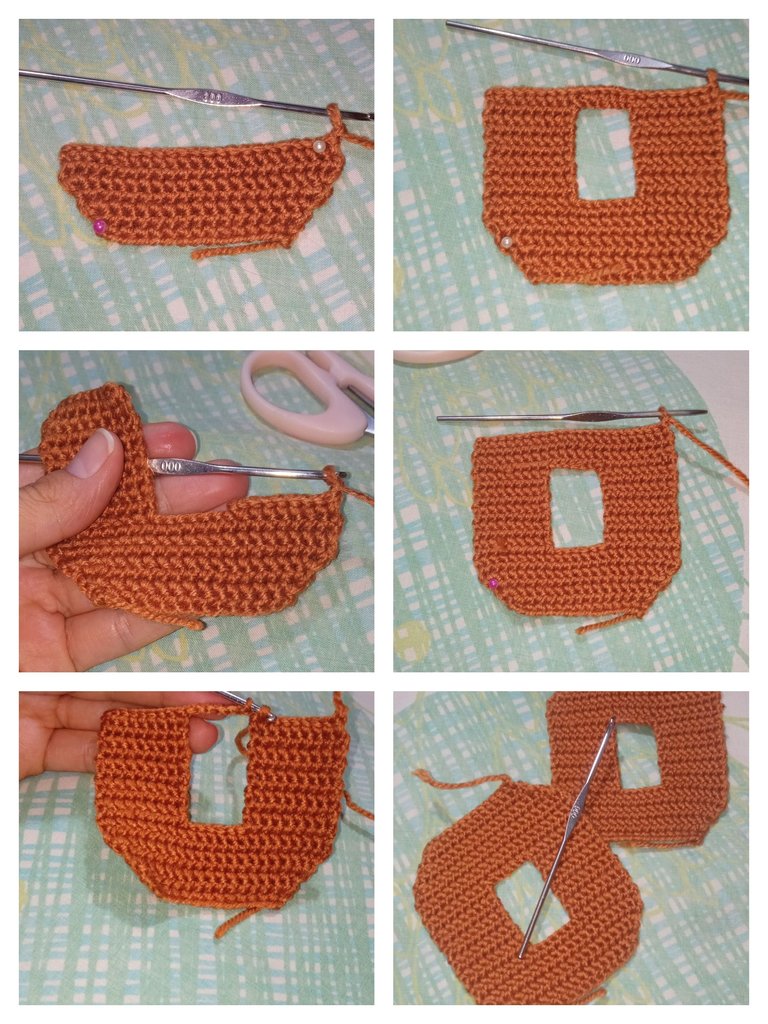
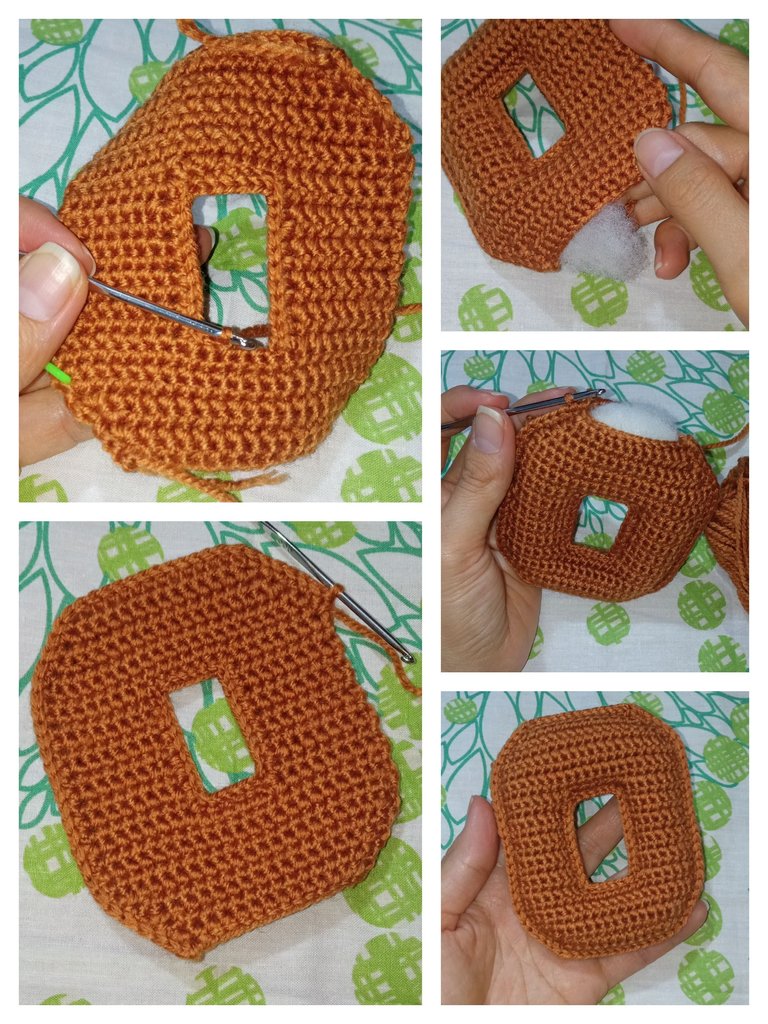
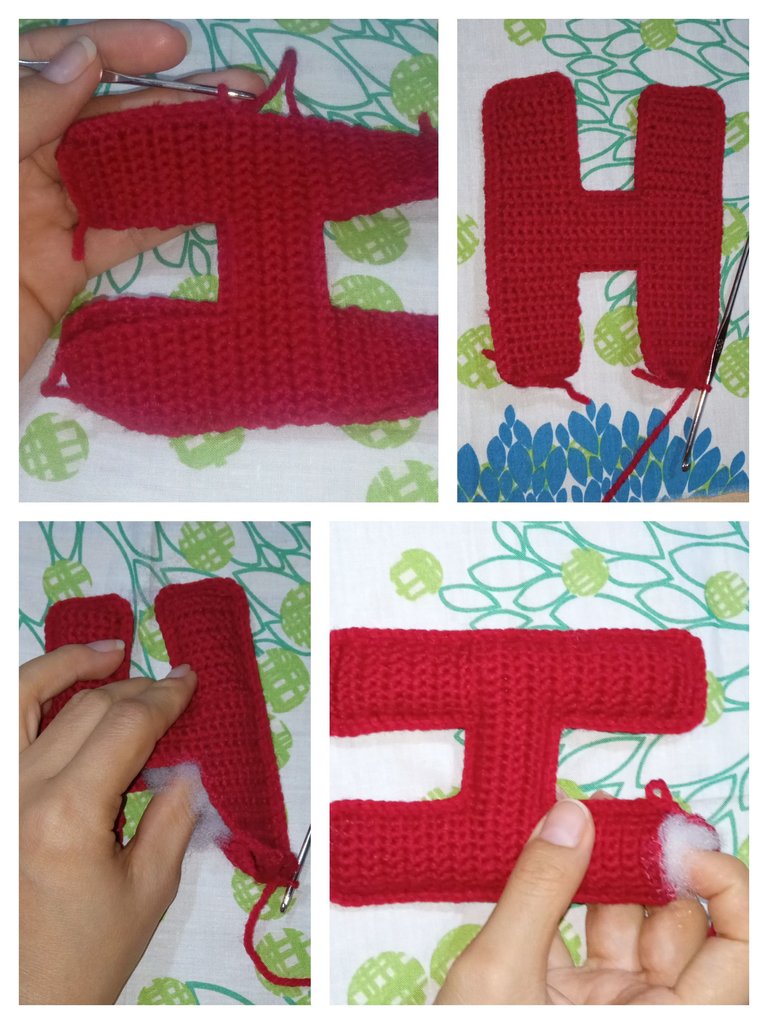
1) Lo principal para realizar el adorno es tejer las letras para hacer el HO-HO-HO y lo hice utilizando un diagrama de la letra “H” que tenía desde hace mucho tiempo en mi pc, el diagrama de la letra “O” lo hice yo guiándome de otro, lo que le modifique fue la parte de arriba de la letra que la hice un poco más ancha. En total son 2 piezas para 1 la letra “O” y 6 piezas para hacer 3 letras “H”. una vez listas todas las piezas se unen juntando dos piezas y bordeándolas con puntos bajos, y se van rellenando a medida que se unen.
🎁 🎄 ABBREVIATIONS OF THE POINTS TO BE USED 🎄 🎁
- MR: magic ring.
- ss: slipped stitch.
- sc: single crochet.
- Ch: chain stitch.
- dc: double crochet.
- Hdc: half double crochet.
- Inc : increase.
- dec : decrease.
🎁 🎄 STEP BY STEP 🎄 🎁
1) The main thing to make the ornament is to weave the letters to make the HO-HO-HO and I did it using a diagram of the letter "H" that I had for a long time in my pc, the diagram of the letter "O" I did it guiding me from another one, what I modified was the top of the letter that I made it a little wider. In total there are 2 pieces for 1 letter "O" and 6 pieces to make 3 letters "H". Once all the pieces are ready, join them by joining two pieces and bordering them with low stitches, and fill them as they are joined.
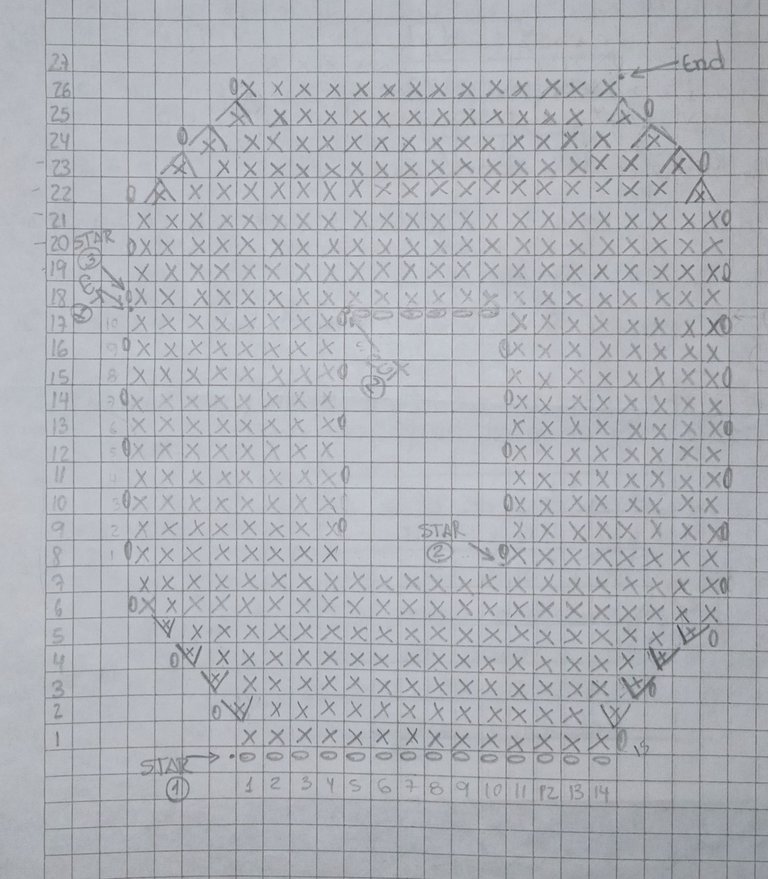
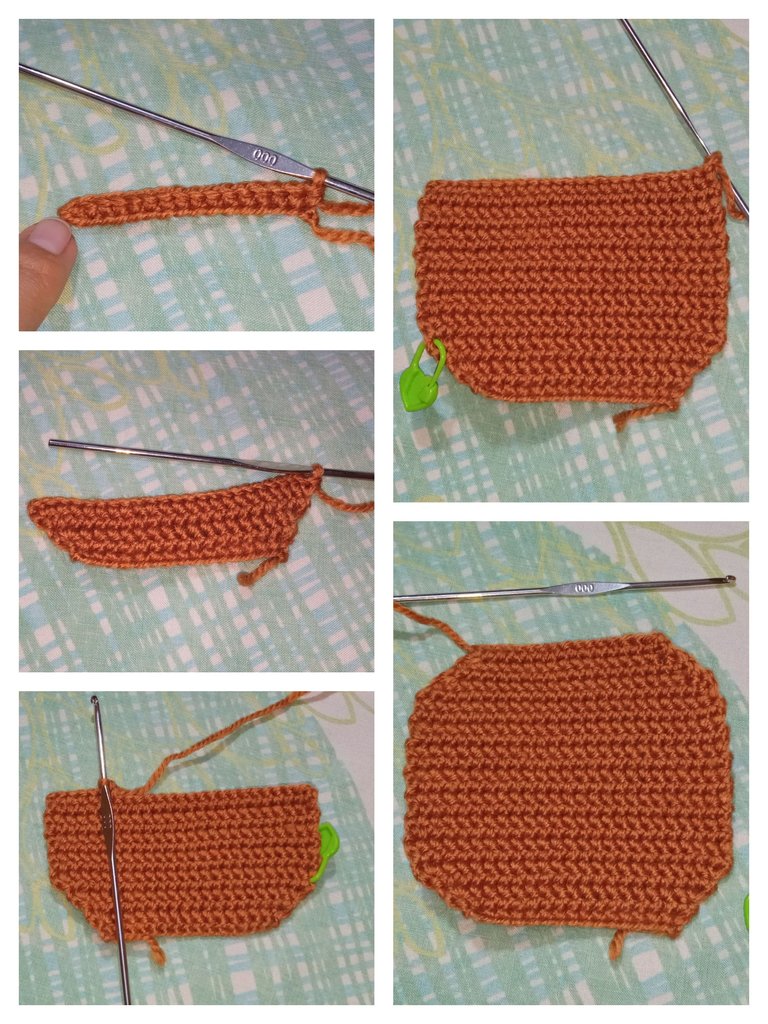
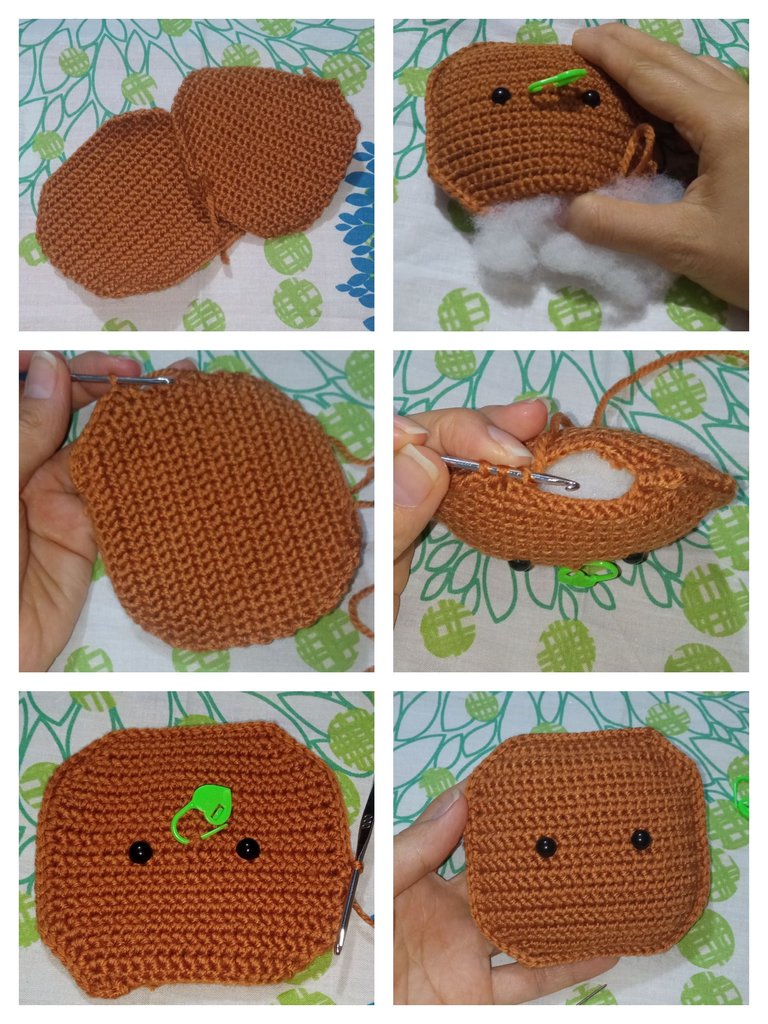
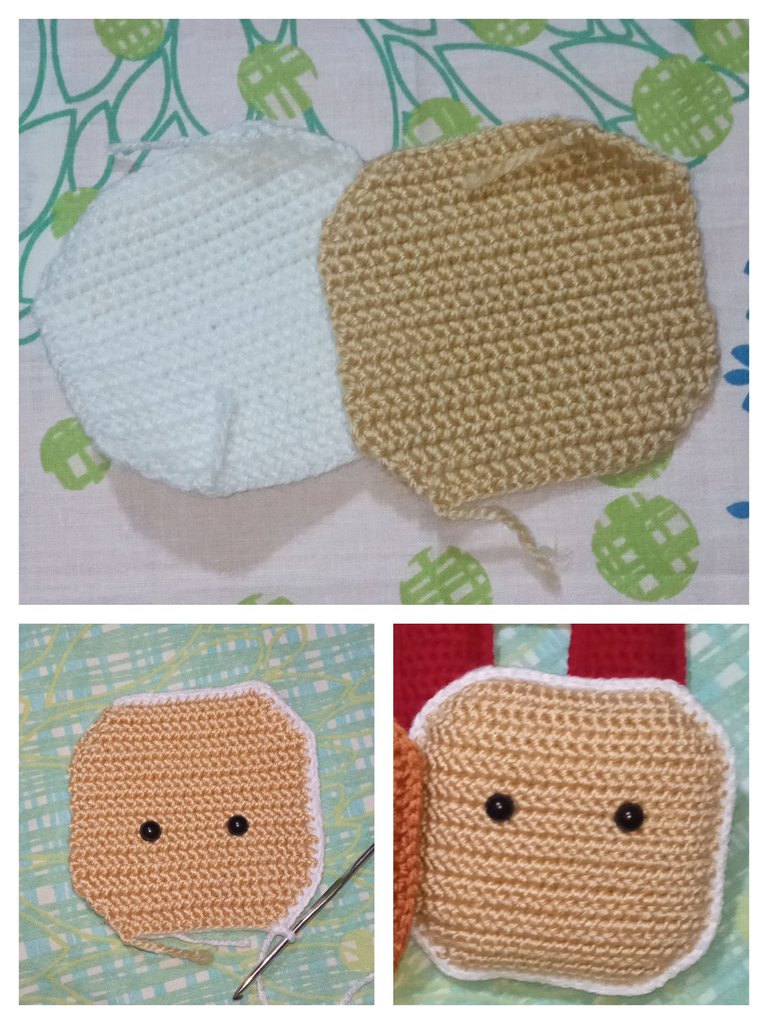
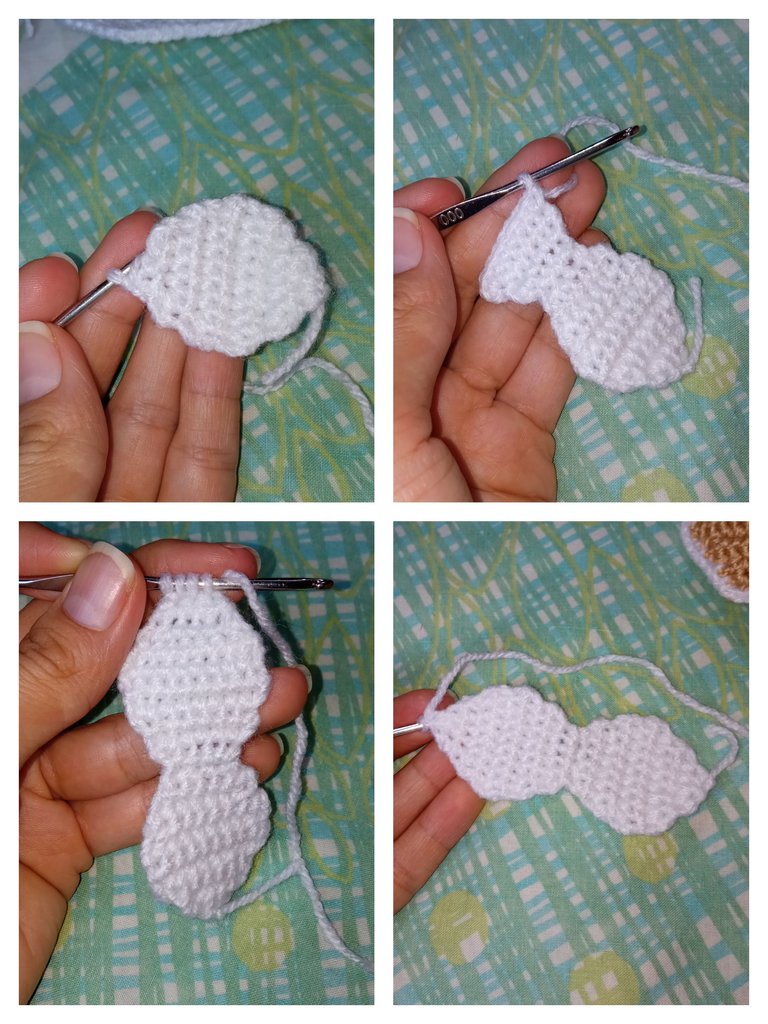
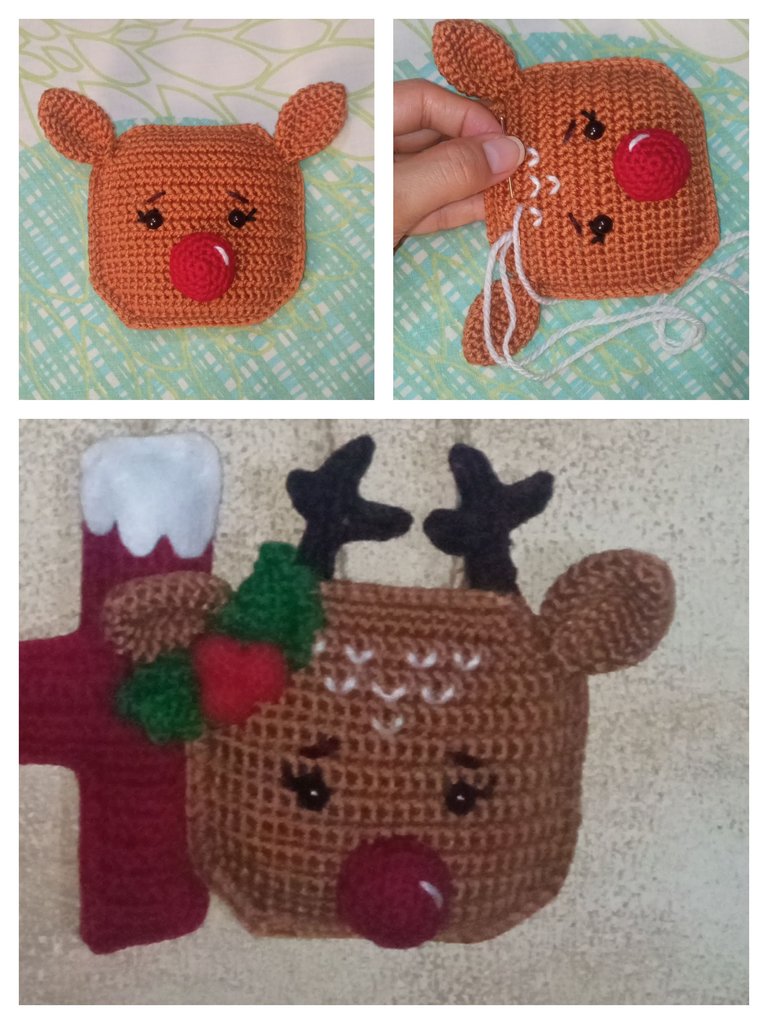
Luego realice las piezas correspondientes a la cara del reno y del Santa Claus. Y lo que hice fue guiarme con el diagrama de la letra “O” pero sin hacer el agujero de la letra, las piezas son simplemente unos cuadrados con las esquinas redondeadas. Para el reno use estambre color caramelo en ambas piezas y para el Santa Claus hice una pieza en color piel y otra en blanco.
Colocar los ojos del reno en la v12 con 8 puntos de separación, y los del Santa Claus en la vuelta 14 también con 8 puntos de separación. Igual que con las letras una vez listas todas las piezas se unen bordeándolas con puntos bajos, y se rellenan luego de colocar los ojos.
Igual les dejo la descripción del tejido para que se entienda mejor:
V1: tejer una base de 16 cad + 1 cad de altura, y 16Pb.
V2-5: hacer un aumento en el punto inicial y final de cada vuelta, y el resto de los puntos serán Pb sobre cada punto de la vuelta anterior.
V6-19: tejer 1Pb sobre cada punto de la vuelta anterior.
V20-23: hacer una disminución en el punto inicial y final de cada vuelta, y el resto de los puntos serán Pb sobre cada punto de la vuelta anterior.
V24: tejer punto sobre punto, deben ser 16Pb, finalizar la vuelta con 1cad, cortar y asegurar la hebra.
Then I made the pieces corresponding to the face of the reindeer and Santa Claus. And what I did was to follow the diagram of the letter "O" but without making the hole of the letter, the pieces are simply squares with rounded corners. For the reindeer I used caramel colored stamen in both pieces and for the Santa Claus I made one piece in skin color and the other in white.
Place the reindeer's eyes on R12 with 8 stitches apart, and the Santa's eyes on round 14 also with 8 stitches apart. As with the letters, once all the pieces are ready, join them together with low stitches, and fill them in after placing the eyes.
I leave you the description of the knitting for a better understanding:
R1: knit a base of 16 ch + 1 ch height, and 16sc.
R2-5: make an increase in the beginning and end stitch of each row, and the rest of the stitches will be sc over each stitch of the previous row.
R6-19: knit 1sc over each stitch of the previous row.
R20-23: make a decrease in the beginning and end stitch of each row, and the rest of the stitches will be sc over each stitch of the previous row.
R24: knit stitch over stitch, there should be 16sc, end the row with 1ch, cut and secure the yarn.
2) Ahora procedemos a tejer los adornitos y las piezas de la cara del reno y la del Santa Claus.
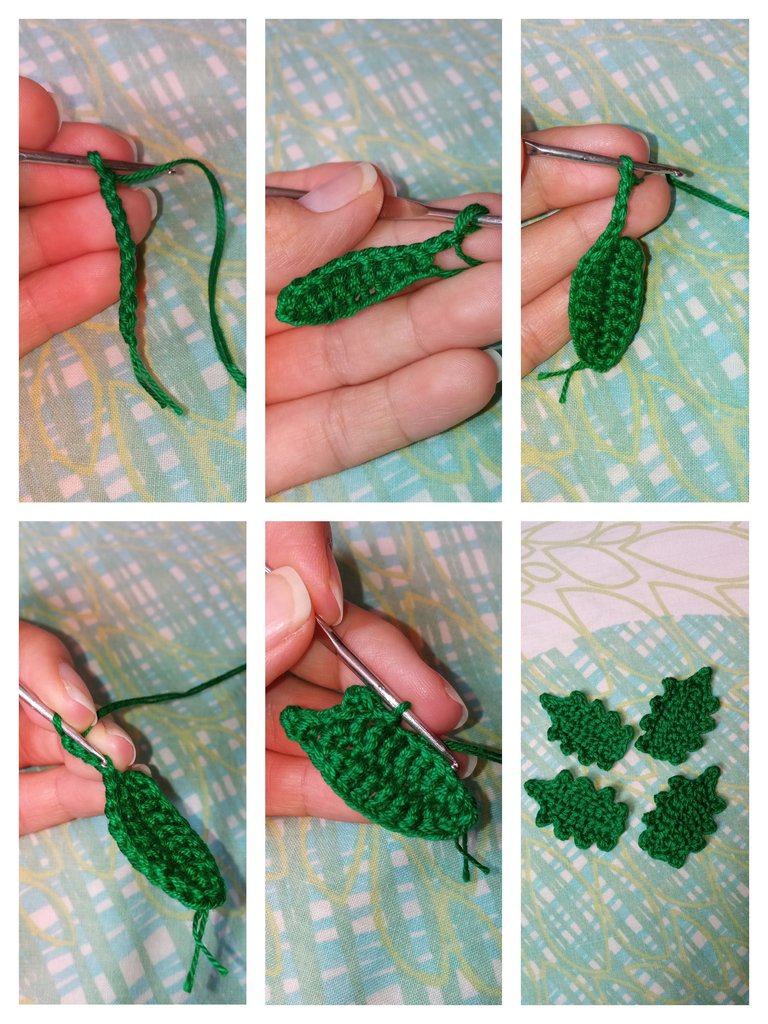
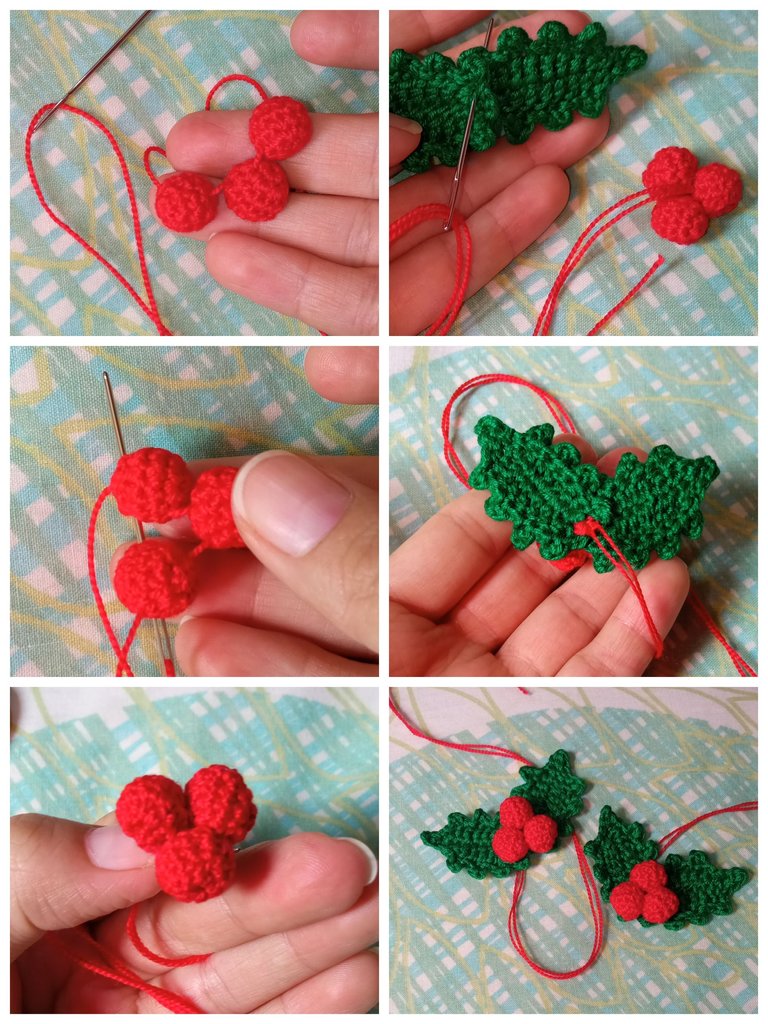
🎄 Hojas de acebo y sus frutos 🎄
Hojas: (tejer en espiral)
V1: cadena base de 10 puntos, en el segundo punto desde el ganchillo tejer 1Pb, en el siguiente punto tejemos 1Pma, en los siguientes 5 puntos hacemos 1Pa en cada uno, luego tejemos 1Pma, y en la última cadena 1Pb, hacemos 2cad. Y repetimos la secuencia el otro lado de la cadeneta.
V2: hacer 4 cad y en la cuarta desde el gachillo tejemos 1Pb,y ahora tejemos 1punto deslizado en los siguientes 2 puntos, que son los 2 primeros puntos de la V1, luego tejemos 2 cad y en la segunda desde el ganchillo tejemos 1Pb y en los siguientes dos puntos hacemos 1Pd en cada uno, en total haremos 4 veces la secuencia de (2Pd, 2cad, 1Pb).
2) Now we proceed to weave the little ornaments and the pieces of the reindeer's face and Santa's face.
🎄 Holly leaves and their fruits 🎄.
Leaves: (spiral knit).
R1: base chain of 10 stitches, in the second stitch from the crochet knit 1sc, in the next stitch we knit 1hdc, in the next 5 stitches we knit 1dc in each stitch, then we knit 1hdc, and in the last chain 1sc, we knit 2ch And repeat the sequence on the other side of the chain.
R2: make 4 ch and in the fourth ch from the crochet hook knit 1sc, and now knit 1sc in the next 2 stitches, which are the first 2 stitches of R1, then knit 2 ch and in the second ch from the crochet hook knit 1sc and in the next two stitches knit 1ss in each one, in total we make 4 times the sequence of (2sc, 2ch, 1sc).
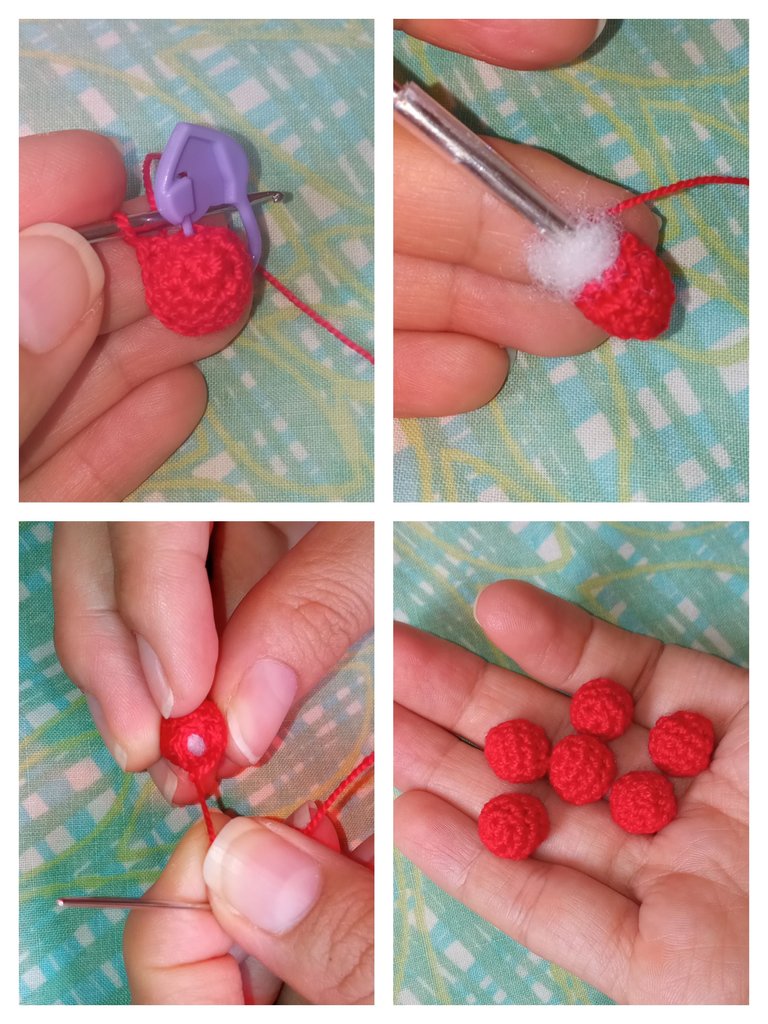
Frutos: tejer 6 espferas de 9Pb de diámetro.
**V1: ** Am, 6Pb. (6)
**V2: ** 1Pb, Aum. (9)
**V3-4: ** 9Pb (9)
**V5: ** 1Pb, Dism. (6) cerrar con Am invertido.
Fruits: weave 6 spheres of 9sc diameter.
**R1: ** MR, 6sc. (6)
**R2: ** 1sc, inc. (9)
**R3-4: ** 9sc (9)
**R5: ** 1sc, dec. (6) close with inverted MR.
🎄 Gorro para letra “H” 🎄 (el hilo rojo es hilo crochet de 1mm y todo lo tejí con aguja #1)
V1: iniciar con blanco, Am, 6 Pb. (6)
V2: 6 Aum. (12)
V3: 6 Dism. (6)
V4: cambio a rojo, 6 Aum. (12)
V5: 12 Pb (12)
V6: 1 Pb, Aum. (18)
V7-10: 18 Pb (18)
V11: 2 Pb, Aum. (24)
V12: 24 Pb (24)
V13: 3 Pb, Aum. (30)
V14-20: 30 Pb (30)
V21: cambiar a blanco, 30 Pma (30) cerrar con 1 Pd, cortar y ocultar la hebra.
🎄 Hat for letter "H" 🎄 (the red yarn is 1mm crochet thread and I knit everything with #1 needle).
R1: start with white, MR, 6 Sc (6).
R2: 6 Increments (12)
R3: 6 Dec. (6)
R4: switch to red, 6 inc. (12)
V5: 12 Sc (12)
V6: 1 Sc, inc. (18)
V7-10: 18 Sc (18)
V11: 2 Sc, inc. (24)
V12: 24 Sc (24)
V13: 3 Sc, inc. (30)
V14-20: 30 Sc (30)
V21: change to white, 30 Hdc (30) close with 1 ss, cut and hide the strand.
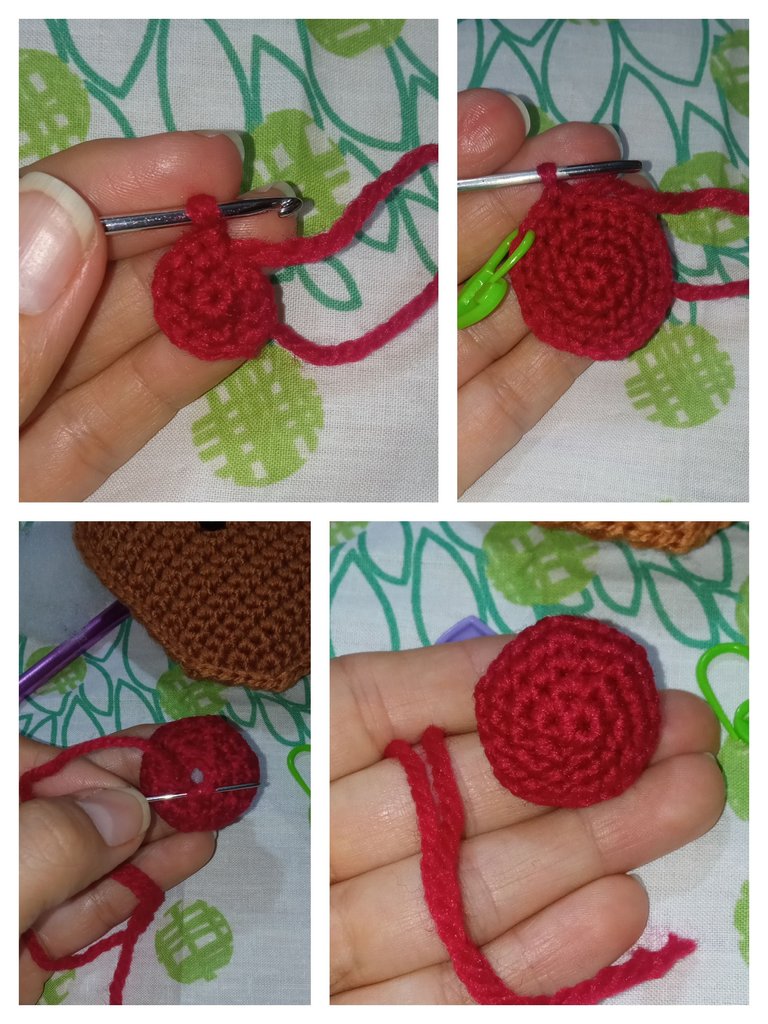
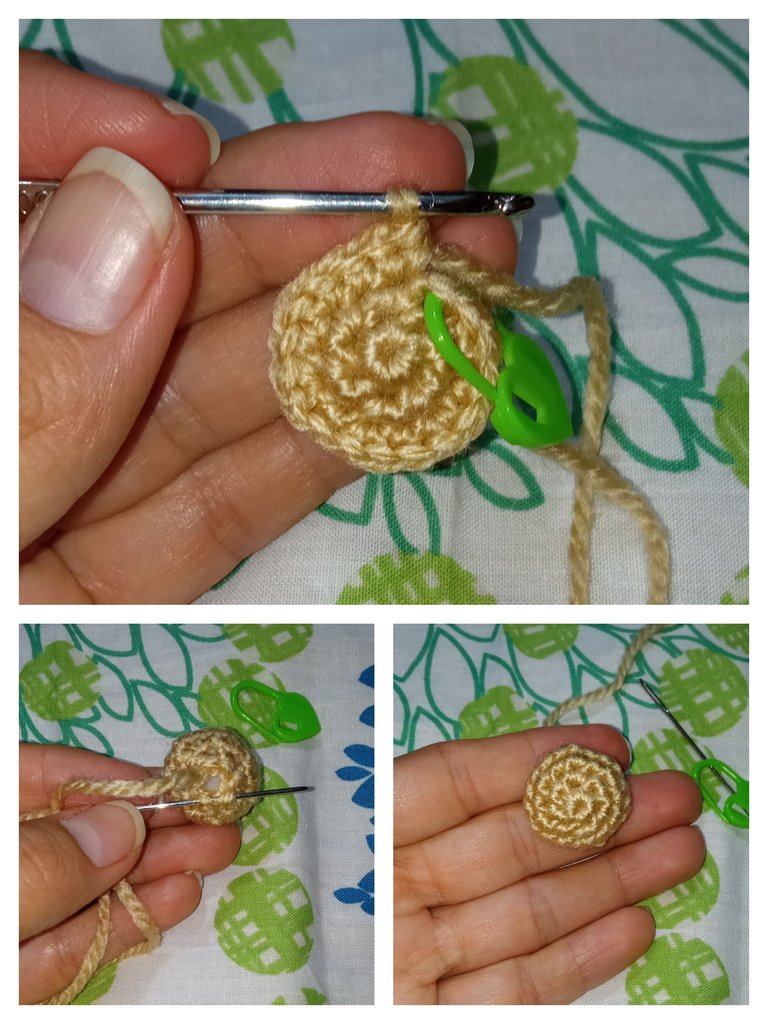
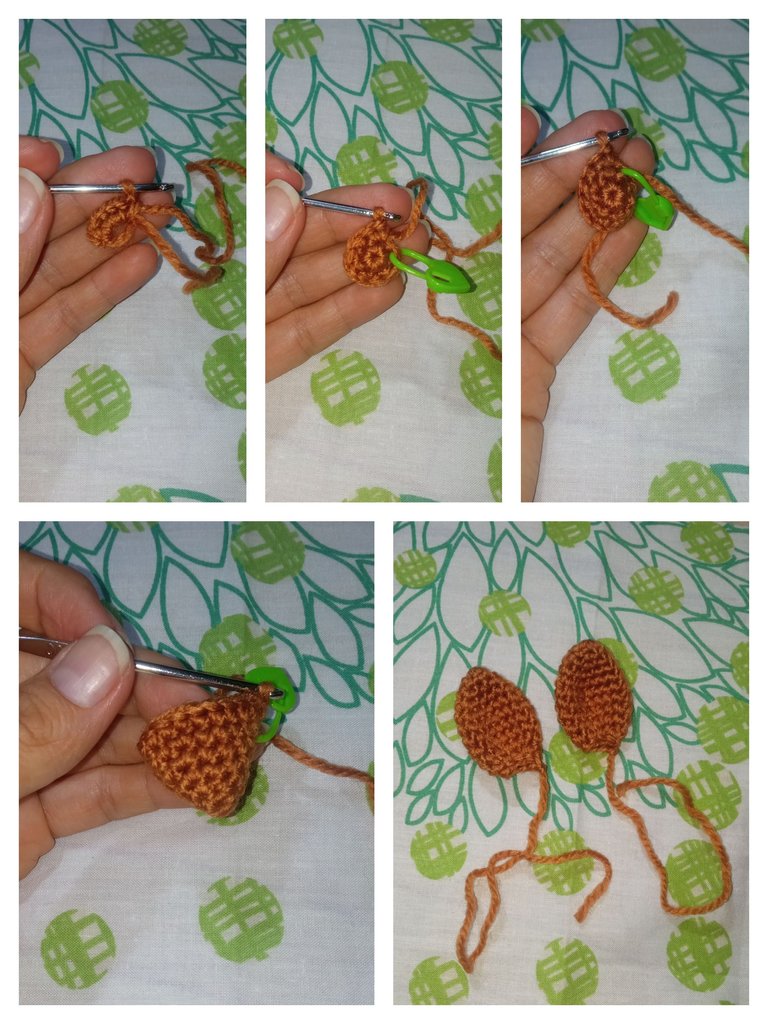
🎄 Nariz del reno y de Santa Claus 🎄
Para el reno haremos una esfera de 24 Pb de diámetro, y para el Santa Claus será de 18Pb de diámetro.
V1: Am, 6 Pb. (6)
V2: 6 Aum. (12)
V3: 1 Pb, Aum. (18)
V4: 2 Pb, Aum. (24) (omitir para el santa)
V5: 24 Pb (24) (para el santa hacer 18Pb)
V6: 2 Pb, Dism. (18) (omitir para el santa)
V7: 2 Pb, Dism. (18) (omitir para el santa)
V8: 1 Pb, Dism. (12)
V9:* 6 Dism (6), cerrar con Am invertido.
🎄 Nose of the reindeer and Santa Claus 🎄.
For the reindeer we will make a sphere 24 sc in diameter, and for Santa Claus it will be 18sc in diameter.
V1: MR, 6 Sc. (6)
V2: 6 inc. (12)
V3: 1 Sc, inc. (18)
V4: 2 Sc, inc. (24) (omit for the santa)
V5: 24 sc (24) (for the santa make 18Pb)
V6: 2 sc, Dec. (18) (omit for santa)
V7: 2 sc, Dec. (18) (omit for santa)
V8: 1 sc, Dec. (12)
V9:* 6 Dec. (6), close with MR inverted.
🎄 Orejas y cuernos del reno 🎄
Orejas (x2):
V1: Am, 6 Pb. (6)
V2: 1 Pb, Aum. (9)
V3: 2 Pb, Aum. (12)
V4: 3 Pb, Aum. (15)
V5: 4 Pb, Aum. (18)
V6-7: 18 Pb (18)
V8: 4 Pb, Dism. (15)
V9: 3Pb, Dism. (12)
V10: 1 Pb, Dism. (9), cortar la hebra dejando unos 15cm para unir la pieza.
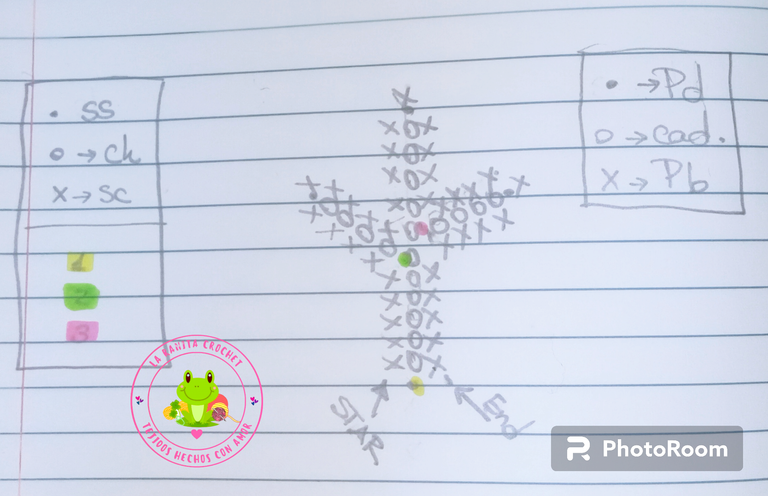
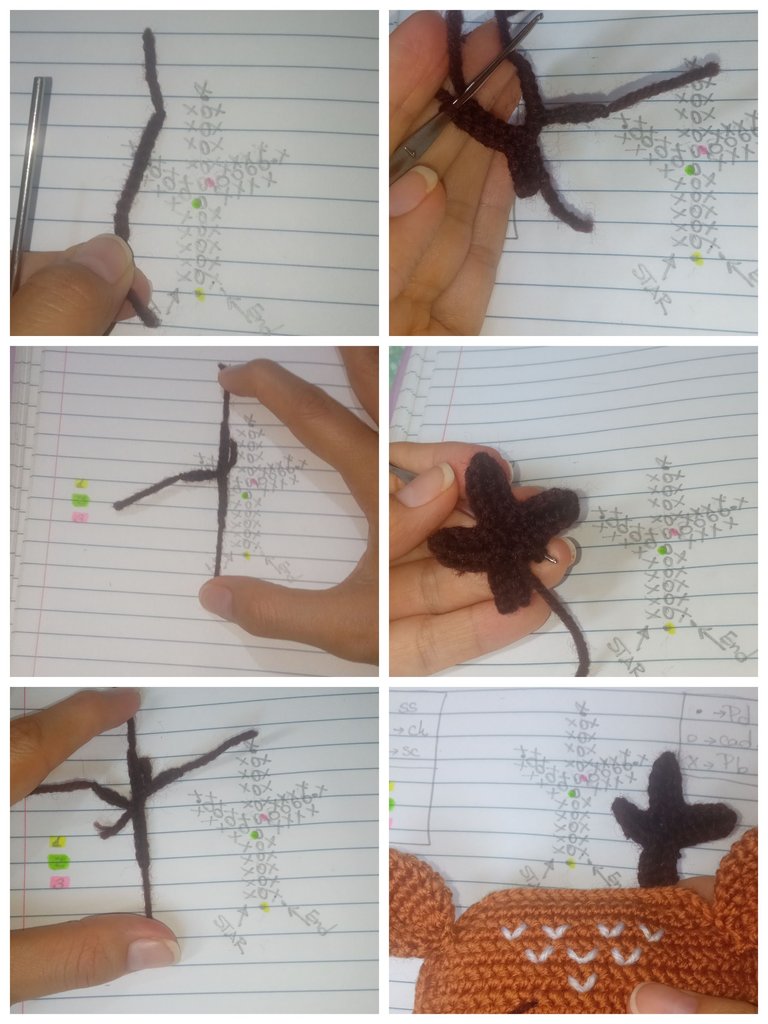
Cuernos (x2): para tejerlos seguí el siguiente diagrama, el cual realice yo misma.
🎄 Reindeer ears and antlers 🎄.
Ears (x2):
R1: MR, 6 Sc. (6)
R2: 1 sc, inc. (9)
R3: 2 Sc, inc. (12)
R4: 3 Sc, inc. (15)
R5: 4Sc, inc. (18)
R6-7: 18 Sc (18)
R8: 4 Sc, Dec. (15)
R9: 3sc, Dec. (12)
R10: 1 sc, Dec. (9), cut the strand leaving about 15cm to join the piece.
Horns (x2): to knit them I followed the following diagram, which I made myself.
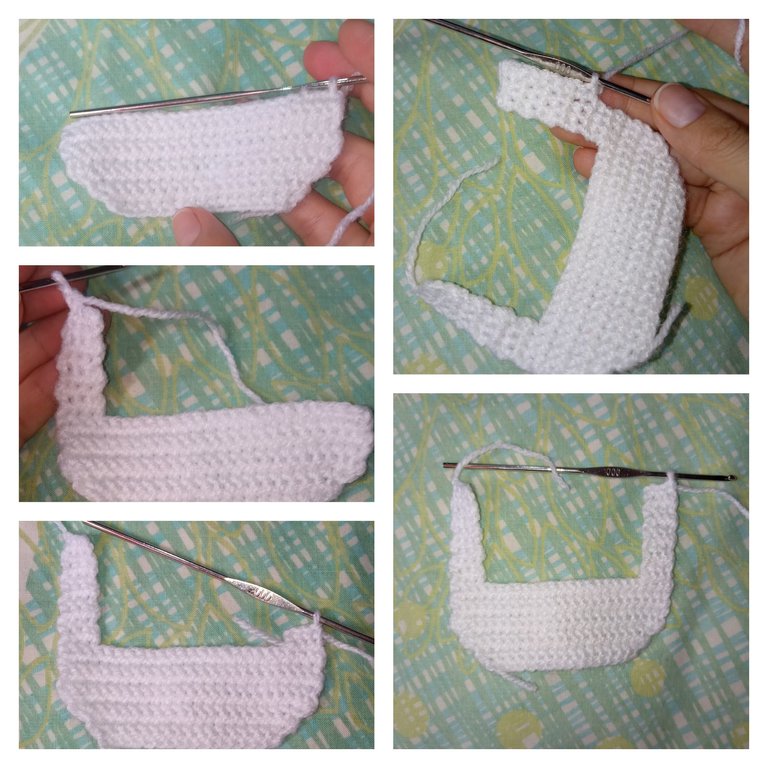
🎄 Barba, bigote y gorro de Santa Claus 🎄
Barba: (blanco)
Se tejera una cadeneta de altura al final de cada vuelta.
V1: 17 cad, a partir de la segunda desde el ganchillo, tejer 16 Pb.
V2-5: hacer un aumento en el punto inicial y final de cada vuelta, y el resto de los puntos serán Pb sobre cada punto de la vuelta anterior.
V6-9: 24 Pb en cada vuelta.
V10-19: 3Pb, 1 cadeneta de altura. Y luego en el otro extremo de la vuelta 9 introducimos la hebra y repetimos las V10-19.
Y para finalizar tejemos Pb en todo el borde interno y eterno de la barba.
🎄 Santa Claus beard, mustache and hat 🎄.
Beard: (white)
You will knit one chain high at the end of each round.
V1: 17 ch, starting from the second from the crochet, knit 16 sc.
R2-5: make an increase in the beginning and end stitch of each row, and the rest of the stitches will be sc over each stitch of the previous row.
R6-9: 24 sc in each row.
R10-19: 3sc, 1 chain high. And then at the other end of row 9 we introduce the yarn and repeat R10-19.
And to finish we knit sc in all the inner and everlasting edge of the beard.
Bigote: (blanco)
Tejer una cadeneta de altura al final de cada vuelta.
V1: 2 cad, en la segunda desde el ganchillo tejer 3Pb. (3)
V2: 1Aum, 1Pb, 1Aum. (5)
V3: 1Aum, 3 Pb, 1Aum. (7)
V4: 1Aum, 5 Pb, 1Aum. (9)
V5-6: 9 Pb. (9)
V7: 1Dism, 5 Pb, 1Dism. (7)
V8: 7 Pb. (7)
V9: 1Dism, 3 Pb, 1Dism. (5)
V10: 1Dism, 1Pb, 1Dism. (3)
V11: 1Aum, 1 Pb, 1Aum. (5)
V12: 1Aum, 3 Pb, 1Aum. (7)
V13: 7 Pb (7)
V14: 1Aum, 5 Pb, 1Aum. (9)
V15-16: 9 Pb. (9)
V17: 1Dism, 5 Pb, 1Dism. (7)
V18: 1Dism, 3 Pb, 1Dism. (5)
V19: 1Dism, 1 Pb, 1Dism. (3)
V20: 3Pb cerrados juntos, 1cad y tejer Pb por todo el borde, con excepción del punto central donde realizaremos 1Pd y en las puntas haremos 3Pb en el mismo punto.
Moustache: (white)
Knit one chain high at the end of each row.
R1: 2 ch, in the second ch from the crochet hook knit 3Sc. (3)
R2: 1inc, 1Sc, 1B, 1inc. (5)
R3: 1inc, 3Sc, 1inc. (7)
R4: 1inc, 5Sc, 1inc. (9)
R5-6: 9 Sc. (9)
R7: 1Dec, 5Sc, 1Dec. (7)
R8: 7Sc. (7)
R9: 1Dec, 3 Sc, 1Dec. (5)
R10: 1Dec, 1Sc, 1Dec. (3)
R11: 1inc, 1Sc, 1inc. (5)
R12: 1inc, 3Sc, 1inc. (7)
R13: 7 Sc (7)
R14: 1inc, 5 Sc, 1inc. (9)
R15-16: 9Sc (9)
R17: 1Dec, 5 Sc, 1Dec. (7)
R18: 1Dec, 3Sc, 1Dec. (5)
R19: 1Dec, 1 sc, 1Dec. (3)
R20: 3Sc close together, 1cad and knit 3Sc all around the edge, except for the center stitch where we will knit 1ss and in the ends we will knit 3Sc in the same stitch.
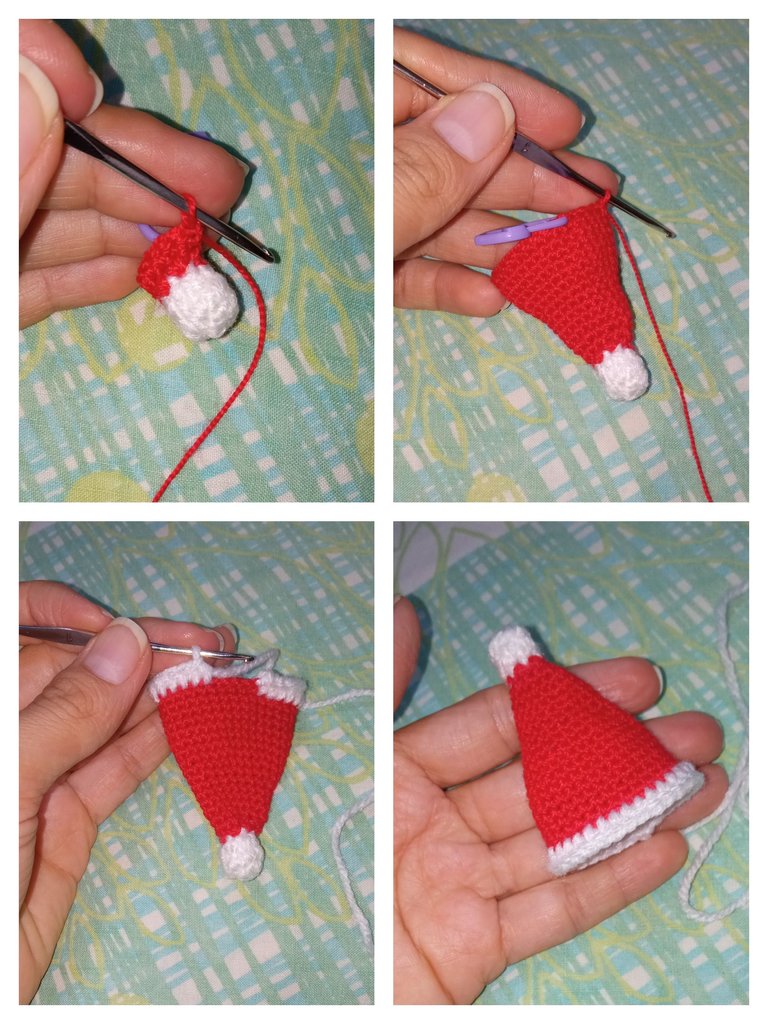
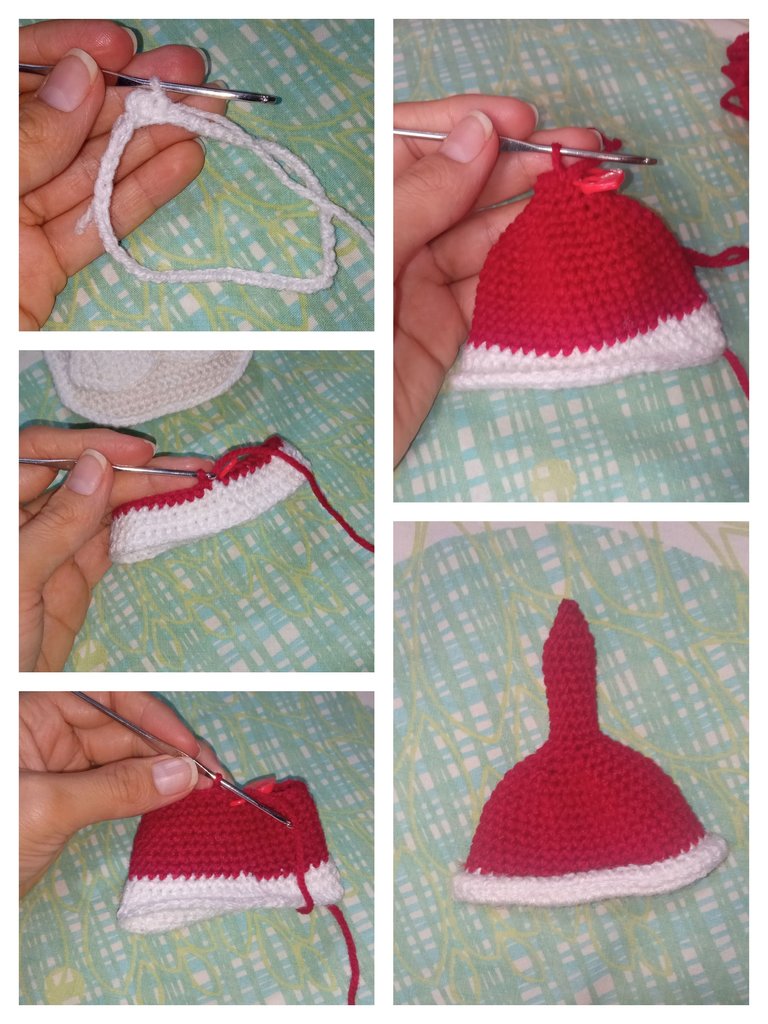
Gorro de Santa Claus:
V1: tejer un anillo de 48 cad, hacer 2 cad de altura y tejer 47 Pma y cerrar la vuelta con 1Pd.
V2: 2 cad de altura, 47Pma, cerrar la vuelta con 1Pd.
V3: 1 cad de altura, 47Pb, y a partir de aquí tejemos en espiral.
V4: cambiar a rojo, (6Pb, Dism) X 6. (42)
V5: 42Pb. (42)
V11: (5 Pb, Dism) X 6. (36)
V12: 36 Pb. (36)
V13: (4 Pb, Dism) X 6. (30)
V14: (3 Pb, Dism) X 6. (24)
V15: (2 Pb, Dism) X 6. (18)
V16: (1 Pb, Dism) X 6. (12)
V17-26: 12Pb. (12)
V27: 6 Dism. (6)
V28: 6Pb (6), cerrar con Am invertido.
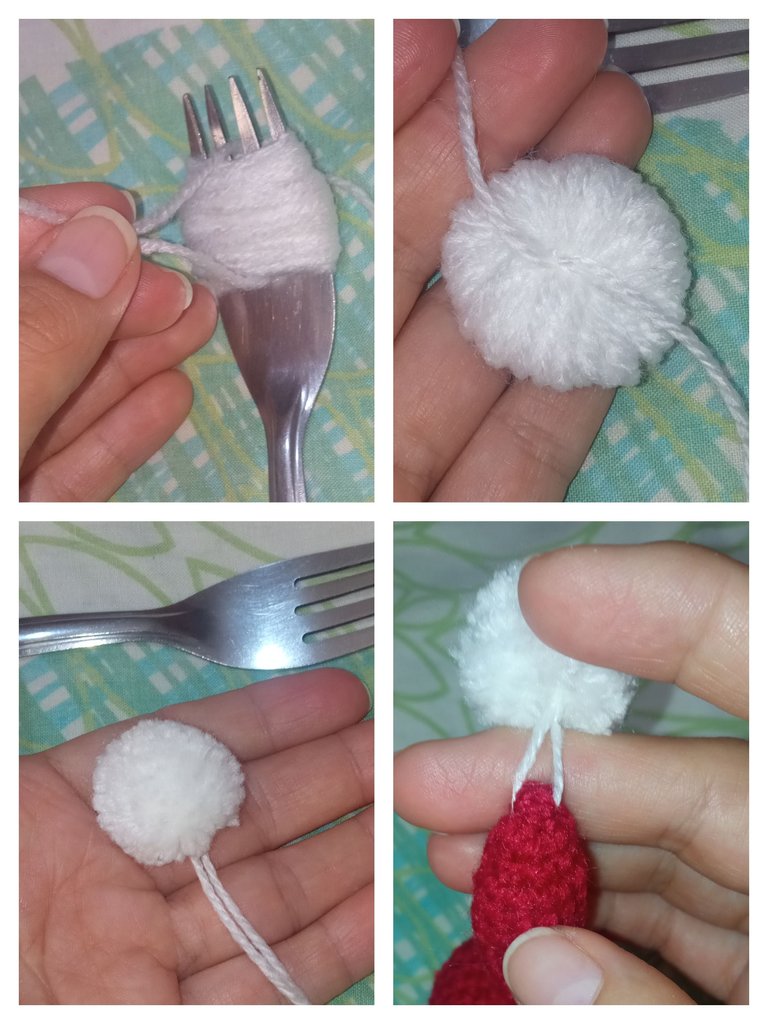
Y hacer un pon-pon con estambre blanco, y pegarlo a la punta del gorro.
Santa Claus hat:
R1: knit a ring of 48 ch, make 2 ch high and knit 47hDC and close round with 1ss.
R2: 2 ch high, 47 Hdc, close round with 1ss.
R3: 1 ch high, 47sc, and from here we knit in a spiral.
R4: change to red, (6sc, Dec) X 6. (42)
R5-10: 42sc. (42)
R11: (5Sc, Dec) X 6. (36)
R12: 36Sc. (36)
R13: (4 sc, Dec) X 6. (30)
R14: (3 sc, Dec) X 6. (24)
R15: (2 sc, Dec) X 6. (18)
R16: (1 sc, Dec) X 6. (12)
R17-26: 12sc. (12)
R27: 6 Dism. (6)
R28: 6sc (6), close with inverted Am.
And make a pon-pon with white stamen, and attach it to the tip of the cap.
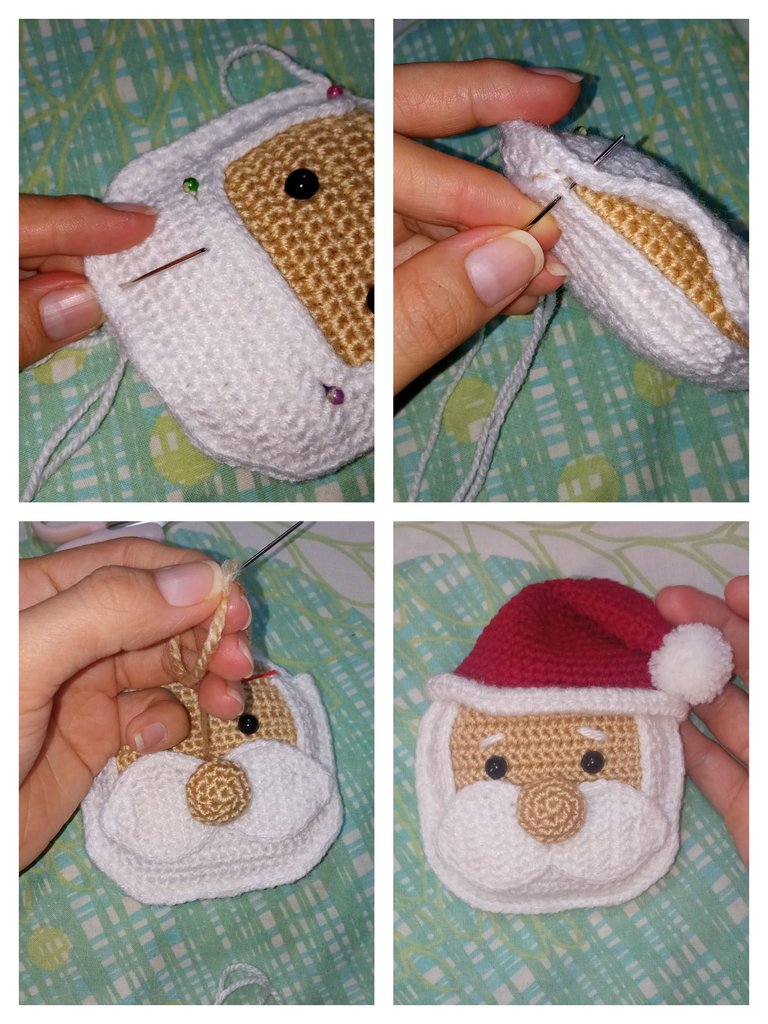
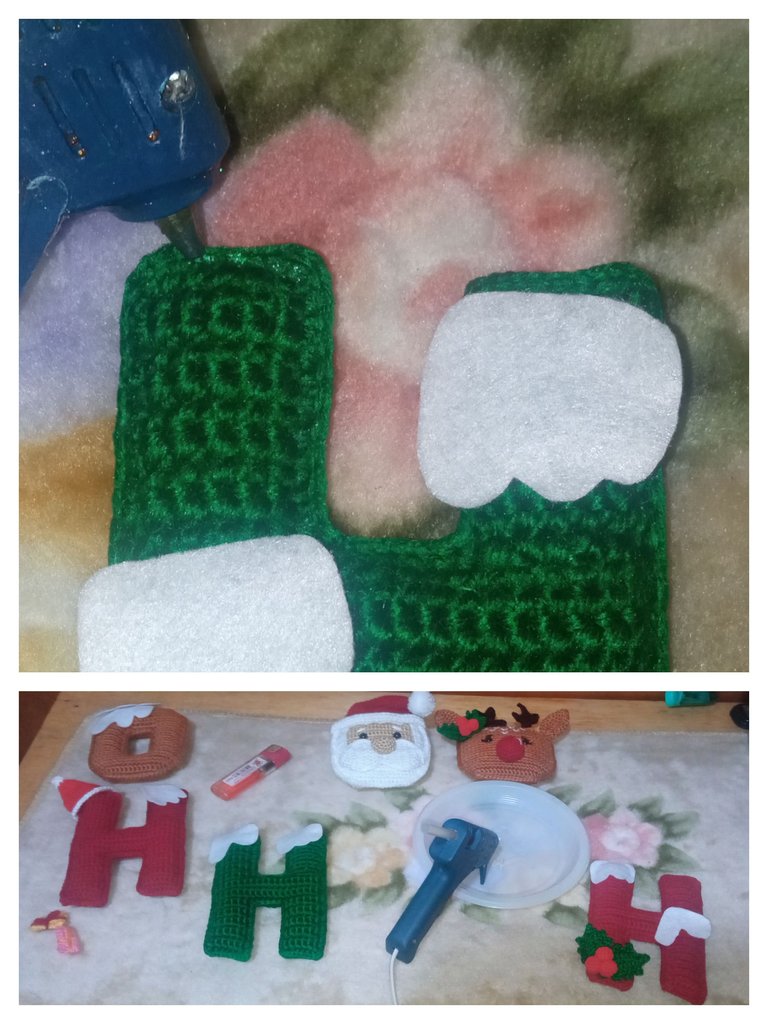
3) Ahora pasamos a pegar todas las piezas de la cara del reno y le bordamos las cejas y las manchitas blancas. También pegamos la barba, bigote y gorro del Santa Claus y luego pegamos los adornitos y las pequeñas figuras de fieltro que simulan la nieve en las letras.
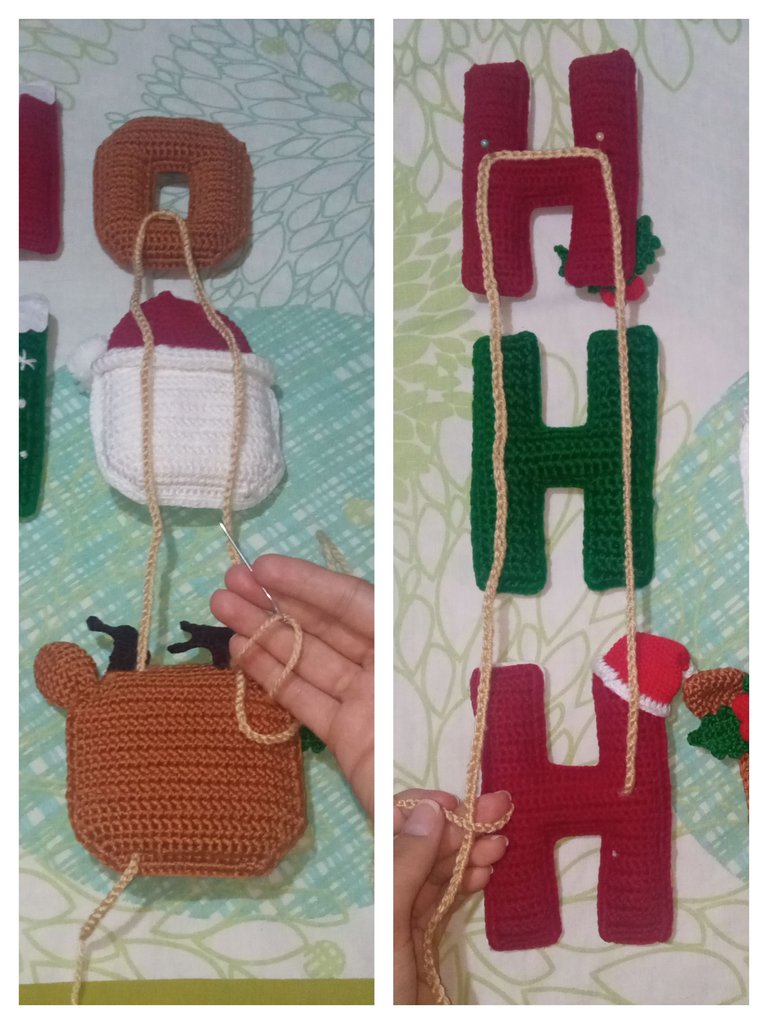
Ya para unir todo y formar el colgante lo que hice fue tejer cadenetas de mas o menos 90cm de largo y la pase entre las piezas con ayuda de una aguja lanera como se muestra en las fotografías.
3) Now we glue all the pieces of the reindeer's face and embroider the eyebrows and the white spots. We also glued the beard, mustache and hat of Santa Claus and then glued the ornaments and small felt figures that simulate snow on the letters.
Now to join everything together and form the pendant what I did was to weave chains of about 90cm long and pass it between the pieces with the help of a wool needle as shown in the pictures.
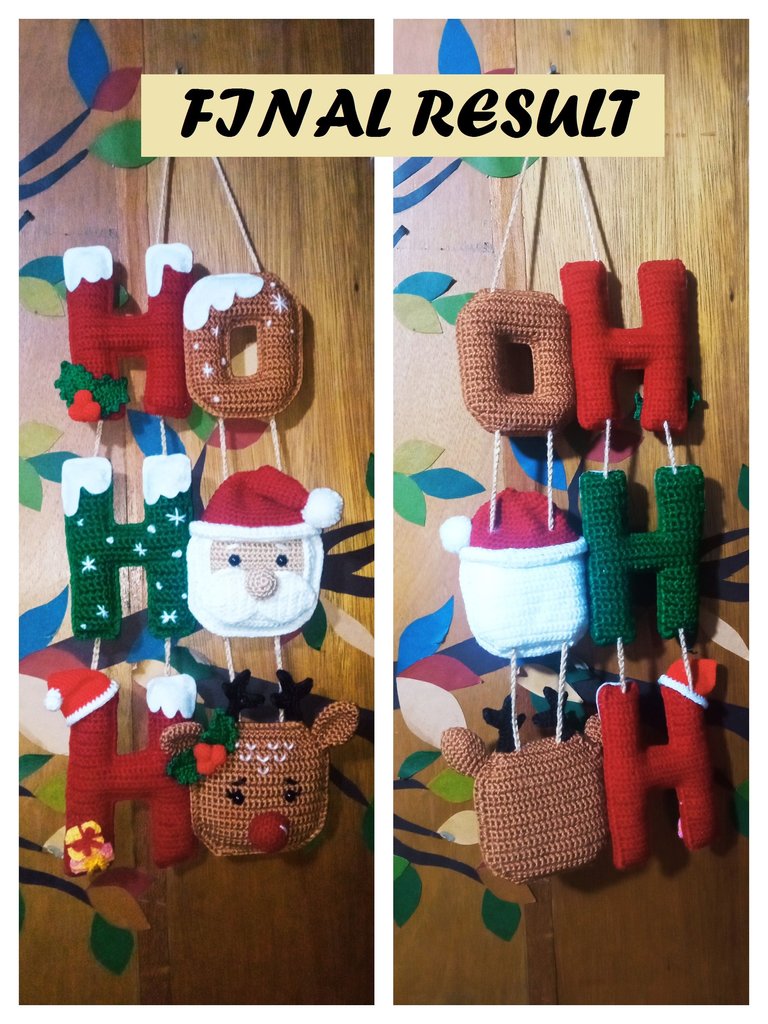
BUENO AMIGOS DESEO LES HAYA GUSTADO TANTO COMO A MÍ EL RESULTADO FINAL DE ESTE COLGANTE NAVIDEÑO PARA PUERTAS TEJIDO A CROCHET, Y ESPERO SUS BONITOS COMENTARIOS Y/O VOTOS, ASÍ ME MOTIVAN PARA SEGUIR COMPARTIENDO MIS CREACIONES CON USTEDES, YO ESTARÉ FELIZ DE RESPONDER TODOS SUS COMENTARIOS 😊 SEAN FELICES Y QUE LA MUSA DE LA CREATIVIDAD NUNCA LOS ABANDONE!
¡GRACIAS POR VISITAR MI BLOG!
Se despide de ustedes con mucho cariño su amiga Nathalie @laranitacrochet
WELL FRIENDS I HOPE YOU LIKED AS MUCH AS I DID THE FINAL RESULT OF THIS CROCHETED CHRISTMAS DOOR HANGER, AND I HOPE YOUR NICE COMMENTS AND / OR VOTES, AND MOTIVATE ME TO CONTINUE SHARING MY CREATIONS WITH YOU, I WILL BE HAPPY TO ANSWER ALL YOUR COMMENTS 😊 BE HAPPY AND MAY THE MUSE OF CREATIVITY NEVER LEAVE YOU!
THANK YOU FOR VISITING MY BLOG!
Your friend Nathalie @laranitacrochet bids you a fond farewell.
*Todas las fotografías utilizadas en la publicación son propiedad de la autora.
*Las fotografías fueron tomadas y editadas con mi REDMI 9 y con la App FotoRoom.
*La traducción la hice en https://www.deepl.com/es/translator
*All photographs used in this publication are property of the author.
*The pictures were taken and edited with my REDMI 9 and the FotoRoom App.
*The translation was done at https://www.deepl.com/es/translator
Hola @laranitacrochet, has hecho un lindo trabajo, me encantó el reno se ve cuchi, una ternurita, Dios bendiga tus manos tienes un gran talento par tejer.
Feliz Navidad!
Hola @belkyscabrera justo fue el que más me costó hacerle la expresión de la carita, no se porqué pero noe gustaba como quedaba y lo borde 3 veces, hasta que por fin quedé conforme.
Muchas gracias por la visita y el comentario 😊🤗
FELIZ NAVIDAD! 🎄🎅🦌🤗
Ohhh, pero que trabajo tan hermoso en crochet, una entrada muy tierna al concurso. Dios bendiga ese don tan hermoso que tienes en tus manos. Suerte mi linda @laranitacrochet ✨
!DIY
😊🤗 Amén y muchas gracias @dayadam , justo quería que se viera súper tierno 😊
You can query your personal balance by
!DIYSTATSSolo puedo decir que talento con la aguja!!!!! Gran trabajo lo ameeeee me encantaría tener uno identico para mi.
!discovery 50
Muchas gracias 😊🤗
This post was shared and voted inside the discord by the curators team of discovery-it
Join our Community and follow our Curation Trail
Discovery-it is also a Witness, vote for us here
Delegate to us for passive income. Check our 80% fee-back Program
Gracias 😌
Te quedo hermoso este diseño de crochet!
Muchas gracias 😊🤗
Hermoso trabajo como siempre, felicidades quedó 😍
Muchas gracias amiga 😊🤗
¡Felicidades! Esta publicación obtuvo upvote y fue compartido por @la-colmena, un proyecto de Curación Manual para la comunidad hispana de Hive que cuenta con el respaldo de @curie.
Si te gusta el trabajo que hacemos, te invitamos a darle tu voto a este comentario y a votar como testigo por La Colmena.
Si quieres saber más sobre nuestro proyecto, te invitamos a acompañarnos en nuestro servidor de Discord.
Muchas gracias por el apoyo ☺️
Congratulations @laranitacrochet! You have completed the following achievement on the Hive blockchain And have been rewarded with New badge(s)
Your next target is to reach 6000 upvotes.
You can view your badges on your board and compare yourself to others in the Ranking
If you no longer want to receive notifications, reply to this comment with the word
STOPCheck out our last posts:
Precioso y prolijo trabajo
Te felicito 👏 🥰
Muchísimas gracias @irenenavarroart 😊🤗
It is so lovely! You're simply great at crocheting, thanks for sharing with us :) :)
Thank you very much for your words 😊🤗 I really thank you very much, your words encourage me a lot!
esta bello, excelente trabajo!
it's beautiful, excellent work!
Muchas gracias @yasmarit 😌🤗
Esto es tan hermoso y único. Realmente vale la pena. Buen trabajo.
Muchas gracias! 😊🤗 Si valió la pena el esfuerzo y tiempo invertido 😁🥰
Gracias por visitar mi blog y por tu comentario 😌
De nada