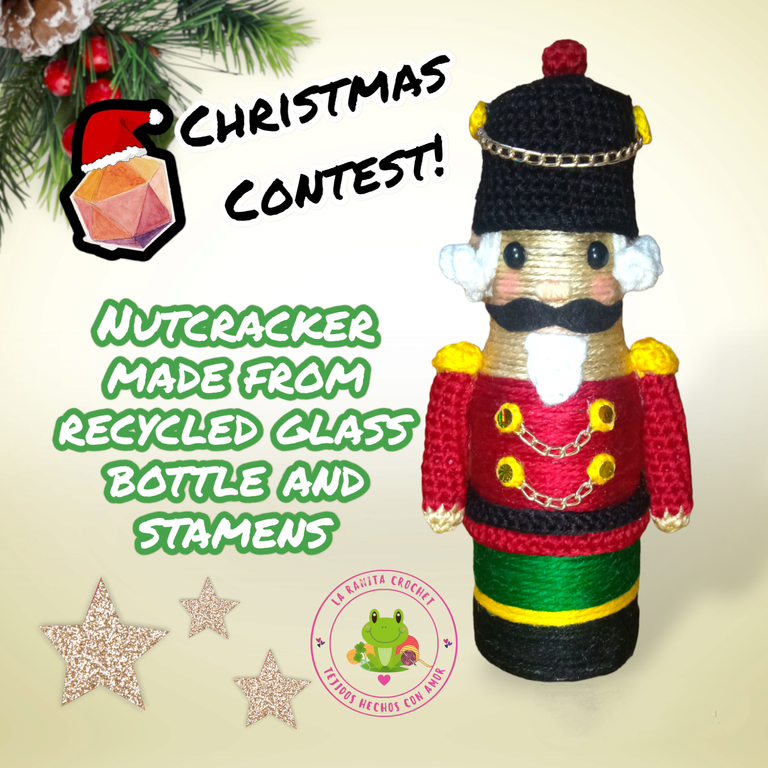
(ESP/ENG) CASCANUECES HECHO CON BOTELLA DE VIDRIO RECICLADA Y ESTAMBRE /NUTCRACKER MADE WITH RECYCLED GLASS BOTTLE AND STAMEN
¡Hola, hola! Hivers y linda comunidad de DIYHub, espero todos se encuentren súper bien, animados e inspirados 💟
Hoy me presento muy feliz para mostrarles como realice este hermoso cascanueces que hice con una pequeña botella de vidrio reciclada y estambre, aparte también utilice la técnica de amigurumis a crochet para hacer algunas partes del cascanueces y me gustaría presentarlo como mi segunda entrada al concurso de navidad de esta encantadora comunidad. 🎅DIY Christmas is Here! 🎁
Hello, hello! Hivers and cute DIYHub community, I hope you all are super well, cheerful and inspired 💟.
Today I am very happy to show you how I made this beautiful nutcracker I made with a small recycled glass bottle and yarn, besides I also used the amigurumis crochet technique to make some parts of the nutcracker and I would like to present it as my second entry to the Christmas contest of this lovely community. 🎅DIY Christmas is Here! 🎁
La idea de realizar el cascanueces surgió de tanto ver adornos navideños realizadas a crochet y me topé con muchos cascanueces, pero yo quería hacer algo un poco diferente y original, y estando en la cocina vi la pequeña botella de vidrio que guarde porque me pareció muy linda y podría usarla para algo, hasta de florero, pero resulto ser mi inspiración para crear este original cascanueces ya que al verla pensé que tenía el tamaño ideal para un muñeco, y pensé… y si hago un cascanueces con la misma técnica con la que hice el arbolito de cartón y estambre…. Y guala surgió esta hermosura que me tiene encantada jajaja….
A continuación los dejo con los materiales que use y también con el paso a paso de cómo lo realice.
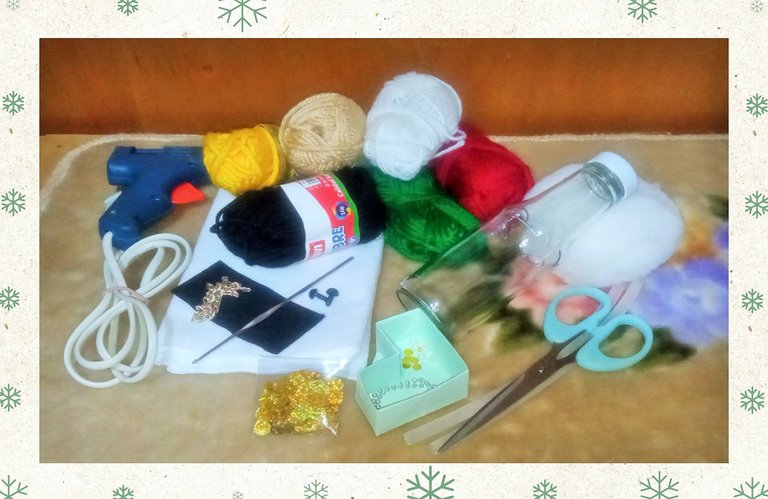
🎁 MATERIALES 🎁
- Una botella de vidrio reciclada.
- Estambre o lana color negro, rojo, verde, amarillo, blanco y piel.
- Silicón en barra y pistola de para silicón.
- Unos 15 cm de cadena dorada.
- Agujas de crochet según correspondan al grosor del hilo.
- Ojos de seguridad de 8mm.
- Un pequeño trozo de fieltro negro.
- Alambre reciclado de flores viejas.
- Guata para rellenar.
- Aguja lanera.
- Alfileres.
- Tijeras y marcadores de puntos.
The idea of making the nutcracker came from seeing so many crocheted Christmas ornaments and I came across many nutcrackers, but I wanted to do something a little different and original, and being in the kitchen I saw the small glass bottle that I kept because I thought it was very cute and could be used for something, even a vase, but it turned out to be my inspiration to create this original nutcracker because when I saw it I thought it had the ideal size for a doll, and I thought .... what if I make a nutcracker with the same technique with which I made the cardboard and yarn tree.... And guala arose this beauty that I love hahaha....
Below I leave you with the materials I used and also with the step by step of how I made it.
🎁 MATERIALS 🎁
- A recycled glass bottle.
- Stamen or wool in black, red, green, yellow, white and leather.
- Silicone stick and silicone gun.
- About 15 cm of golden chain.
- Crochet needles according to the thickness of the yarn.
- 8mm safety eyes.
- A small piece of black felt.
- Recycled wire from old flowers.
- Wadding for stuffing.
- Wool needle.
- Pins.
- Scissors and stitch markers.
🎁 PASO A PASO 🎁
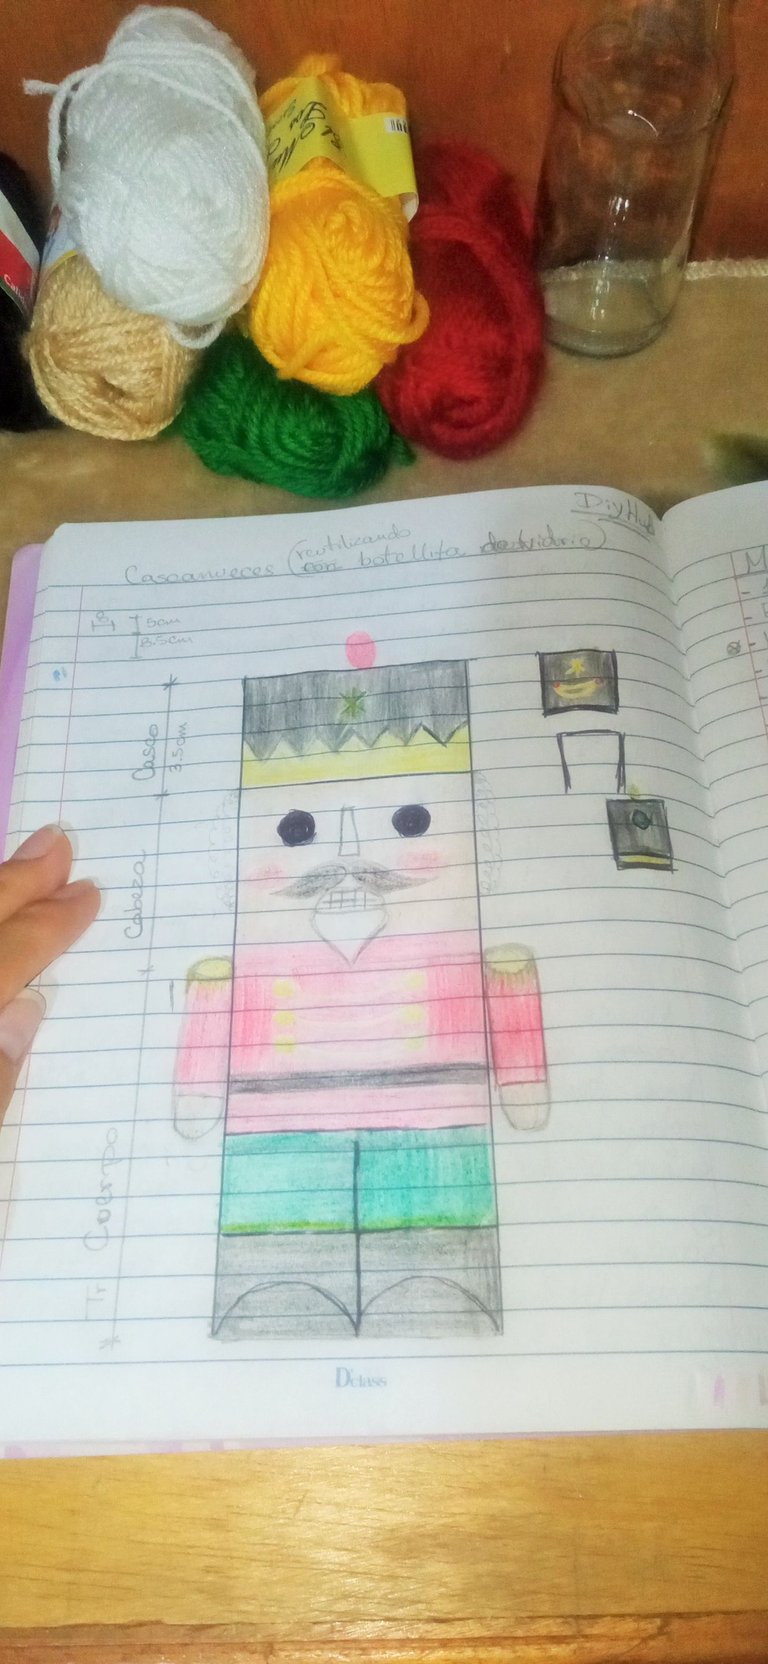
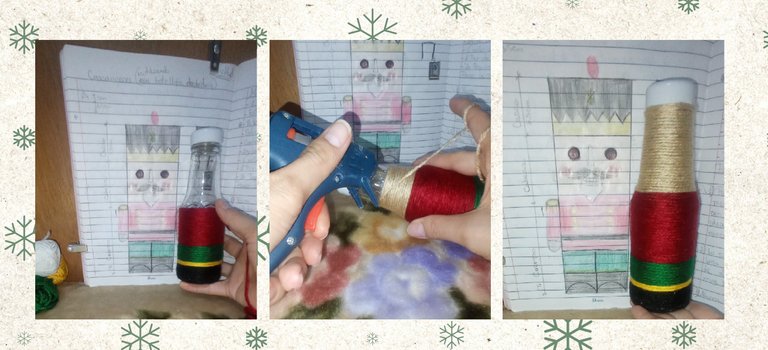
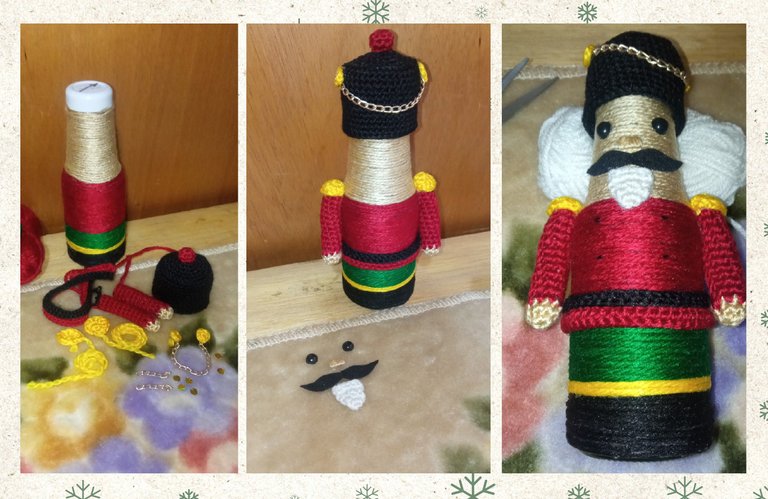
1) Para iniciar lo que hice fue tomar las medidas de la botella para luego guiarme con ellas para dibujar un boceto de como quiero que sea mi cascanueces.
🎁 STEP BY STEP 🎁
1) To start what I did was to take the measurements of the bottle to then guide me with them to draw a sketch of how I want my nutcracker to look like.
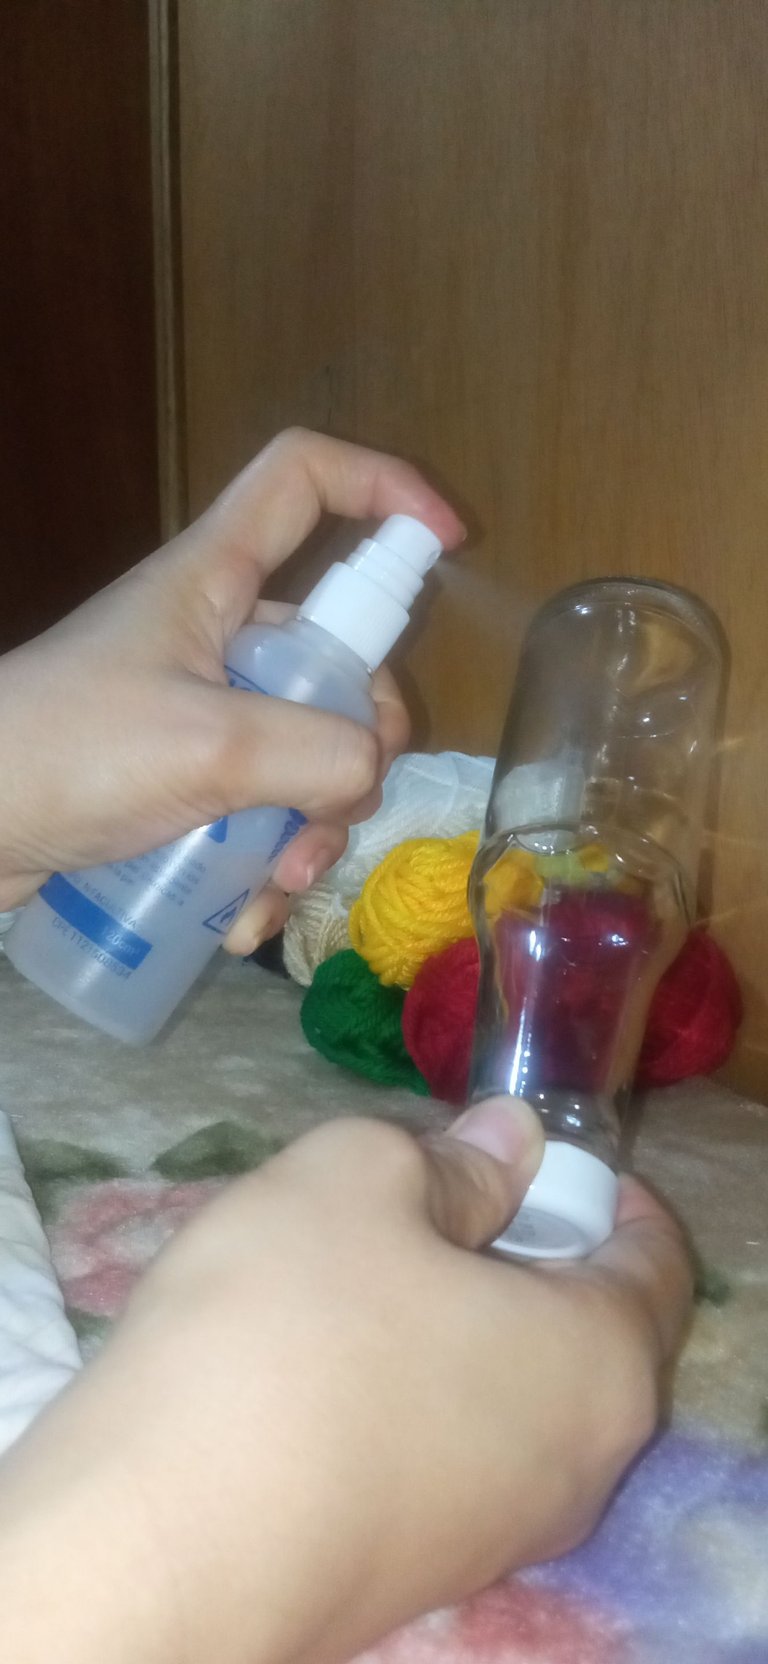
2) Lo siguiente que hice fue limpiar muy bien la superficie de la botella con alcohol, esto es necesario para asegurarnos de que el silicón se pegue muy bien al vidrio.
2) The next thing I did was to clean the surface of the bottle very well with alcohol, this is necessary to make sure that the silicone sticks very well to the glass.
3) Ahora teniendo en cuenta las medidas que marque en el dibujo, empecé a enrollar y pegar el estambre en la botella, intercalando los colores según correspondiera.
3) Now, taking into account the measurements I marked on the drawing, I began to roll and glue the STAMEN on the bottle, alternating the colors as appropriate.

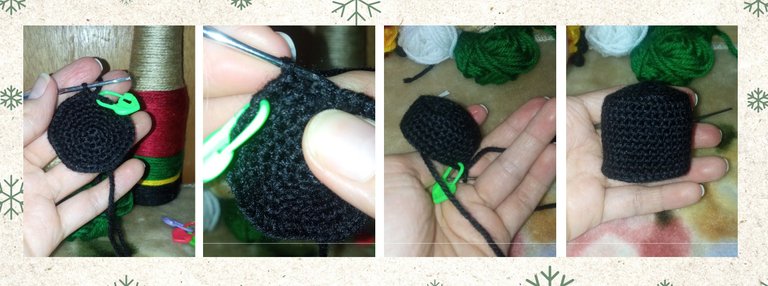
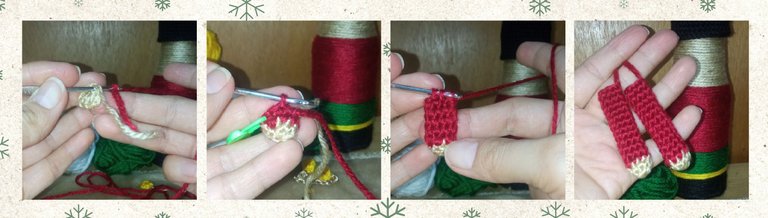
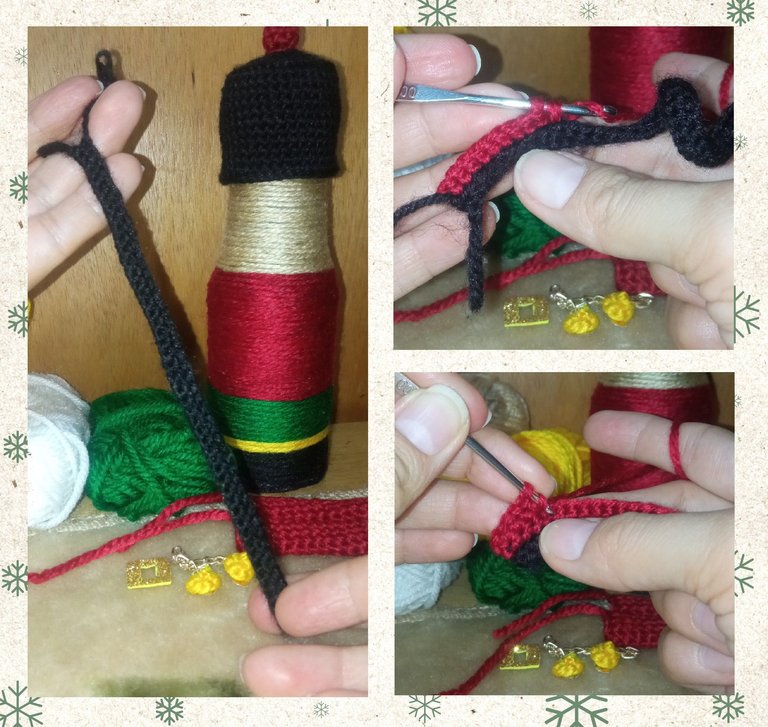
4) Una vez pegado todo el hilo en la botella procedí a tejer el resto de las piezas del cascanueces como lo son los brazos, el casco o sombrero, los botones, el cabello y la barba.
- Casco o sombrero:
Con estambre negro:
V1: tejer 6Pb dentro de un anillo mágico. (6)
V2: 6 Aumentos (12)
V3: 1 Aum, 1Pb x 6. (18)
V4: 1 Aum, 2Pb x 6. (24)
V5: 1 Aum, 3Pb x 6. (30)
V6: 1 Aum, 4Pb x 6. (36)
V7: 1Pb en cada punto, tejer solo en la hebra trasera (BLO). (36)
V8-17: tejer 1Pb en cada punto, cerrar con punto deslizado y cortar y ocultar la hebra. (36)
4) Once all the yarn was glued to the bottle, I proceeded to weave the rest of the pieces of the nutcracker such as the arms, the helmet or hat, the buttons, the hair and the beard.
- Helmet or hat:
With black STAMEN:
R1: weave 6sc inside a magic ring (6).
R2: 6 increases (12)
R3: 1 inc, 1sc x 6. (18)
R4: 1 inc, 2sc x 6. (24)
R5: 1 inc, 3sc x 6. (30)
R6: 1 inc, 4sc x 6. (36)
R7: 1sc in each stitch, knit only in the back loop (BLO). (36)
R8-17: knit scb in each stitch, close with slip stitch and cut and hide the yarn. (36)
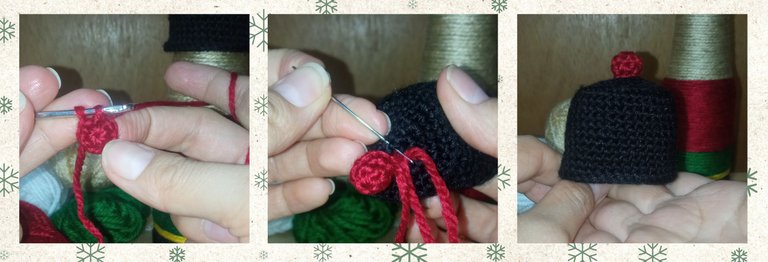
Con estambre rojo (adorno superior):
V1: 6Pb dentro de un anillo mágico. (6)
V2: 1Pb en cada punto de la vuelta anterior y cerrar con 1Pd. (6) dejar unos 10cm de hebra para cocer la pieza al sombrero.
With red stamen (top ornament):
R1: 6sc inside a magic ring. (6).
R2: 1sc in each stitch of the previous row and close with 1sl st. (6) leave about 10cm of yarn to bind off the piece to the hat.
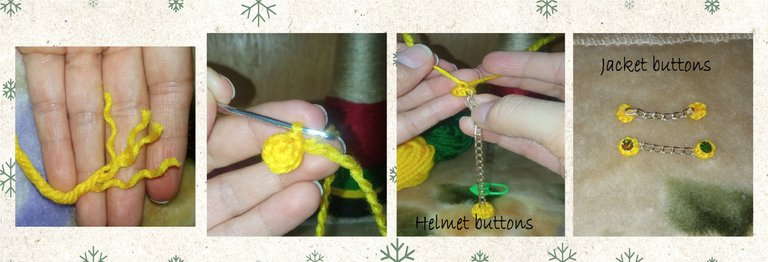
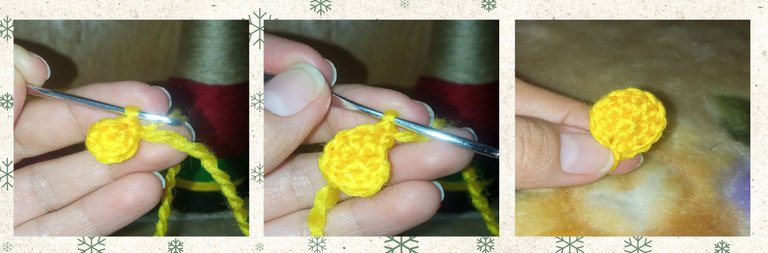
Con estambre amarillo (botones):
Tejer 6Pb dentro de un anillo mágico.
(NOTA: para tejer los botones dividí la hebra de estambre para los del casco use 2 cabos y para los de la chaqueta con 1 solo cabo).
With yellow stamen (buttons):
Knit 6sc inside a magic ring.
(NOTE: to knit the buttons I divided the stamen strand for the helmet buttons I used 2 strands and for the jacket buttons I used 1 strand).
- Brazos:
Con estambre color piel:
V1: tejer 6Pb dentro de un anillo mágico. (6)
V2: 1Aum, 2Pb x 2. (8)
Cambiar a color rojo:
V3-14: 1Pb en cada punto de la vuelta anterior y cerrar con 1Pd. (8)
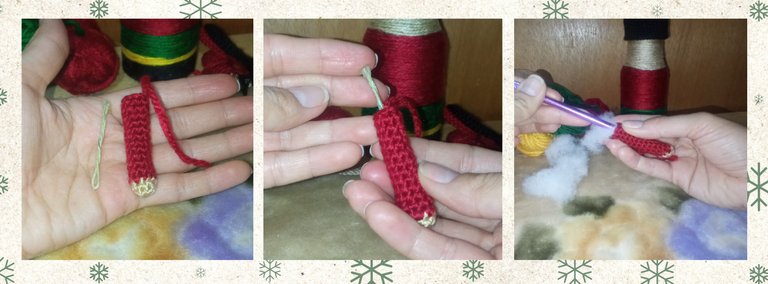
Colocar el alambre de floristería en el interior de la pieza y rellenar con guata.
- Arms:
With skin colored stamen:
R1: weave 6sc inside a magic ring. (6).
R2: 1inc, 2sc x 2. (8)
Change to red:
R3-14: 1sc in each stitch of the previous row and close with 1sl st. (8)
Place the florist's wire inside the piece and stuff with wadding.
- Hombreras:
V1: tejer 6Pb dentro de un anillo mágico. (6)
V2: 2Pb, 2Pma, 2Pa, 2Pa, 2Pma, 2Pb. (12)
Cerrar con 1Pd, cortar la hebra y dejar unos 10 cm para unir la pieza al brazo.
- Shoulder pads:
R1: knit 6sc inside a magic ring.(6).
R2: 2sc, 2hdc, 2dc, 2dc, 2hdc, 2sc. (12)
Close with 1sl st, cut the yarn and leave about 10 cm to attach the piece to the arm.
- Cinturón:
Con estambre negro tejer una cadeneta que cubra todo el diámetro de la botella a la altura de la cintura del cascanueces, en mi caso fueron 46 puntos cadena, hacer una cadena de altura y realizar 47Pb.
Cambiar a color rojo y tejer 2 vueltas de 47Pb cada una, cortar la hebra y dejar unos 10 cm para cerrar la pieza luego de pegarla al cuerpo.
- Belt:
With black stamen knit a chain that covers the entire diameter of the bottle at the height of the waist of the nutcracker, in my case it was 46 chain stitches, make a chain of height and make 47sc.
Change to red color and knit 2 rows of 47sc each, cut the yarn and leave about 10 cm to close the piece after attaching it to the body.
- Barba: tejer 2cad. Y en el segundo punto contando desde la aguja realizar 3Pb, 1cad. De altura dar vuelta al tejido y tejer 1Pb, 1Aum, 1Pb, nuevamente hacer una cadena de altura dar vuelta al tejido y en esta última vuelta tejer 2Pb, 1Aum, 1Pb, cortar y ocultar la hebra.
- Beard: knit 2 ch. And in the second stitch counting from the needle knit 3sc, 1 ch. From height turn knit and knit 1sc, 1inc, 1sc, again make a chain from height turn knit and in this last round knit 2sc, 1sc, 1sc, 1sc, cut and hide the yarn.

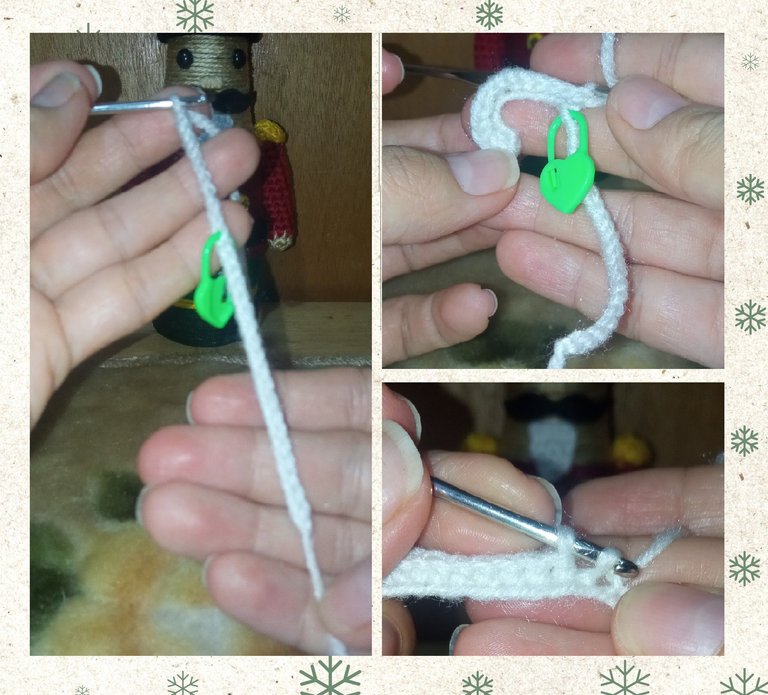
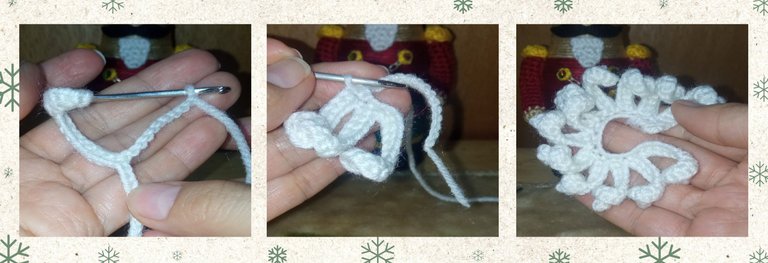
- Cabello:
“cadena base”: Tejer una cadeneta que cubra toda la parte posterior de la cabeza del cascanueces, como lo muestro en la imagen, en mi caso fueron 20 cad.
Mechones: seguidamente de la cadena base tejer 11cad e iniciando en el segundo punto contando desde la aguja tejer la siguiente secuencia (5Aum, 5Pb) y hacemos 1 Pd en la cadena base dejando un punto de por medio, y seguidamente se continua tejiendo el siguiente mechón haciendo los 11 puntos cadena y siguiendo la secuencia de (5Aum, 5Pb), y esto lo haremos hasta cubrir toda la cadena base con mechones.
- Hair:
Base chain: Knit a chain that covers the whole back of the nutcracker's head, as shown in the picture, in my case it was 20 ch.
Tufts: following the base chain knit 11 chain and starting in the second stitch counting from the needle knit the following sequence (5inc, 5sc) and make 1 sl st in the base chain leaving a stitch in between, and then continue knitting the next tuft making the 11 chain stitches and following the sequence of (5inc, 5sc), and we will do this until we cover the whole base chain with tufts.
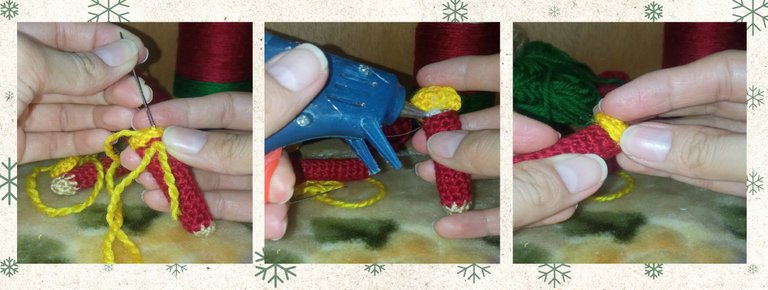
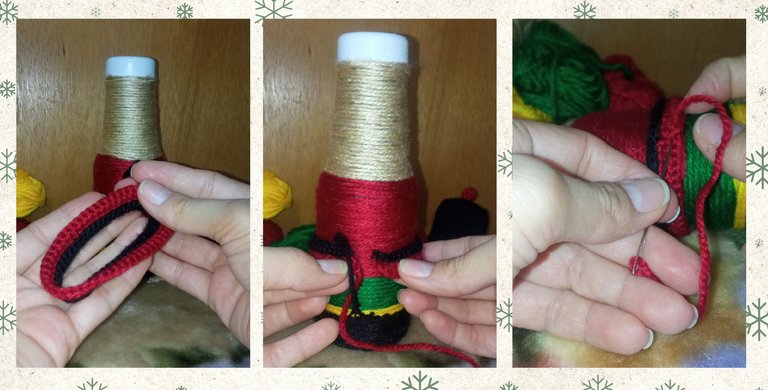
5) Luego de tejidas todas las piezas procedí a pegarlas a la botella, y ahora si va tomando vida mi lindo cascanueces, lo primero que pegue fue el cinturón, y lo que hice fue pegarlo en el centro de la cintura con una gota de silicón y luego cerré la pieza por la parte trasera con el hilo rojo.
Luego pegue los brazos, y seguidamente pase a pegar las piezas del rostro, comenzando de abajo hacia arriba, el bigote lo hice con fieltro negro, la nariz es un pequeño trozo de cartón forrado con hilo color piel, y a los ojitos de seguridad les corte la parte del tornillo y les queme con un yesquero y lo que quedaba para dejar la superficie lo más plana posible y facilitar el pegado.
Luego pegue los botones de la chaqueta a los cuales previamente les había pegado la cadena.
Ahora es el turno del cabello, este lo fije primero con alfileres y luego fie colocando silicón caliente por debajo del mismo en la parte de la cadena base, luego retire los alfileres y comencé a pegar los mechones pero dejando la parte risada sin pegar.
Por ultimo peque el sombrero, primero se lo coloque al cascanueces en la cabeza y luego levantando un poco la parte trasera y delantera del mismo le coloque un poco de silicón por dentro para así fijarlo muy bien a la cabeza.
5) After weaving all the pieces I proceeded to glue them to the bottle, and now my cute nutcracker is coming to life, the first thing I glued was the belt, and what I did was to glue it in the center of the waist with a drop of silicone and then I closed the piece at the back with red thread.
Then I glued the arms, and then I glued the pieces of the face, starting from the bottom up, I made the mustache with black felt, the nose is a small piece of cardboard lined with skin colored thread, and the safety eyes I cut the part of the screw and burned them with a tinder and what was left to leave the surface as flat as possible and facilitate the gluing.
Then I glued the buttons of the jacket to which I had previously glued the chain.
Now it's the turn of the hair, I fixed it first with pins and then I placed hot silicone under it in the part of the base chain, then I removed the pins and began to glue the strands but leaving the laughing part without gluing.
Finally I made the hat, first I put it on the nutcracker on the head and then lifting a little the back and front part of the hat I put some silicone inside to fix it very well to the head.
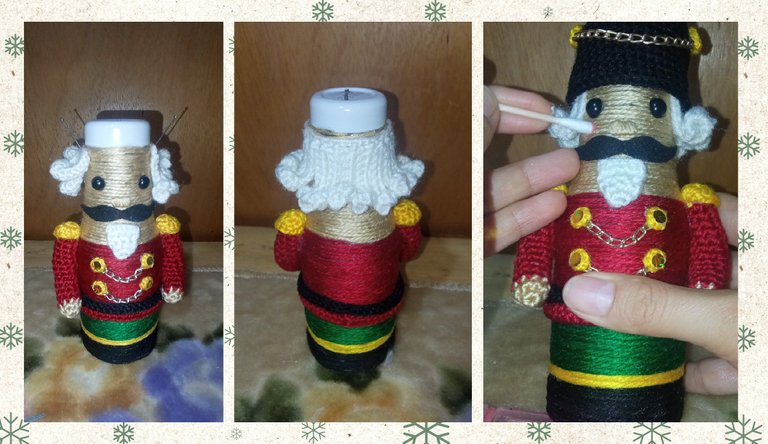
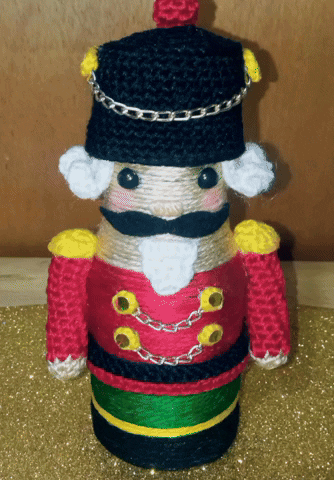
Y así obtuve el hermosísimo resultado de un muy original cascanueces realizado con una botella de vidrio reciclada y estambres, yo quede realmente enamorada del resultado y este lindo cascanueces junto con el arbolito del post anterior serán los adornos de la mesa central de la sala de mi casa, la cual tengo que decorar esta semana, ya sé que es algo tarde para decorar pero mi papá estaba haciendo unas reparaciones en la casa y pues esta algo desastrosa y hay que limpiar y ordenar todo muy bien para poder colocar la decoración navideña, así que mientras tanto yo sigo haciendo más adornos nuevos jajaja…
And so I got the beautiful result of a very original nutcracker made with a recycled glass bottle and stamens, I was really in love with the result and this cute nutcracker along with the tree of the previous post will be the decorations of the center table in the living room of my house, which I have to decorate this week, I know it's a little late to decorate but my dad was doing some repairs in the house and it's a little messy and we have to clean and tidy everything very well to place the Christmas decoration, so meanwhile I keep making more new decorations hahaha....

BUENO AMIGOS DESEO LES HAYA GUSTADO TANTO COMO A MÍ EL RESULTADO FINAL DE ESTE HERMOSO CASCANUECES, ESPERO SUS BONITOS COMENTARIOS Y/O VOTOS, ASÍ ME MOTIVAN PARA SEGUIR COMPARTIENDO MIS CREACIONES CON USTEDES, YO ESTARÉ FELIZ DE RESPONDER TODOS SUS COMENTARIO, SEAN FELICES Y QUE LA MUSA DE LA CREATIVIDAD NUNCA LOS ABANDONE!
¡GRACIAS POR VISITAR MI BLOG!
Se despide de ustedes con mucho cariño su amiga Nathalie @laranitacrochet
WELL FRIENDS, I HOPE YOU LIKED THE FINAL RESULT OF THIS BEAUTIFUL NUTCRACKER AS MUCH AS I DID, I LOOK FORWARD TO YOUR NICE COMMENTS AND/OR VOTES, THIS WAY YOU MOTIVATE ME TO KEEP SHARING MY CREATIONS WITH YOU, I WILL BE HAPPY TO ANSWER ALL YOUR COMMENTS, BE HAPPY AND MAY THE MUSE OF CREATIVITY NEVER LEAVE YOU!
THANK YOU FOR VISITING MY BLOG!
Your friend Nathalie @laranitacrochet bids you a fond farewell.
*Todas las fotografías utilizadas en la publicación son propiedad de la autora.
*Las fotografías fueron tomadas y editadas con mi REDMI 9 y con la App FotoRoom.
*La traducción la hice en https://www.deepl.com/es/translator
*All photographs used in this publication are property of the author.
*The pictures were taken and edited with my REDMI 9 and the FotoRoom App.
*The translation was done at https://www.deepl.com/es/translator
Hermoso cascanueces , me gustó mucho te felicito, éxitos en el concurso 🌹🌷🪷🌸🌺💐💮🏵️🌼🌻☘️
Muchas gracias @taniagonzalez ☺️🤗 🤞🍀
Que precioso quedó amiga 😊
Muchas gracias amiga 😊🤗 quedó más hermoso de lo que había planeado 😍
!DIY
Nice work, this nutcracker is very well done, thank you for participating. Good luck
Thank you very much!😊🤗
You can query your personal balance by
!DIYSTATSHola amiga que belleza de cascanueces me encanto esta super hermoso y cada paso muy bien explicado te felicito
Muchas gracias amiga 😊🤗 y gracias por leer mi post, esa es la idea que se entienda muy bien cada paso por si alguien se anima a realizar el proyecto 😁
Hola amiga. Buenos días. Se ve súper lindo este Cascanueces. Me encantó lo original de tu proyecto, specialmente porque estás usando la técnica del crochet.
Ambos proyectos que has presentado están preciosos. Te deseo mucha suerte en este nuevo concurso.
Buenos días amiga Lelis ☀️☺️🤗 Muchas gracias, y bueno al inicio había pensado realizar los brazos y casco con cartón y enrollar el estambre en ellos también pero se me ocurrió que tejidos se podrían ver muy bien y lo intente y me encantó el resultado 😁😍💂
Excelente idea!!! Combinar el crochet con otras técnicas da muy buenos resultados 😁
Pues sí 😁 y es la primera vez que lo hago. Al menos en algo como ésto.
Guao , la felicito amiga hizo un excelente trabajo, los cascanueces me parecen demasiado hermosos y el suyo me fascino, tiene un toque de elegancia, gracias por compartirnos su idea, le deseo mucha suerte en el concurso 🥰
Muchísimas gracias @marlynmont que bueno que te gustó 😊🤗
Muy bonito tu cascanueces realizado con botellas de vidrio, ideal para adornar nuestro hogar, gracias por compartirlo, saludos
Muchas gracias ☺️ me alegra que te gustará, y sí es perfecto yo lo coloqué en laesa central de la sala 😁💂
Me imagino que quedó muy bonito allí, saludos
Me encantó. Muy original y lindo. Suerte.
☺️ Muchas gracias @yannira 😊🤗 Feliz día!
Feliz día. Saludos.
Lindo, muy al estoy crochet. Saludos
Gracias 😊
Congratulations @laranitacrochet! You have completed the following achievement on the Hive blockchain And have been rewarded with New badge(s)
Your next target is to reach 4750 upvotes.
You can view your badges on your board and compare yourself to others in the Ranking
If you no longer want to receive notifications, reply to this comment with the word
STOPMe encanta se ve precioso, se ve que te dio algo mas de trabajo que el arbolito pero es super lindo 😍
Gracias @lismarcarolina2 si dió más trabajo que el arbolito pero me emocionó mucho hacerlo xq cada que avanzaba se veía más lindo y me iba encantando más lo que estaba logrando.
Congratulations, your post has been upvoted by @dsc-r2cornell, which is the curating account for @R2cornell's Discord Community.
Enhorabuena, su "post" ha sido "up-voted" por @dsc-r2cornell, que es la "cuenta curating" de la Comunidad de la Discordia de @R2cornell.
Te quedó hermosisimoo .. éxitos en el concurso 🤗.
Muchas gracias! ☺️🤗
Que bonito cascanueces, me gustó mucho las técnicas que utilizastes por un lado el forrado de la botella el traje, los colores,se ve perfecto muy bien detallado.
Suerte en el concurso amiga 😃
Muchas gracias amiga 😊, si puse mucho cuidado a cada paso y detalle, quería que quedará super lindo para regalarlo a mi mamá, y a ella le encantó 😍💗