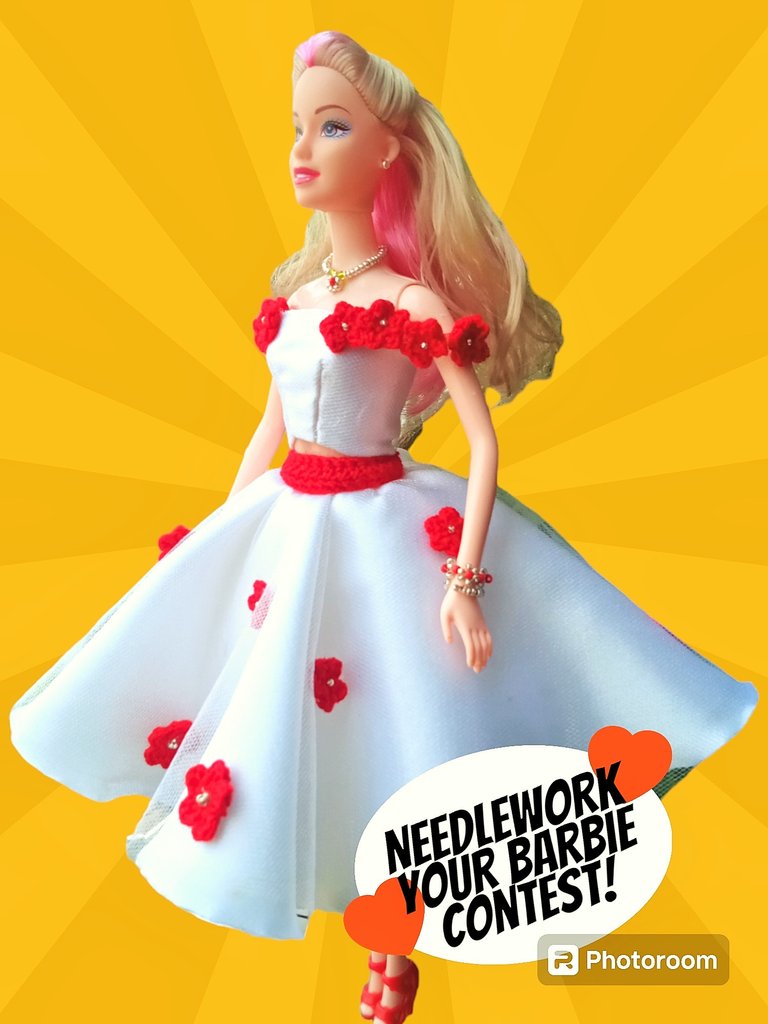
(ESP/ENG) 🌺 My entry to the NeedleWork Your Barbie contest! – Vestido Romance Primaveral / Spring Romance Dress 🌺
¡Hola, hola! Hivers y hermosa comunidad de Needleworkmonday, espero todos se encuentren súper bien, animados e inspirados 💟 Esta es mi entrada al concurso de NeedleWork Your Barbie Contest! - 2024 Edition
Hello, hello! Hivers and beautiful Needleworkmonday community, I hope everyone is super well, encouraged and inspired 💟 This is my entry to the NeedleWork Your Barbie Contest! - 2024 Edition

Le agradezco a @belkyscabrera el haberme invitado, esta es mi primera vez participando y les confieso que me emocione muchísimo al saber del concurso; en mi cumpleaños #32 un tío me dio un regalo súper original y me sorprendió con una muñeca tipo Barbie y fue un momento muy gracioso y agradable, ya que fue el único regalo que recibí pues todos en casa estábamos enfermos con COVID y lo único que planeamos fue cantar el cumpleaños feliz con una torta que yo misma hice.
Y bueno en resumen la muñeca fue un muy hermoso regalo, pero tenía tiempo con ganas de hacerle un atuendo nuevo y más lindo que el que trajo originalmente ya que buscando cosas para tejer he visto ropita para muñecas, pero no quería que su atuendo fuera todo tejido. Así que al ver el anuncio del concurso me sentí muy entusiasmada porque sería la excusa perfecta para por fin realizar el nuevo atuendo de mi muñeca.
Así que apenas leí el anuncio del concurso y el tema del mismo me puse a imaginar diferentes atuendos que podía realizar, y de inmediato supe que quería que fuera un vestido muy elegante y primaveral, también pensé en tejer una braga o un lindo mini suéter de flores y hacer un pantalón de blue yeans, pero termine inclinándome por la idea del vestido ya que comencé a imaginar que podía usar la oportunidad para hacer algo que yo también usaría jajaja… me encanta mandar a realizar mis vestidos a la medida, tengo varios y son mis favoritos.
Ya teniendo a la muñeca en mis manos note que sus zapatos no combinaban con el vestido ya que sus tacones son rojos y el vestido es rosado, y opte por hacer algo que combinara con sus zapatos y se me ocurrió hacer un lindo vestido blanco con flores rojas, no sé porque pero tengo muchos días pensando en flores de cayena y por eso decide hacer flores rojas de 5 pétalos, así que a pesar de no ser muy buena dibujando decidí plasmar en papel lo que más o menos quería para el vestido de mi muñeca y use de inspiración las flores de cayena.
Por cierto he estado pensando que ella necesita un nombre jajaja… pero no se cual ponerle… así que si tienen alguno que les parezca lindo me lo pueden sugerir en los comentarios y ya les diré cual le pondré.
A continuación les contare sobre los materiales que use para realizar el nuevo atuendo de mi muñeca y como lo realice.
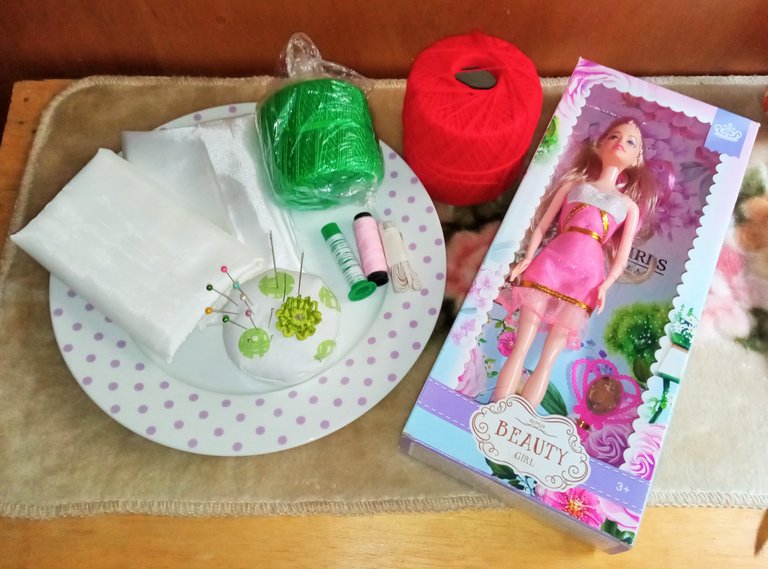
MATERIALES:
-Retazos de tela de raso, tul y tafeta.
-Aguja e hilo para coser a mano.
-Alfileres.
-Tijera.
-Cinta métrica.
-Hilo de crochet rojo y aguja #1.
-Mostacillas plateadas.
-Silicón y/o pegamento universal.
I thank @belkyscabrera for inviting me, this is my first time participating and I confess that I was very excited to know about the contest; on my birthday #32 an uncle gave me a super original gift and surprised me with a Barbie doll and it was a very funny and nice moment, as it was the only gift I received because everyone at home was sick with COVID and the only thing we planned was to sing happy birthday with a cake that I made myself.
And well in short the doll was a very beautiful gift, but I had been wanting to make her a new and nicer outfit than the one she originally brought since I have been looking for things to knit and I have seen some doll clothes, but I didn't want her outfit to be all knitted. So when I saw the contest announcement I was very excited because it would be the perfect excuse to finally make my doll's new outfit.
So as soon as I read the contest announcement and the theme of the contest I started to imagine different outfits I could make, and immediately I knew I wanted it to be a very elegant and spring dress, I also thought about knitting a panties or a cute mini flower sweater and make a blue yeans pants, but I ended up leaning towards the dress idea because I started to imagine that I could use the opportunity to make something that I would also use hahaha... I love to have my dresses made to measure, I have several and they are my favorites.
Once I had the doll in my hands I noticed that her shoes didn't match the dress since her heels are red and the dress is pink, so I decided to make something that matched her shoes and I came up with a nice white dress with red flowers, I don't know why but I have many days thinking about cayenne flowers and so I decided to make red flowers of 5 petals, so despite not being very good at drawing I decided to capture on paper what I wanted more or less for my doll's dress and I used the cayenne flowers as inspiration.
By the way I have been thinking that she needs a name hahaha... but I don't know what to name her... so if you have one that you think is cute you can suggest it to me in the comments and I will tell you which one I will give her.
Next I will tell you about the materials I used to make my doll's new outfit and how I made it.
MATERIALS:
- Pieces of satin, tulle and taffeta fabric.
- Needle and thread for hand sewing.
- Pins.
- Scissors.
- Tape measure.
- Red crochet thread and #1 needle.
- Silver beads.
- Silicon and/or universal glue.
PROCESO DE CONFECCION:
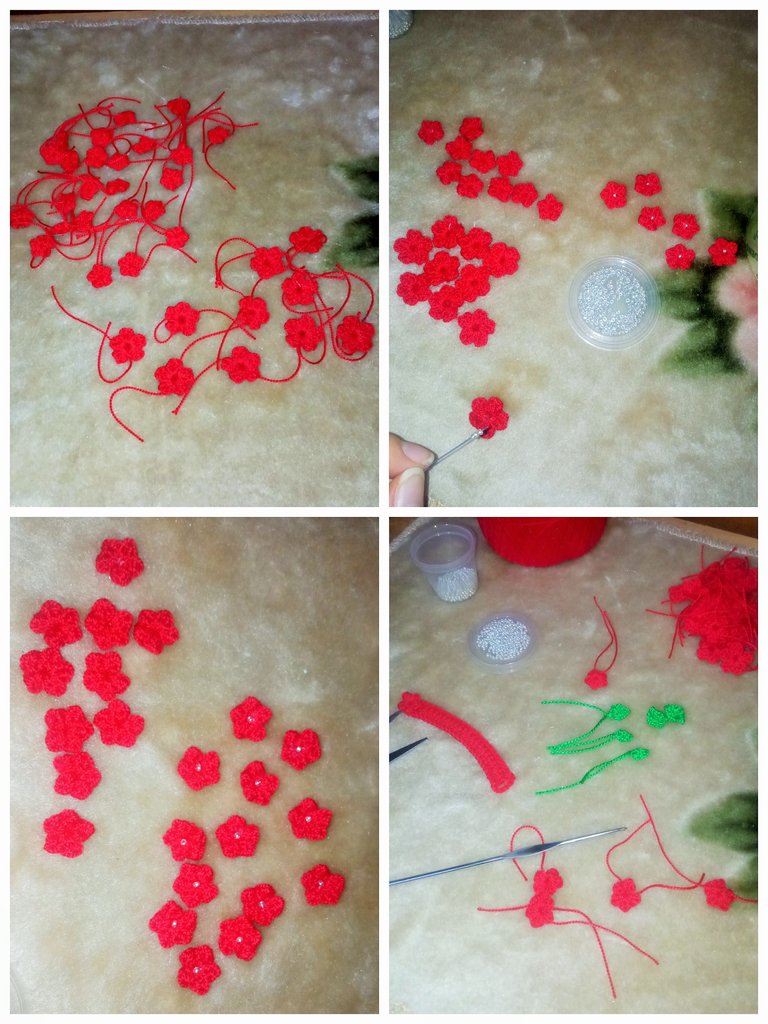
Una vez tuve el dibujo de mi idea de más o menos cómo sería el vestido, me puse manos a la obra y lo primero que hice fue tejer las florecitas rojas para el vestido, así que me instale en el mueble de la sala de estar y coloque la serie que estoy viendo y tejí 24 flores pequeñas y 10 flores grandes en lo que vi dos capítulos de la serie y ni cuenta me di de cuantas flores llevaba tejidas jajaja… hasta que mi esposo me pregunto que para que estaba tejiendo tantas florecitas jajaja… así que me detuve a contarlas y pues ya eran suficientes.
No tome fotos del proceso de tejido porque estaba muy distraída con la serie pero les explico como las tejí…
Flores pequeñas:
Dentro de un anillo mágico tejer (1 Pd, 2 mpa) X5 veces. Luego cortar la hebra, ajustar el anillo mágico y con ambas hebras realizar un par de nudos para asegurarlas y cortar el excedente.
Flores grandes:
Dentro de un anillo mágico tejer 1 Pd, 1 mpa, 2 Pa, 1 mpa) X5 veces. Luego cortar la hebra, ajustar el anillo mágico y con ambas hebras realizar un par de nudos para asegurarlas y cortar el excedente.
También tejí unas pequeñas hojas pero al final no las use, y además me sobraron algunas flores así que las guardare para un próximo proyecto.
A las flores les pegue mostacillas plateadas en el centro para darles un toque brillante y hacerlas lucir más hermosas.
MAKING PROCESS:
Once I had the drawing of my idea of more or less how the dress would be, I got down to work and the first thing I did was to knit the little red flowers for the dress, so I installed myself in the living room furniture and placed the series I'm watching and knitted 24 small flowers and 10 large flowers in what I saw two chapters of the series and I did not even realize how many flowers I had knitted hahaha .... until my husband asked me why I was knitting so many flowers hahaha... so I stopped to count them and there were enough.
I didn't take pictures of the knitting process because I was too distracted with the series but I'll explain how I knitted them....
Small flowers:
Inside a magic ring weave (1 sl st, 2 hdc) X5 times. Then cut the loop, adjust the magic ring and with both loops make a couple of knots to secure them and cut off the excess.
Large flowers:
Inside a magic ring knit 1 sl st, 1 hdc, 2 dc, 1 hdc) X5 times. Then cut the loop, adjust the magic ring and with both loops tie a couple of knots to secure them and cut off the excess.
I also wove some small leaves but in the end I didn't use them, and I also had some flowers left over so I'll save them for a future project.
I glued silver beads in the center of the flowers to give them a shiny touch and make them look more beautiful.
Corte y confección del vestido:
Bueno en otras ocasiones les he contado que coser no es lo mío, pero me he dado cuenta que el problema en mi caso no son las puntadas si no el corte y confección de las prendas o piezas que quiero realizar, así que la parte más difícil para mí fue precisamente la parte de cortar la tela para el pequeño corset, la parte fácil fue la falda.
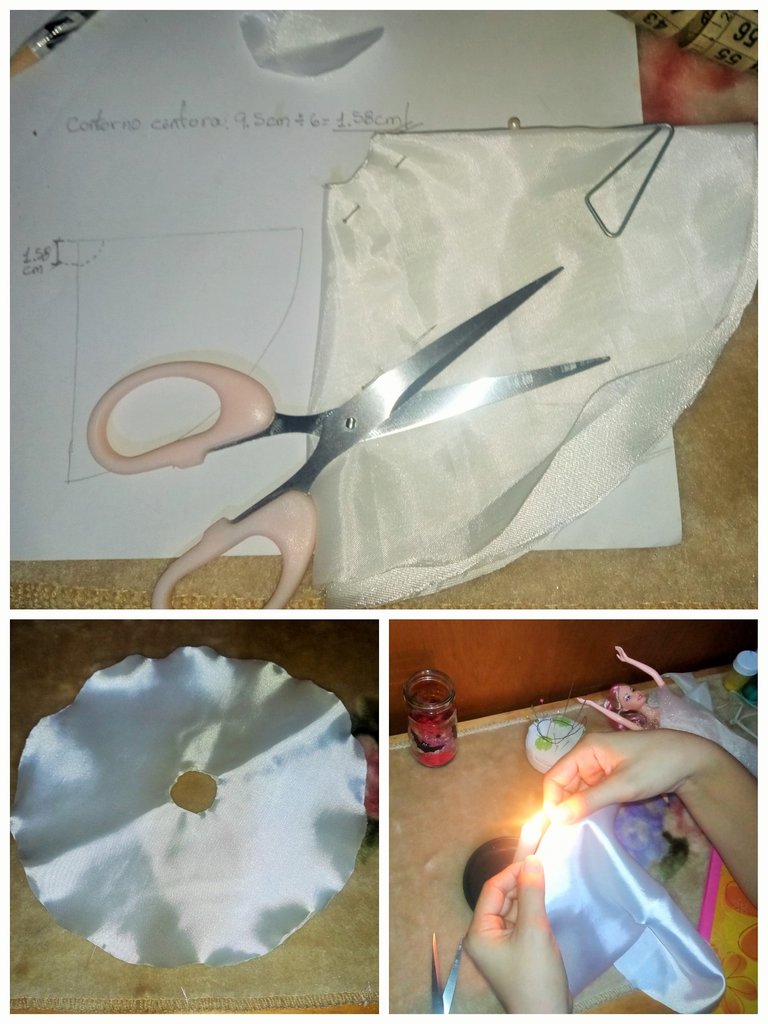
Falda:
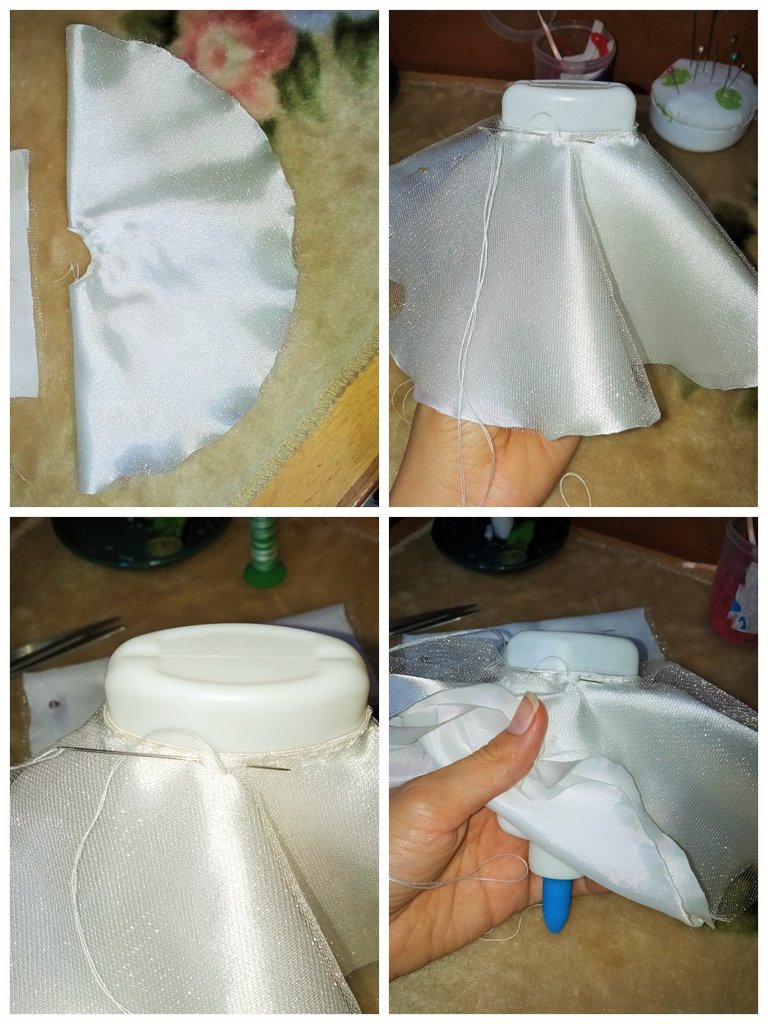
Decidí que la falda seria circular ya que este tipo de faldas me encantan y su caída es muy bonita así que lo que hice fue tomar el plato llano más grande que encontré en la cocina y lo use como guía para marcar el circulo en la tela, y tome los tres retazos de tela que usaría, uno de tul, uno de tela de raso y otro de tafeta y las coloque una sobre la otra y las asegure con alfileres para así solo marcar una de ellas y cortarlas todas al mismo tiempo.
Luego aun teniendo las telas juntas doble la circunferencia a la mitad y quedo medio circulo que nuevamente doble a la mitad, luego tomando la medida de la cintura de la muñeca hice una marca en el ángulo de la tela como muestro en la imagen y corte esa parte de la tela.
Lo siguiente que hice fue pasar las orillas de las telas por el fuego de una vela para evitar que se deshilache y así evitar coser el dobladillo, y resulto ser una gran idea porque me encanto el resultado, pues las orillas de la tela quedaron más firmes y con un lindo ondulado.
A la parte de la cintura de la falda le cosí un elástico y ya tuve lista la falda.
Ya que se me complicaba un poco coser el elástico en una pieza tan pequeña, se me ocurrió usar un envase de pega para apoyarme en esta tarea y resulto una gran idea, me ayudo a hacer la costura súper rápido.
También realice una pequeña falda de tul, para usarla como fondo y así la falda del vestido tuviera más volumen.
Cutting and making the dress:
Well in other occasions I have told you that sewing is not my thing, but I have realized that the problem in my case is not the stitches if not the cutting and sewing of the garments or pieces I want to make, so the hardest part for me was precisely the part of cutting the fabric for the little corset, the easy part was the skirt.
Skirt:
I decided that the skirt would be circular since I love this type of skirt and its fall is very pretty so what I did was to take the biggest flat plate I found in the kitchen and use it as a guide to mark the circle on the fabric, and take the three pieces of fabric I would use, one of tulle, one of satin fabric and one of taffeta and place them one on top of the other and secure them with pins so I could only mark one of them and cut them all at the same time.
Then still having the fabrics together I folded the circumference in half and left half a circle that I folded in half again, then taking the measurement of the waist of the doll I made a mark on the angle of the fabric as shown in the picture and cut that part of the fabric.
The next thing I did was to pass the edges of the fabrics through the fire of a candle to avoid fraying and thus avoid sewing the hem, and it turned out to be a great idea because I loved the result, as the edges of the fabric were firmer and with a nice wavy.
I sewed an elastic to the waist part of the skirt and I had the skirt ready.
Since it was a little complicated to sew the elastic on such a small piece, I thought of using a glue container to support me in this task and it turned out to be a great idea, it helped me to make the seam super fast.
I also made a small tulle skirt, to use it as a background so the skirt of the dress would have more volume.


Corset:
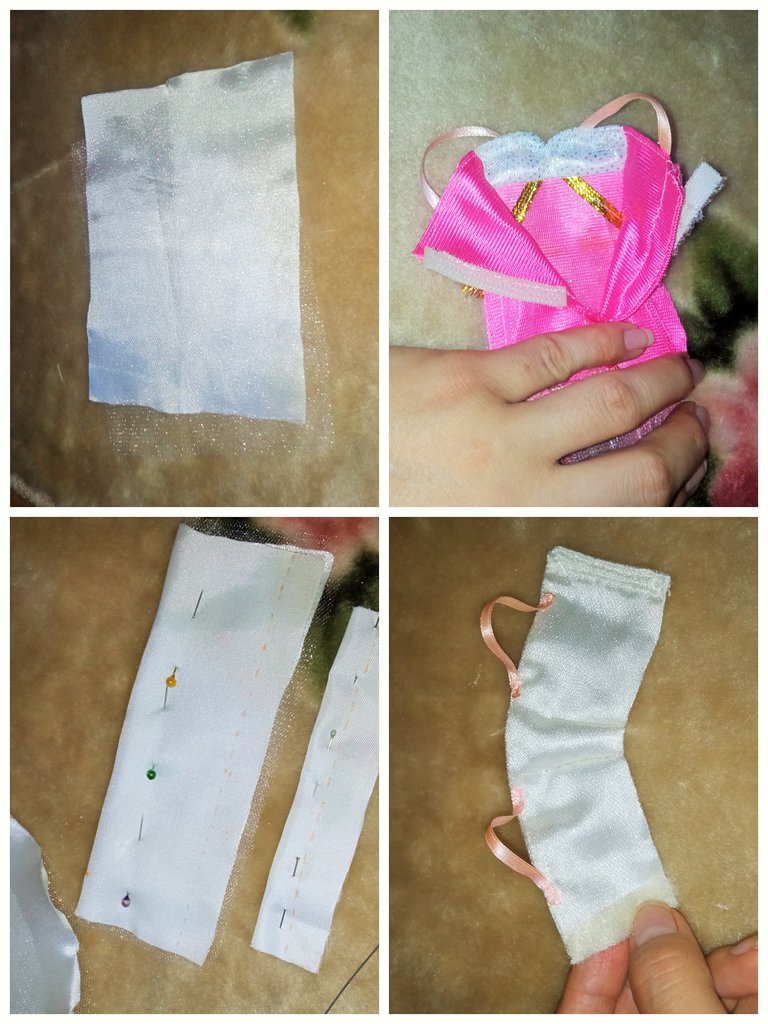
Decidiendo como hacer el corset fue donde más demore pero se me ocurrió que si hacia un rectángulo con la tela y luego le hacia una pinzas al frente podría encajar bien en la muñeca y que podía usar el velcro del vestido original de la muñeca para cerrar el corset. Así que proseguí con mi idea y resulto bastante bien.
Corte un cuadrado de tul y otro de raso y enfrenté ambas telas, las doble a la mitad y las cosí por el revés, luego le di la vuelta al derecho y cosí el velcro en los extremos, para luego colocar la blusa a la muñeca y tomar la medida de donde ubicaría las pinzas, y seguidamente cosí los tiros del corset usando un trocito de cinta de raso que también saque del vestido original de la muñeca.
Corset:
Deciding how to make the corset was where it took the longest but it occurred to me that if I made a rectangle with the fabric and then made a darts in the front it could fit well on the doll and that I could use the velcro from the doll's original dress to close the corset. So I went ahead with my idea and it turned out quite well.
I cut a square of tulle and a square of satin and faced both fabrics, folded them in half and sewed them on the back, then I turned it right side out and sewed the velcro on the ends, then I placed the blouse on the doll and took the measurement of where I would place the darts, and then I sewed the straps of the corset using a small piece of satin ribbon that I also took from the doll's original dress.

Esperando la primera prueba de su nuevo vestido / Waiting for the first fitting of her new dress

Le quedo perfecto / Perfect fit 😉
Detalles finales:
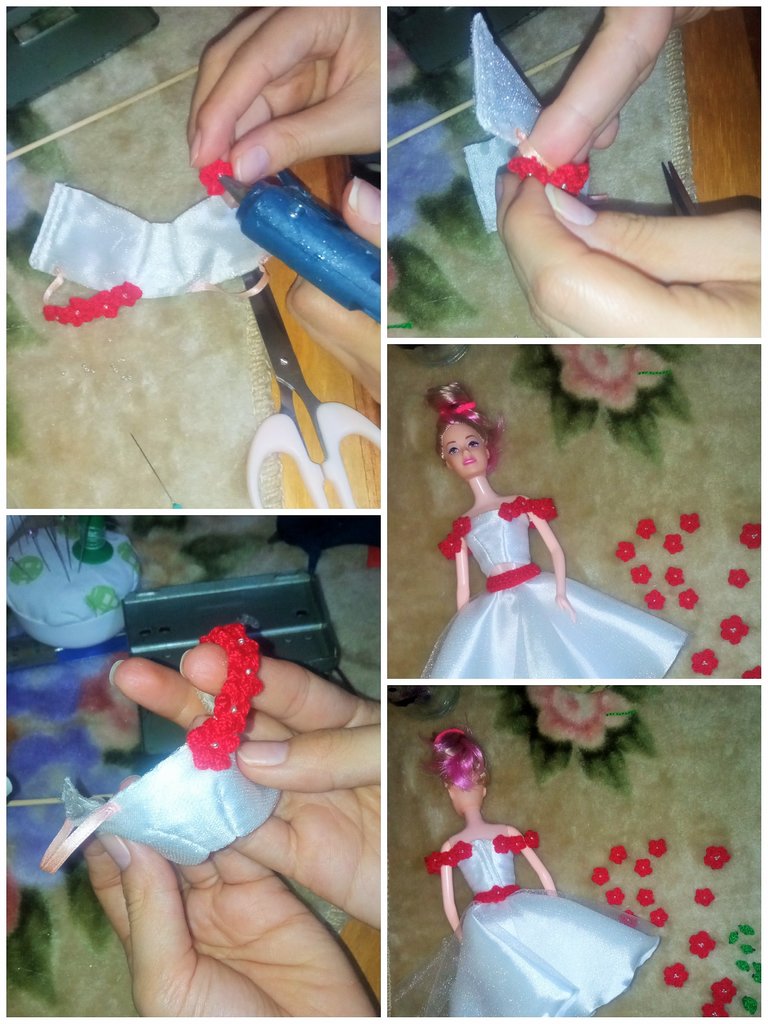
-Tejí un pequeño cinturón con hilo crochet rojo para darle un cavado más bonito y vistoso a la cintura de la falda. Simplemente medí la cintura de la muñeca y en base a esa medida tejí 2 vueltas de medios puntos bajos, al final hice un arco con una cadeneta de 5 puntos para simular un ojal y como botón use una de la flores pequeñas.
-Para culminar el corset lo que hice fue pegarle las flores pequeñas en los tiros con un poco de silicón caliente.
-Para terminar la falda también con silicón caliente pegue las flores grandes y pequeñas de manera aleatoria.
-Y también peiné el cabello de la muñeca y le corte las puntas para que quedara parejo.
Final details:
- I knitted a little belt with red crochet thread to give the skirt's waist a prettier and more eye-catching dig. I simply measured the waist of the doll and based on that measurement I knitted 2 rows of low half stitches, at the end I made a bow with a 5 stitch chain to simulate a buttonhole and as a button I used one of the small flowers.
- To finish the corset what I did was to glue the small flowers on the straps with a little hot silicone.
- To finish the skirt I also glued the big and small flowers randomly with hot silicone.
- I also combed the doll's hair and cut the ends to make it even.

Accesorios:
Mientras iba terminando de realizar el vestido note que la muñeca no tenía ningún tipo de joyería así que se me ocurrió realizarle algunas prendas con las mostacillas plateadas que use para los centros de las flores.
Le realice un pequeño brazalete todo plateado y una pulsera de flores que hacían juego con un lindo collar al cual también le realice una linda flor con el centro rojo, y para los aretes lo que hice fue introducir una mostacilla plateada en un pequeño trozo de nailon transparente al cual luego doble e introduje en el orificio de la orejas de la muñeca.
Accessories:
While I was finishing the dress I noticed that the doll didn't have any jewelry so I decided to make her some silver beads with the silver beads I used for the flower centers.
I made a small silver bracelet and a flower bracelet that matched with a nice necklace to which I also made a pretty flower with a red center, and for the earrings what I did was to insert a silver bead in a small piece of transparent nylon which I then folded and inserted into the ear hole of the doll's ears.


Sesión de fotos / Photo session
and
Resultado Final / Resultado Final
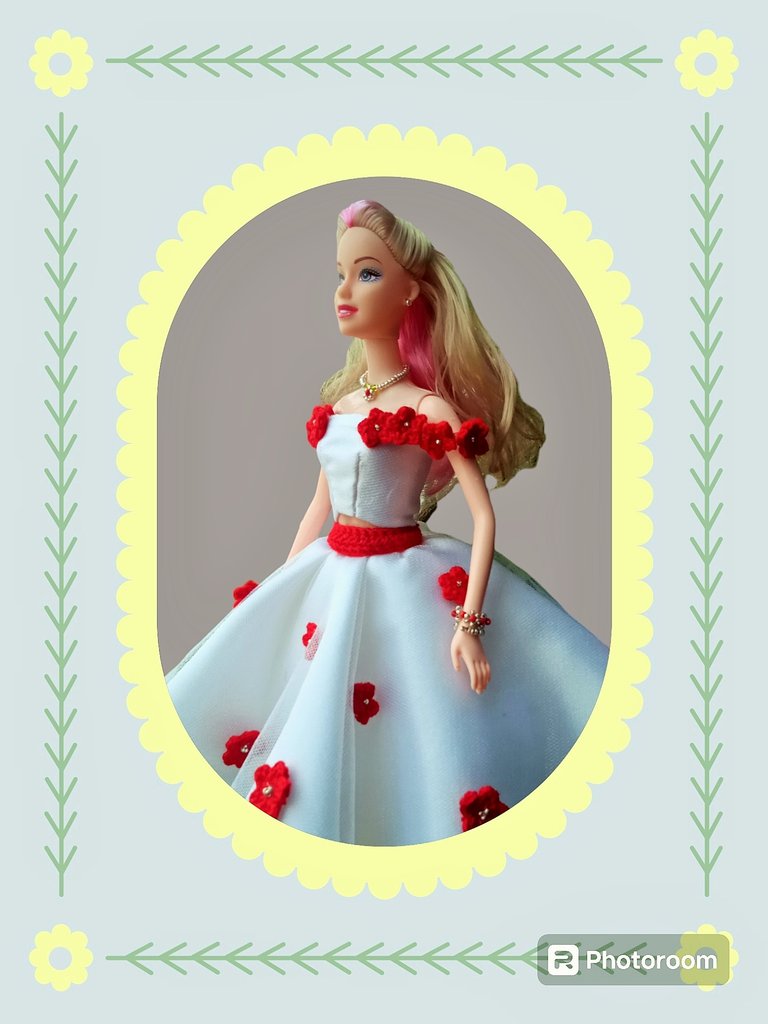


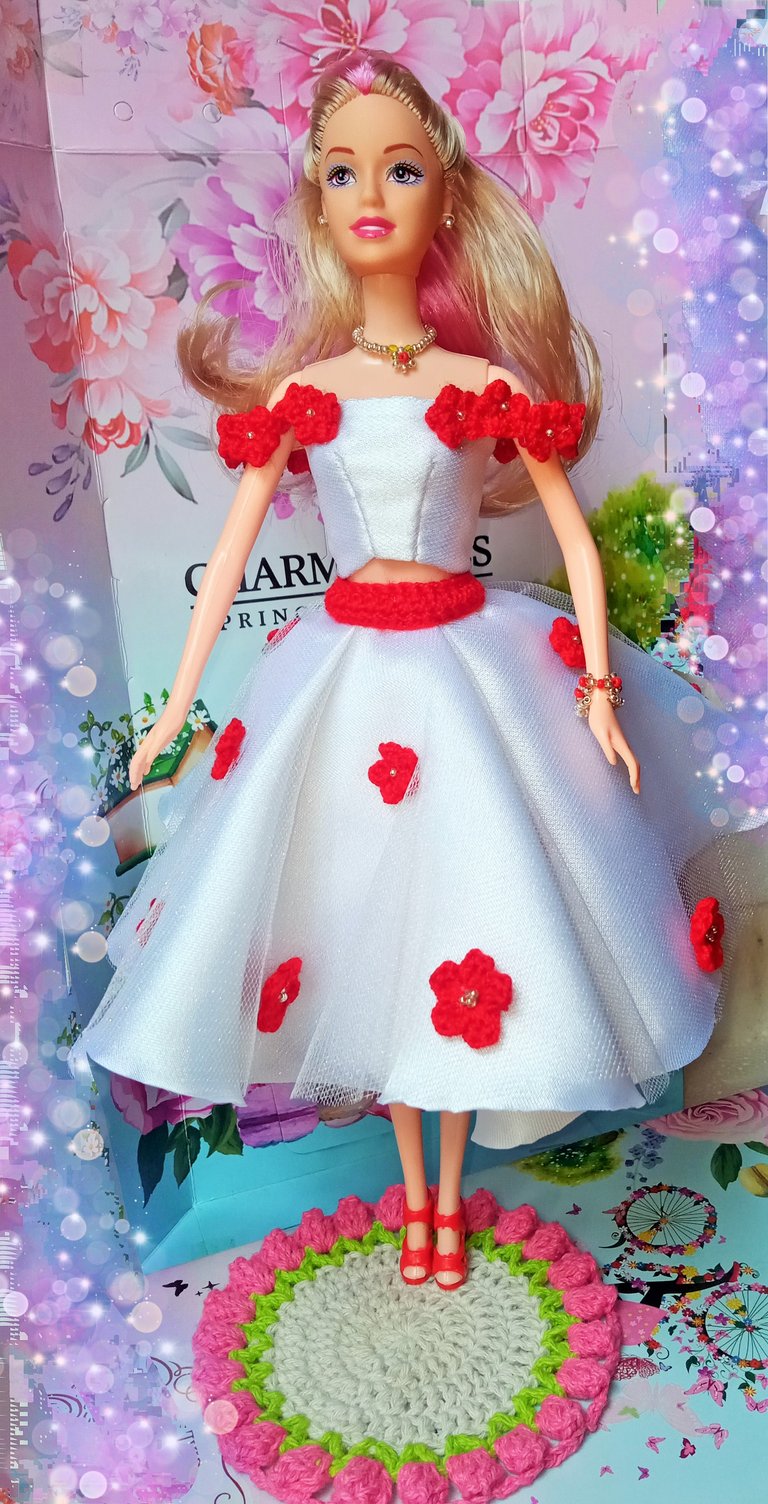

REALMENTE DESEO LES HAYA GUSTADO TANTO COMO A MÍ EL RESULTADO FINAL DE ESTE HERMOSO VESTIDO, LES JURO QUE SIGO EMOSIONADA CON EL RESULTADO Y NO DEJO DE CONTEMPLAR LO LINDA QUE SE VE MI MUÑECA JAJAJA… ME SIENTO COMO UNA NIÑA.
ESPERO SUS BONITOS COMENTARIOS Y/O VOTOS, ASÍ ME MOTIVAN PARA SEGUIR COMPARTIENDO MIS CREACIONES CON USTEDES, YO ESTARÉ FELIZ DE RESPONDER TODOS SUS COMENTARIOS, ¡SEAN FELICES Y QUE LA MUSA DE LA CREATIVIDAD NUNCA LOS ABANDONE!
¡GRACIAS POR VISITAR MI BLOG!
Se despide de ustedes con mucho cariño su amiga Nathalie @laranitacrochet
I REALLY HOPE YOU LIKED AS MUCH AS I DID THE FINAL RESULT OF THIS BEAUTIFUL DRESS, I SWEAR I'M STILL THRILLED WITH THE RESULT AND I CAN'T STOP CONTEMPLATING HOW PRETTY MY DOLL LOOKS HAHAHA... I FEEL LIKE A LITTLE GIRL.
I HOPE YOUR NICE COMMENTS AND/OR VOTES, THIS WAY YOU MOTIVATE ME TO KEEP SHARING MY CREATIONS WITH YOU, I WILL BE HAPPY TO ANSWER ALL YOUR COMMENTS, BE HAPPY AND MAY THE MUSE OF CREATIVITY NEVER LEAVE YOU!
THANK YOU FOR VISITING MY BLOG!
Your friend Nathalie @laranitacrochet bids you a fond farewell.
*Todas las fotografías utilizadas en la publicación son propiedad de la autora.
*Las fotografías fueron tomadas y editadas con mi REDMI 9 y con la App FotoRoom.
*La traducción la hice en https://www.deepl.com/es/translator
*All photographs used in this publication are property of the author.
*The pictures were taken and edited with my REDMI 9 and the FotoRoom App.
*The translation was done at https://www.deepl.com/es/translator
Hello @laranitacrochet , what a beautiful job, she is a tenderness, all a spring.
😁☺️💕 Thank you so much!
Hola ranitacrochet, que bella quedo tu princesa, te felicito porque se nopta too el amor que le pusiste al diseño.
Hola @carolinacardoza ☺️🤗 muchas gracias, realmente si le puse mucho amor y dedicación en realizar este traje para mi linda muñeca 😍
Wuao! que hermoso vestido, el resultado es genial, cada detalle de las flores, lo hacen muy original, excelente trabajo, feliz día.
Muchas gracias amiga 😌🤗 que tengas un lindo día también.
Excelente trabajo quedó muy hermoso te felicito
Muchas gracias 😊
Te ha quedado hermoso ese vestido primaveral. Cuidando cada detalle, las flores tejidas, los accesorios, todo, excelente trabajo. Sin dudas será un éxito. Felicidades.
Muchas gracias 😊🤗 era lo que pretendía que quedara muy hermosa y que tuviera pequeños y lindos detalles en sus accesorios 😍
Wow, wow, wow this amazing, I imagine how many hours it took to finished this project, making this tiny outfit is not really easy, and you give out a nice style so so beautiful, this is a wonderful skill you have, well done more grace
☺️ Thank you very much for your nice comment, it did take me 2 whole afternoons until late at night to finish the whole outfit with its details and accessories, but it was worth every second because I was in
Hola @laranitacrochet, gracias por unirte al concurso, el vestido es hermoso, delicado y elegante, me encantó que cuidaste cada detalle, elaborando esos diminutos accesorios. Se nota que le pusiste mucho amor a este proyecto y que la pasaste muy bien en el proceso.
Hola @kattycrochet , gracias a ustedes por crear tan hermoso concurso ☺️ y gracias por leer mi publicación y por el apoyo ☺️🤗 me disfruté cada momento de realización del vestido 😊💕
Holaaa @laranitacrochet. Que belleza de vestido 🤩. Me gustó la forma de la falda. Se ve que disfrutaste ese proceso. Éxito en el concurso.
Muchas gracias 😊 y sí realmente lo disfrute muchísimo 😌
Hola amiga, que lindo vestido, me encantan las flores y la falda , Barbie luce muy elegante, las zapatillas se ven geniales; éxito en el concurso 🌸🌺🌻🌻🌷
Saludos!
Muchas gracias amiga 😊🤗
Thank you for creating this beautiful contest 😊💕
Hermoso y delicado trabajo, tiene esa elegancia de los vestidos de los 50
Felicidades 👏
Muchas gracias ☺️ si es muy cierto parece un vestido de los años 50, eso me vino a la mente apenas hice la falda.
Hermoso, ame como te quedó. Saludos
Gracias 😊 yo también amo el resultado 🥰 gracias por pasarte por acá
Maravilloso trabajo ❤️. Que gran regalo una Barbie a los 32 años jaja, yo también hubiese estado feliz por eso. Muy precioso el diseño y todos los detalles, hasta sus accesorios... Se nota que le pusiste mucho amor y entusiasmo al proyecto. Felicitaciones y gracias por unirte al concurso 😃
Si lo fué ☺️🥰
Felicidades por ser la ganadora del concurso con este hermoso diseño que le has hecho a este regalo tan especial que te hicieron en ese cumpleaños #32.
Esta bello y todo bien delicado.
Aurora, se me ocurre que puede ser un lindo nombre para ella.
Muchas gracias amiga! 😉💖 me encanta el nombre de Aurora, es el nombre de la Bella Durmiente así que ese será el Nombre de mi Muñeca, muchas gracias @leidimarc
Gracias amiga. Gracias por tomarlo en cuenta.
Sabes que sin pensarlo dije ese nombre, fue algo mágico y extraño, pediste un nombre y se me ocurrió ese al ver tu linda muñeca.
Jajajaja... Y tanto que me gusta esa princesa y no pensé en su nombre y cuando lo leí me encantó 🥰
Entonces ese es el nombre que tiene que llevar amiga.
Y con ese traje se ve como toda una princesa.
Se lo voy a mostrar a mi hija para que le haga uno a su muñeca.