(ESP/ENG) FUNDAS TEJIDAS A CROCHET USADAS PARA DECORAR FRASCOS DE VIDRIO RECICLADOS / CROCHETED COVERS USED FOR DECORATING RECYCLED GLASS JARS
¡Hola, hola! Hivers y hermosa comunidad de DIYHUB, espero todos se encuentren súper bien, animados e inspirados 💟
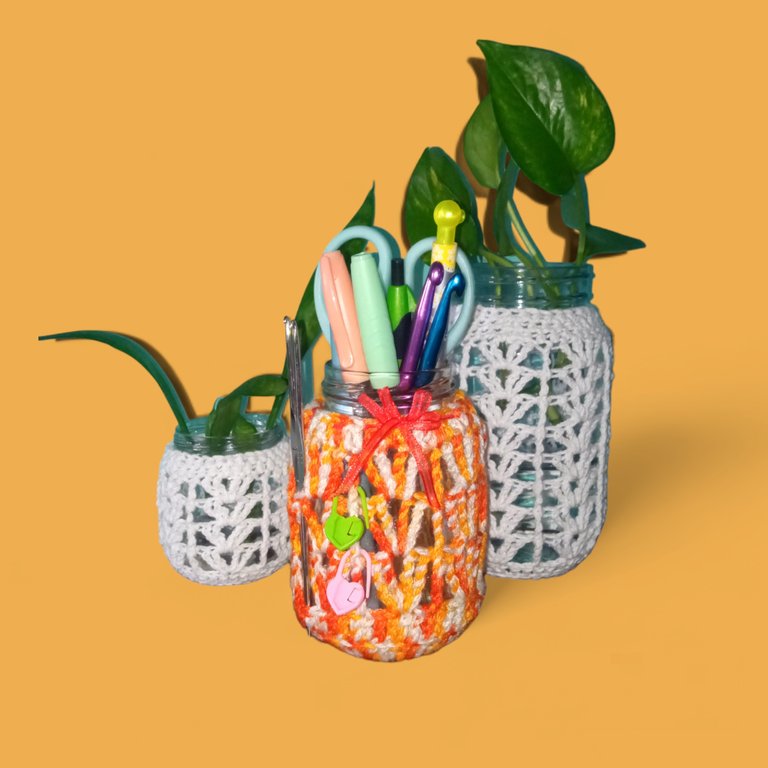
Hoy les presentare un proyecto que hace mucho quería realizar, y que me tiene bastante entusiasmada ya que ansiaba ver el resultado final; son unas hermosas fundas tejidas a crochet que usare para cubrir algunos frascos de vidrio reciclados que uso para plantas y también como portalápices.
Este trabajo lo presento como mi entrada al concurso del mes World Earth Day DIY CONTEST - Invest In Our Planet para celebrar el día internacional de la tierra, y también es una pequeña sorpresa para mi mama, ya que ella tiene muchas plantas tipo suculentas en su pequeño jardín en la ventana del apartamento y siempre quiere tener algunas plantas dentro del departamento.
Hello, hello! Hivers and beautiful DIYHUB community, I hope you are all super well, encouraged and inspired 💟.
Today I will present you a project that I have been wanting to do for a long time, and that has me quite excited as I was anxious to see the final result; they are beautiful crocheted covers that I will use to cover some recycled glass jars that I use for plants and also as pencil holders.
I am submitting this work as my entry to World Earth Day DIY CONTEST - Invest In Our Planet contest to celebrate the international earth day, and it is also a little surprise for my mom, since she has many succulent plants in her small garden in the window of the apartment and always wants to have some plants inside the apartment.
Me gustaría contarles que el proyecto que originalmente tenía pensado para participar en el concurso era muy diferente ya que quería hacer eran macetas con latas recicladas, pero mi mama tomo las latas sin preguntar y las uso para otra cosa, así que tuve que cambiar mi plan.
Reciclar frascos de vidrio es algo que realmente me gusta hacer, y lo podrán ver seguido parte de mi trabajo, para Halloween realice una lámpara y también unos vasos con frascos de mayonesa y también para navidad realice un pequeño cascanueces con una botella de salsa de tomate y estambres que resulto más hermoso de lo que yo había planificado.
La verdad pienso que la mejor manera de homenajear a nuestro planeta y de cuidarlo es reciclando, y evitando hacer todo lo que ya sabemos que lo enferma como la tala y la quema, además de generar la menor cantidad de desechos posibles diariamente.
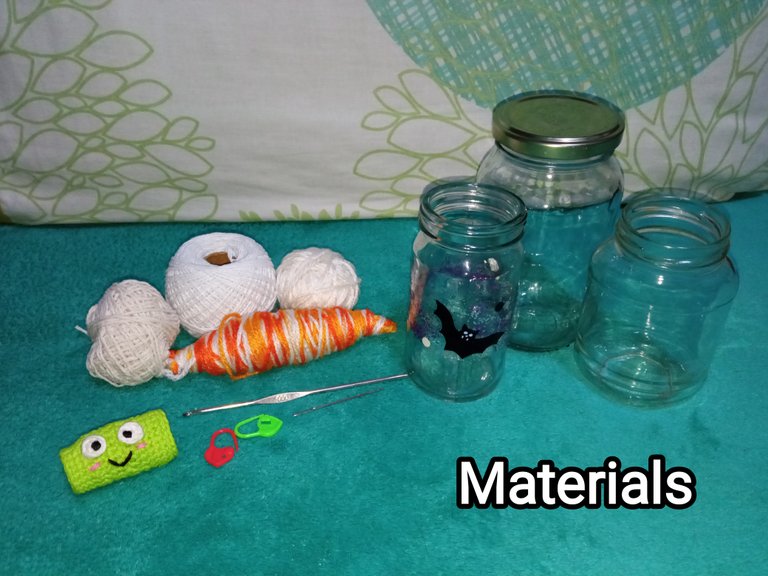
Bueno amigos a continuación les presento los materiales que use para realizar las fundas y también el proceso de tejido, el diseño de la funda lo hice a ojo de una foto que saque de Pinterest y que tenía guardada desde hace más de un año.
MATERIALES:
-Hilo de algodón o pabilo.
-Aguja de crochet #000.
-Marcadores de puntos.
-Aguja lanera.
-Tijera.
I would like to tell you that the project I originally had in mind to participate in the contest was very different since I wanted to make flower pots with recycled cans, but my mom took the cans without asking and used them for something else, so I had to change my plan.
Recycling glass jars is something I really like to do, and you can see it often in my work, for Halloween I made a lamp and also some glasses with mayonnaise jars and also for Christmas I made a little nutcracker with a bottle of tomato sauce and stamens that turned out more beautiful than I had planned.
I really think that the best way to pay tribute to our planet and take care of it is to recycle, and avoid doing everything we already know that makes it sick, such as logging and burning, in addition to generating as little waste as possible on a daily basis.
Well friends below I present the materials I used to make the covers and also the weaving process, the design of the cover I did by eye from a photo I took from Pinterest and had saved for more than a year.
MATERIALS:
- Cotton thread or wick.
- Crochet needle #000.
- Stitch markers.
- Wool needle.
- Scissors.
PUNTOS A UTILIZAR:
-Mpa: medio punto alto.
-Pa: punto alto.
-PaD: punto alto Doble.
-PaT: punto alto Triple.
-Cad: cadeneta.
-Pd: punto deslizado.
-Aum: aumento.
-Dism: disminución.
-BLO: tomar solo la hebra trasera.
-PaD en relieve por delante
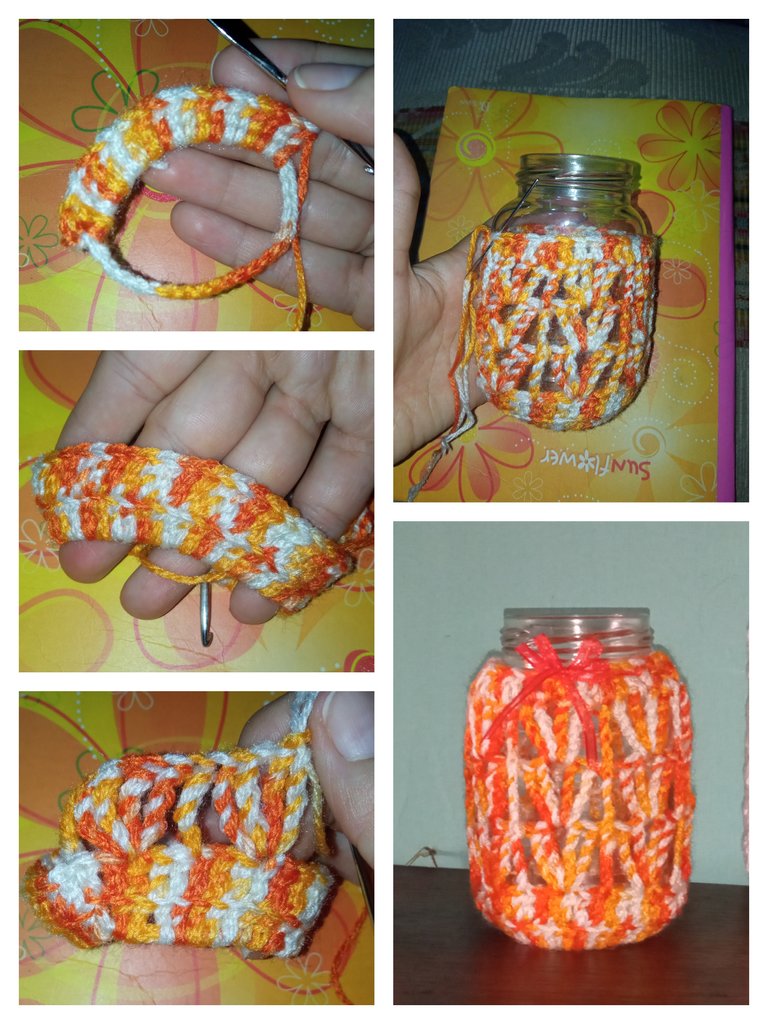
PASO A PASO:
La funda del frasco grande y pequeño las realice con hilo blanco de algodón para combinarlos ya que estos los usare para tener plantas en agua y la del frasco mediano la realice con estambre matizado color naranja y este lo usare como porta lápices y para colocar.
Funda para frasco grande:
V1: tejer un anillo de 12 cad, y realizar 24 Pa y cerrar la vuela con 1 Pd. (24)
V2: 3 Pa, 1 Aum en toda la vuelta. (30)
V3: 4 Pa, 1 Aum. (36)
V4: 5 Pa, 1 Aum. (42) tejer todos los puntos de la vuelta en BLO.
V5: a partir de esta vuelta comence con el diseño de la funda e inicie tejiendo 3 cad, salte 2 puntos y en el tercero teji (2 PaD, 1 cad, 2 PaD) todo en el mismo punto, saltar 2 puntos y en el tercero tejer 1 PaD y continuar con la secuencia.
V6-12: esta vuelta es casi igual a la anterior pero en este caso los PaD se realizan en relieve por delante, como lo muestra el grafico.
V13-15: tejer 1 mpa sobre cada punto de la vuelta anterior, cerrar con 1Pd, cortar y ocultar la hebra.
NOTA: los gráficos no tienen exactamente los puntos utilizados en el patrón ya que son solo para mostrar gráficamente como realizar el tejido.
POINTS TO BE USED:
- hdc: half double crochet.
- dc: double crochet.
- trc: treble (triple ) crochet.
- dtr: double treble (triple ) crochet.
- Ch: chain stitch.
- sl st: slipped stitch.
- inc: increase.
- Dec: decrease.
- BLO: take only the back loop.
STEP BY STEP:
The cover of the large and small jar I made with white cotton yarn to combine them since I will use them to have plants in water and the medium jar I made with orange colored yarn and I will use it as a pencil holder and to place it.
Cover for big jar:
R1: knit a ring of 12 ch, and make 24 dc and close the fly with 1 sl st (24).
R2: 3 Pa, 1 inc in all round. (30)
R3: 4 dc, 1 inc. (36)
R4: 5 dc, 1 inc. (42) knit all the stitches of the row in BLO.
R5: from this row begin with the design of the cover and start knitting 3 ch, skip 2 stitches and in the third row knit (2 trc, 1 ch, 2 trc) all in the same stitch, skip 2 stitches and in the third row knit 1 trc and continue with the sequence.
R6-12: this row is almost the same as the previous one but in this case the trc are knitted in relief from the front, as shown in the chart.
R13-15: knit 1 hdc over each stitch of the previous row, close with 1sl st, cut and hide the loop.
NOTE: the charts do not have the exact stitches used in the pattern as they are only to show graphically how to knit.
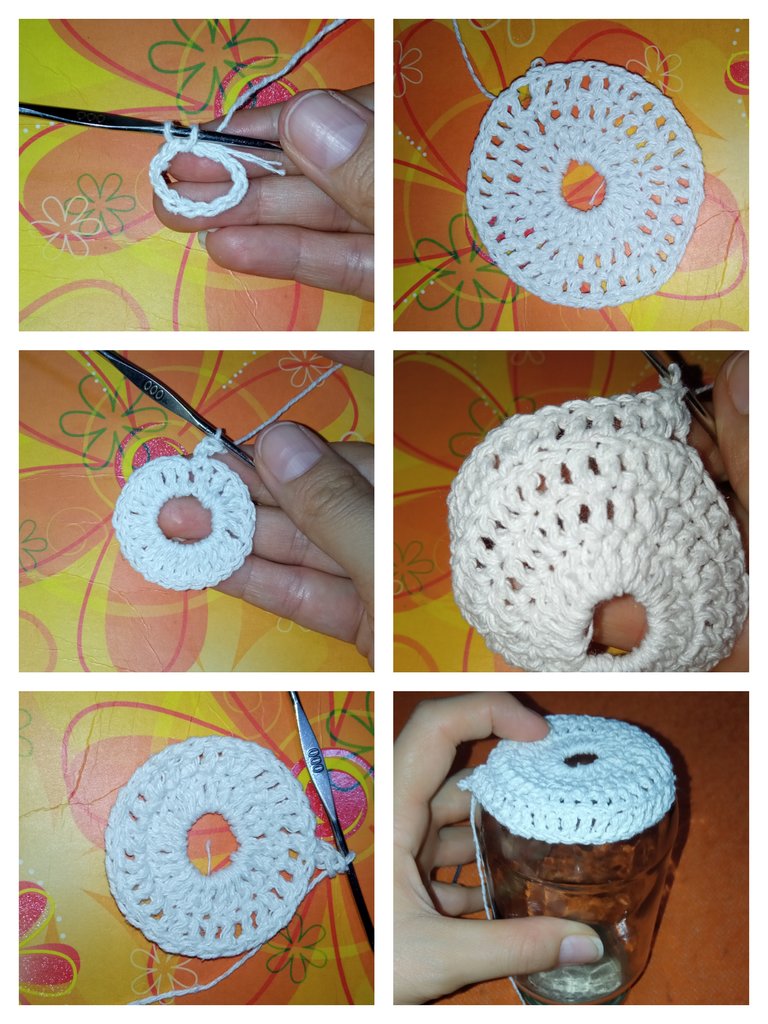
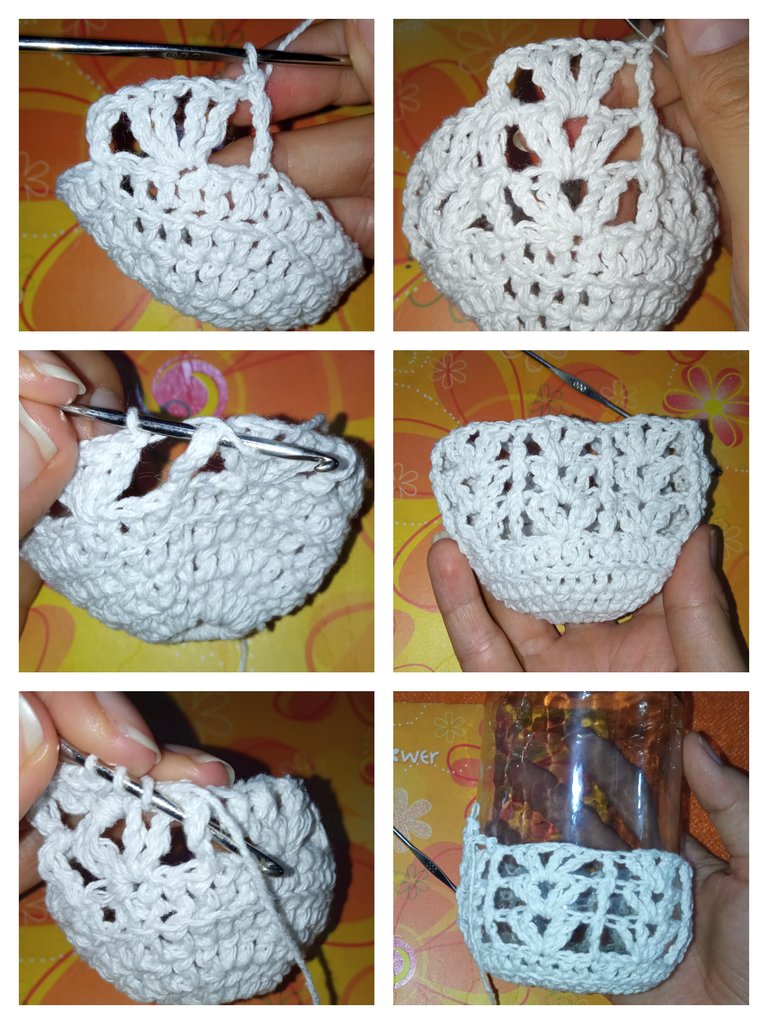
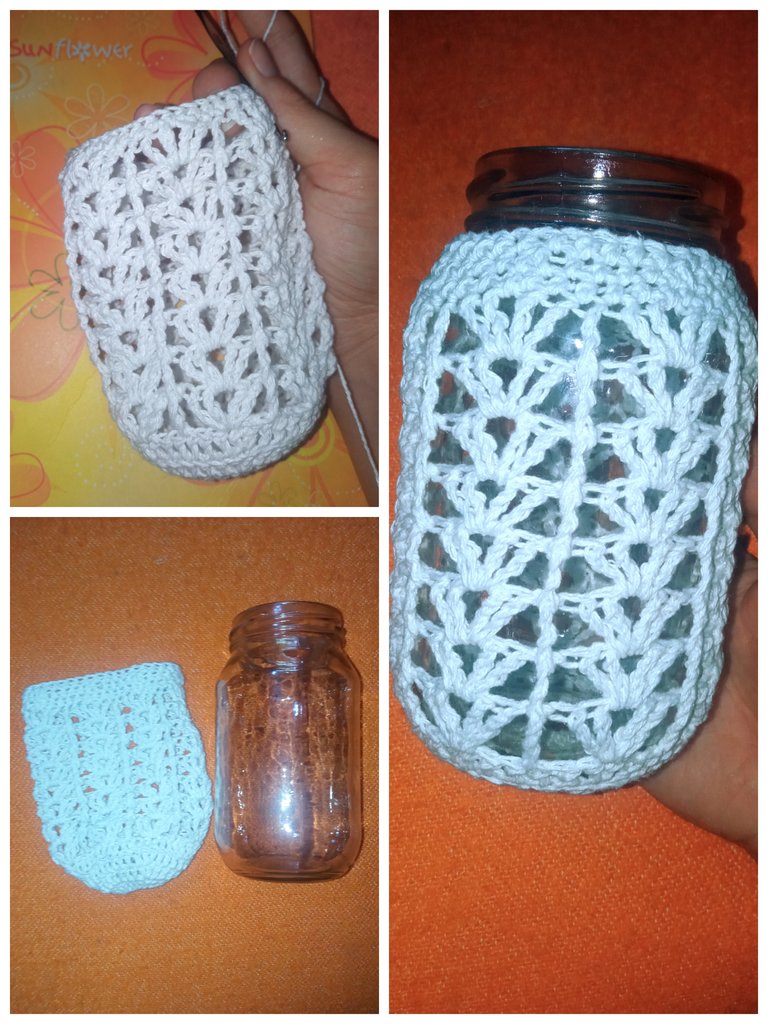
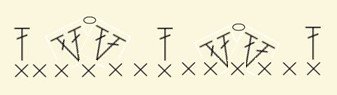
DIAGRAMA V5 / DIAGRAM V5
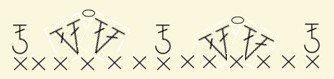
DIAGRAMA V6 / DIAGRAM V6
Funda para frasco mediano:
V1: tejer un anillo de 32 cad, y dentro de este realizar 42 Pa y cerrar la vuela con 1 Pd. (42)
V2: tejer en BLO 42 Pa. (42)
V3-5: repetí el patrón aplicado en las vueltas 5 y 6 de la funda para el frasco grande, pero cambie los PaD por PaT.
V6: tejer 4 Pa, 1 Dism en toda la vuelta, cerrar con 1Pd, cortar y ocultar la hebra. (36)
Para culminar introduje una cinta delgada entre los puntos de la última vuelta, luego le coloque la funda al frasco y la ajuste haciendo un lazo con la cinta.
Cover for medium jar:
R1: knit a ring of 32 ch, and within this knit 42 dc and close the fly with 1 sl st (42).
R2: knit in BLO 42 dc. (42)
R3-5: repeat the pattern applied in rows 5 and 6 of the cover for the large jar, but change the trc to dtr.
R6: knit 4 Pa, 1 Dism in the whole round, close with 1 dc, cut and hide the loop (36).
To finish, insert a thin ribbon between the stitches of the last row, then place the cover on the jar and adjust it by making a loop with the ribbon.
Funda para frasco pequeño:
El frasco pequeño se teje igual que el grande, lo que varía es el tamaño y se los aplico a continuación.
V1: en un anillo de 12 cad, tejer24 Pa y cerrar la vuela con 1 Pd. (24)
V2: 3 Pa, 1 Aum en toda la vuelta. (30)
V3: 4 Pa, 1 Aum. (36) tejer todos los puntos de la vuelta en BLO.
V4-7: repetí exactamente el mismo patrón aplicado en las vueltas 5 y 6 de la funda para el frasco grande.
V8: tejer 1 mpa sobre cada punto de la vuelta anterior. (36)
V9: 4 mpa, 1 dism. (30) Cortar y ocultar la hebra.
Cover for small jar:
The small jar is knit the same as the large one, what varies is the size and I apply them below.
R1: in a ring of 12 ch, knit24 dc and close the row with 1 sl st. (24)
R2: 3 dc, 1 inc in the whole round. (30)
R3: 4 dc, 1 inc. (36) knit all the stitches of the row in BLO.
R4-7: I repeated exactly the same pattern applied in rows 5 and 6 of the cover for the large jar.
R8: knit 1 hdc over each stitch of the previous row (36).
R9: 4 hdc, 1 dec. (30) Cut and hide the loop.

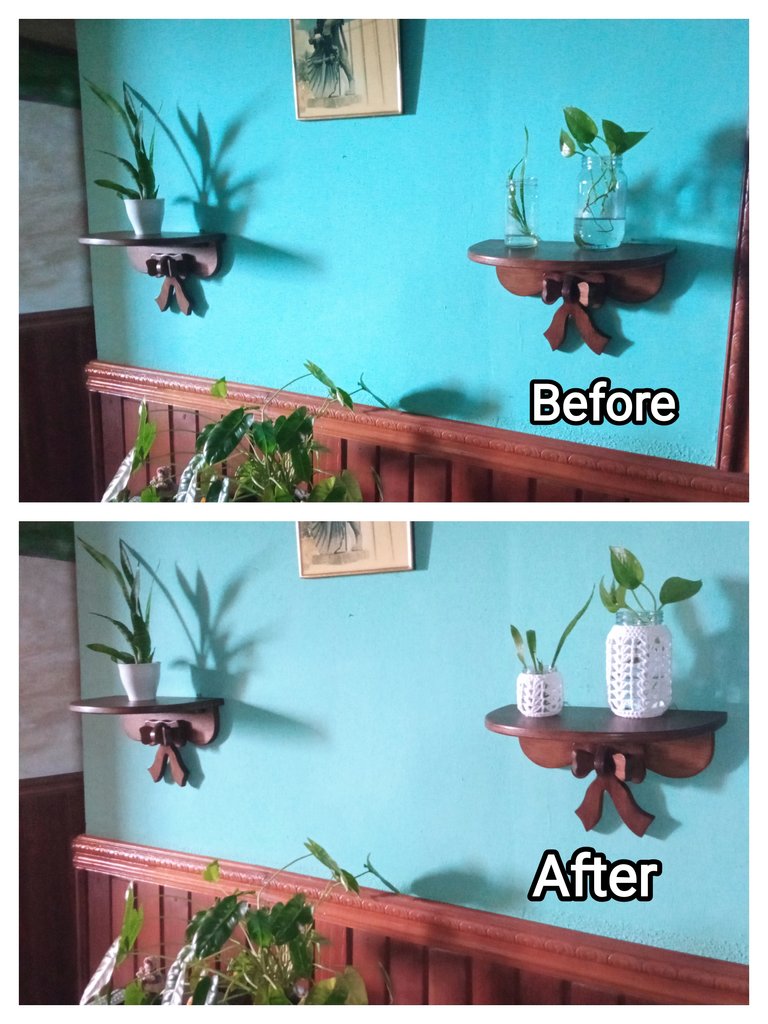
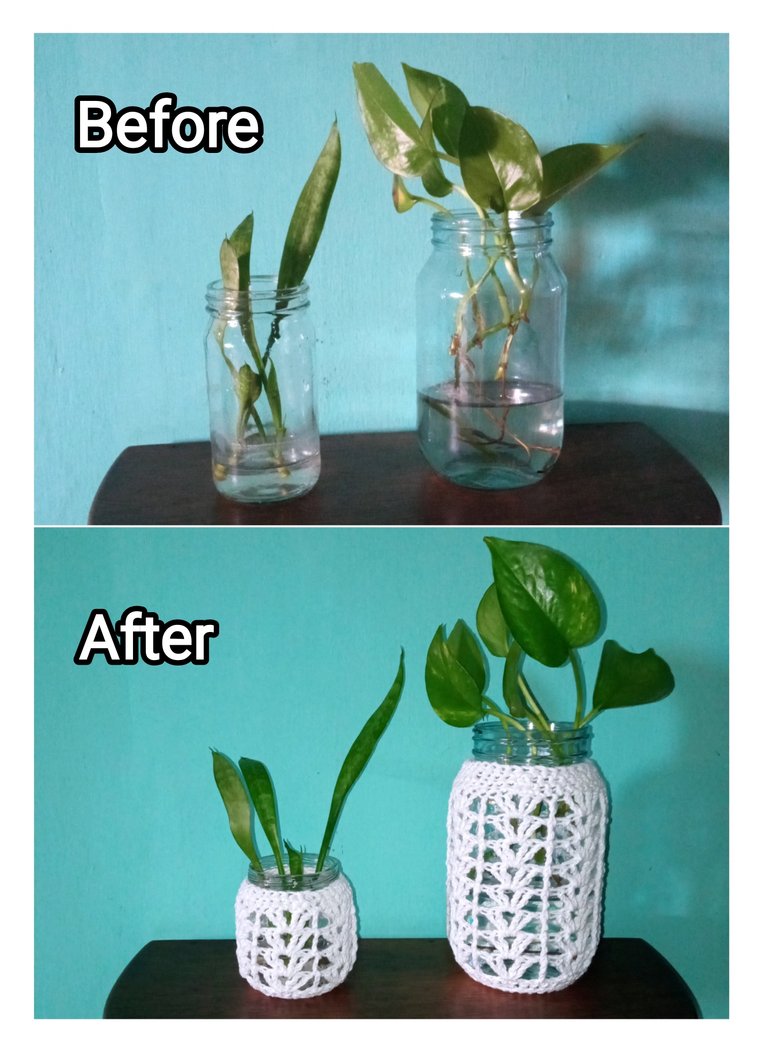
A continuación les muestro fotografías de como lucen los frascos decorados con las fundas tejidas y como lucen en donde los coloque en el apartamento.
Below I show you pictures of how the jars look decorated with the woven covers and how they look where I placed them in the apartment.
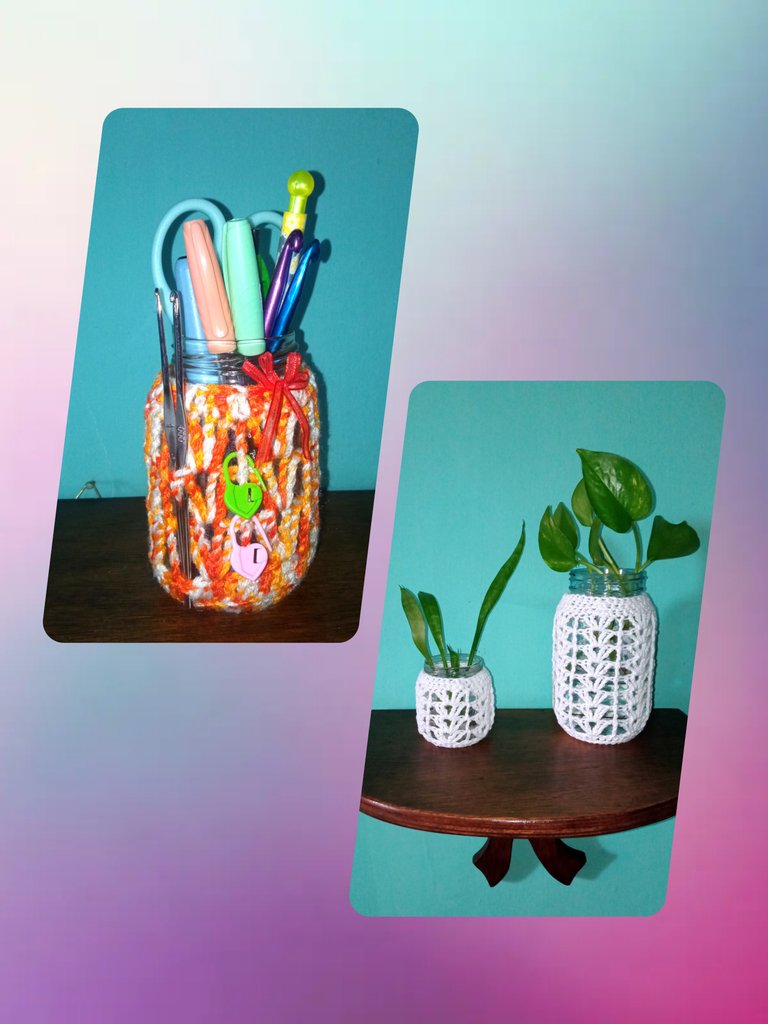
Resultado Final / Final Result
REALMENTE DESEO LES HAYA GUSTADO TANTO COMO A MÍ EL RESULTADO FINAL DE ESTAS HERMOSAS FUNDAS TEJIDAS A CROCHET USADAS PARA DECORAR FRASCOS DE VIDRIO RECICLADOS Y ESPERO SUS BONITOS COMENTARIOS Y/O VOTOS, ASÍ ME MOTIVAN PARA SEGUIR COMPARTIENDO MIS CREACIONES CON USTEDES, YO ESTARÉ FELIZ DE RESPONDER TODOS SUS COMENTARIOS, SEAN FELICES Y QUE LA MUSA DE LA CREATIVIDAD NUNCA LOS ABANDONE!
¡GRACIAS POR VISITAR MI BLOG!
Se despide de ustedes con mucho cariño su amiga Nathalie @laranitacrochet
I REALLY HOPE YOU LIKED AS MUCH AS I DID THE FINAL RESULT OF THESE BEAUTIFUL CROCHETED COVERS USED TO DECORATE RECYCLED GLASS JARS AND I LOOK FORWARD TO YOUR NICE COMMENTS AND/OR VOTES, THIS WAY YOU MOTIVATE ME TO KEEP SHARING MY CREATIONS WITH YOU, I WILL BE HAPPY TO ANSWER ALL YOUR COMMENTS, BE HAPPY AND MAY THE MUSE OF CREATIVITY NEVER LEAVE YOU!
THANK YOU FOR VISITING MY BLOG!
Your friend Nathalie @laranitacrochet bids you a fond farewell.
*Todas las fotografías utilizadas en la publicación son propiedad de la autora.
*Las fotografías fueron tomadas y editadas con mi REDMI 9 y con la App FotoRoom.
*La traducción la hice en https://www.deepl.com/es/translator
*All photographs used in this publication are property of the author.
*The pictures were taken and edited with my REDMI 9 and the FotoRoom App.
*The translation was done at https://www.deepl.com/es/translator
these covers for recycled glass jars are pretty neat and lovely. Nice job
Thank you very much and thank you for the support 😊🤗
Hola, me encanta esa idea, los frascos lucen bellos y quedan más protegidos. Gracias por compartir el paso a paso.
Gracias ☺️ yo también pienso que así están más protejidos
Lucen muy bonitas, me encantan las manualidades a crochet, todo lo que se puede crear con esta maravillosa técnica. Saludos
Muchas gracias ☺️ y si es muy cierto con el crochet se pueden hacer demasiadas cosas.
Wow! the covers are beautiful and unique. 👌
Thank you very much ☺️🤗
You are welcome.
Ooh what a great idea! !LUV
!LOLZ
laranitacrochet, phoenixwren sent you LUV. 🙂 (1/1) tools | trade | connect | wiki | daily
Made with LUV by crrdlx.
lolztoken.com
I'm over you.
Credit: reddit
@laranitacrochet, I sent you an $LOLZ on behalf of phoenixwren
(1/1)
Delegate Hive Tokens to Farm $LOLZ and earn 110% Rewards. Learn more.
Thank you 😊🤗