(ENG/ESP) CONCURSO ESPECIAL DE HALLOWEEN: SPOOKY GLASS AND MUG POSITIONS, INSPIRED BY SKULLS, TO DECORATE YOUR TABLE ON HALLOWEEN NIGHT.
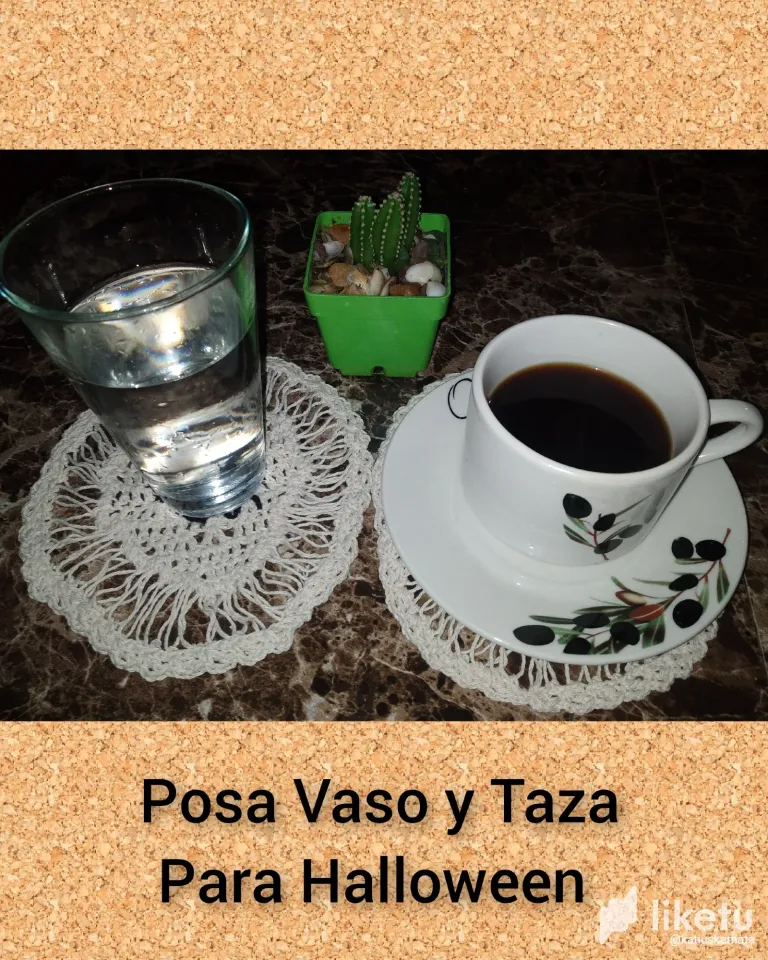

Hello, to all my DIY loving friends, I am pleased to be once again with you in this great community @diyhub who, hand in hand with @liketu, bring us this Halloween special. It is a pleasure, very close to celebrating this great night, where we share food and drinks with family and friends. Regarding them, I will show you a very easy, simple and creative tutorial on how to make some Spooky Coasters Glass and Cup, ideal for decorating the table, inspired by Skulls. Without further ado, I invite you to follow me.
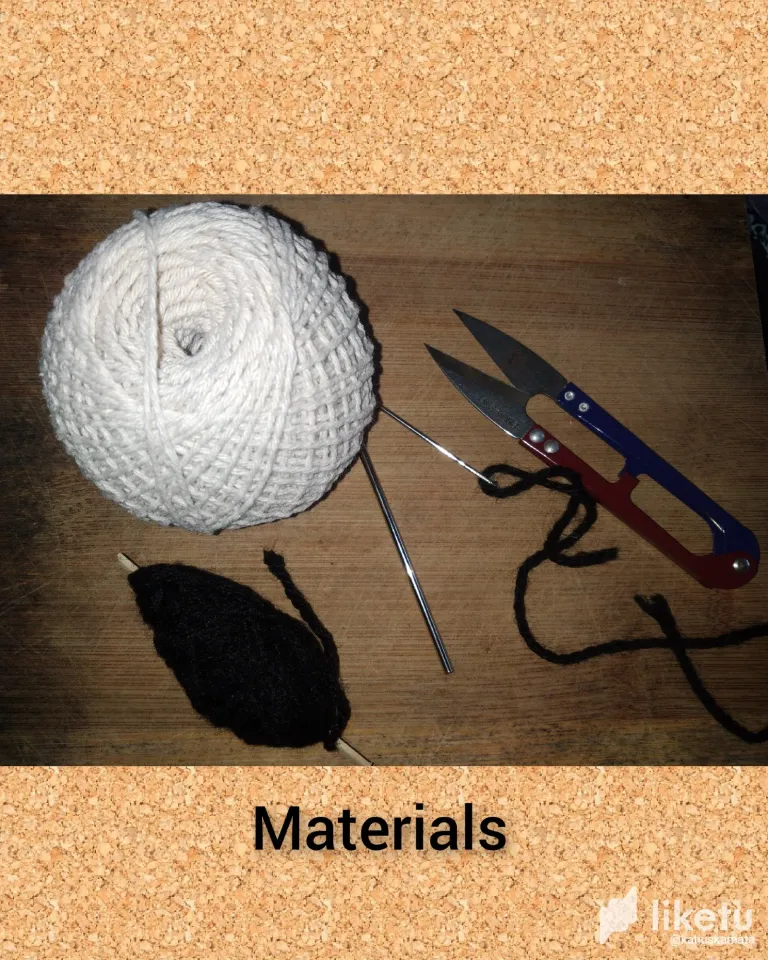
Materials/Materials.
.Pavilo thread, traditional color.
. Worsted yarn.
. Wool needle.
. Knitting needle.
. Piece of cardboard 2.5 cm wide.
. Scissors.
Step/Steps
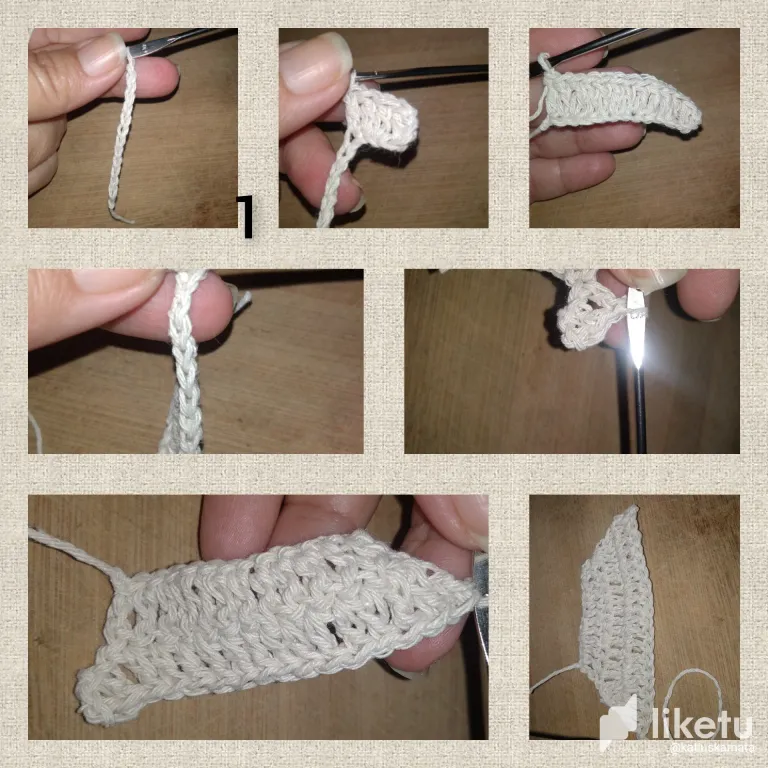
1.) I start by lifting ten chain stitches, I lift three more chains, equivalent to a double crochet, and in chain point number ten, I lift a first double crochet, I begin to go through the chain stitches and in each of them, I lift a high point. I knit two chain stitches, then three and in chain stitch number two, I raise a double crochet, and in this way I continue the route, until I reach the next extreme, where I make an increase of three double crochets. In this way I have given an increase in this pass compared to the first. I knit three rows, with double crochets, without the need to increase.
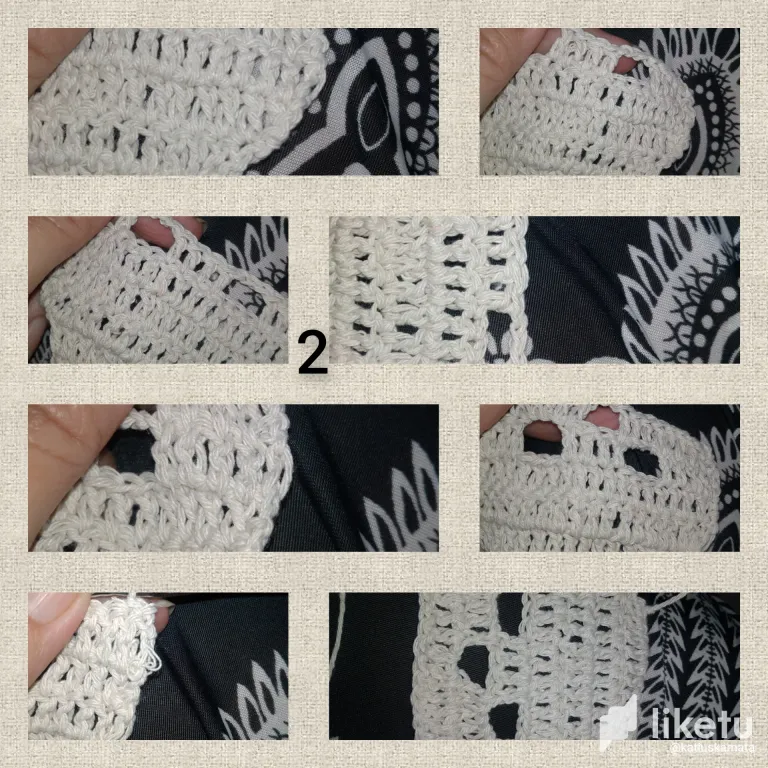
2.) Continue, on row number five, I knit four double crochets, three chain stitches, I leave three spaces from the previous row, I knit five double crochets, three chain stitches, I leave three spaces and five double crochets. In this way, I have left two spaces separated by five double crochets, which will simulate the holes in the eyes of the skull. In the next row, I knit a double crochet in each double crochet of the previous row, including the separating chain stitches, one more in the points that separate the eyes, I knit chain stitches, leaving three spaces and in the fifth, I knit a double crochet, continuous with double crochets, and from this stitch, I simulated the nostril of the skull.
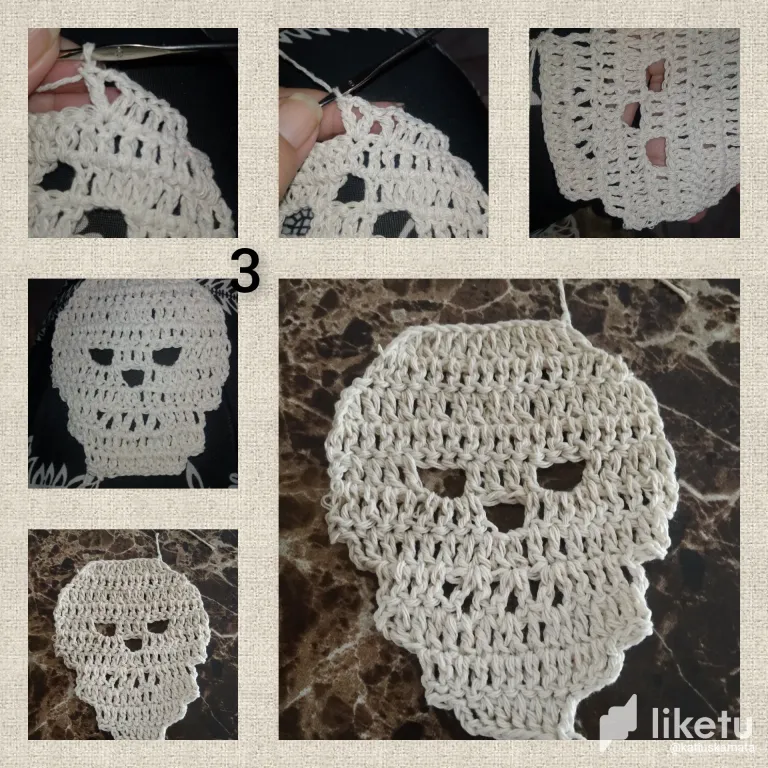
3.) On this round, with slip stitch, I run two spaces to decrease and from there, I knit only double crochets, until I reach the other side, where I still leave the two double crochets from the previous round without knitting. I make a new decrease, this time by one point. I knit four double crochets, continue with two chain stitches, I take yarns with the needle and lift a double crochet, I introduce right in the same space as the double crochet number four, I leave a space and I knit a double crochet, two chain stitches and one stitch high in the same space as the previous one. I continue with high points. In this pass, I make a new decrease of two double crochets from the last row. The same thing happens at the other end, I turn the fabric and make a new decrease of two double crochets. In this way I have woven the silhouette of the Caravela.
4.) Using the piece of cardboard, I begin to go around the face of the caravel, passing the thread through the cardboard, fixing with a slipped stitch at each starting point, I position myself in the next space and I will repeat this way until I go through everything.
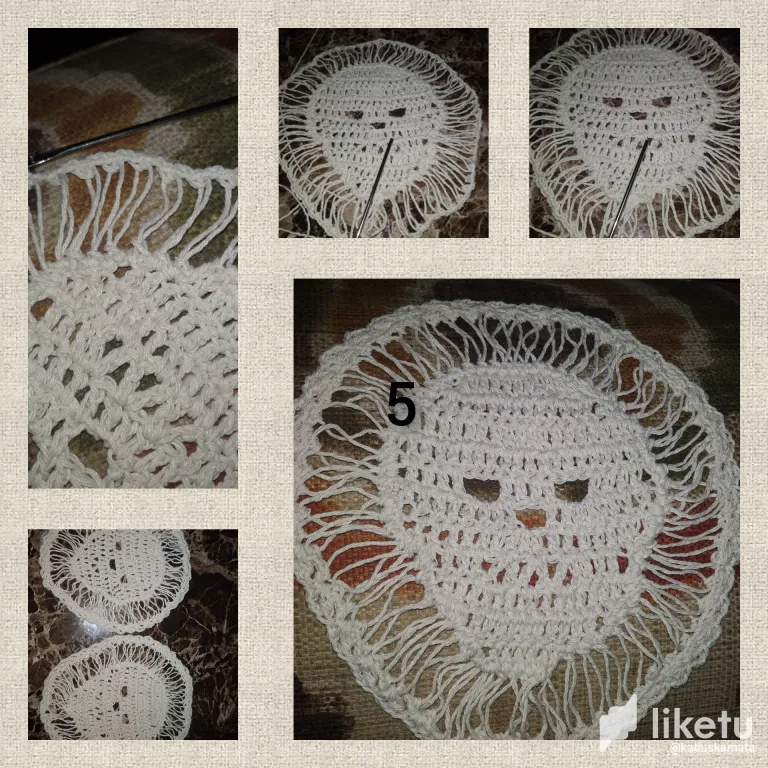
5.) I place myself at the top of the strands, I knit half a point, two chain stitches and take the next one, and in this way, I go through the route and involve all the strands. Now taking two chain stitches and I knit a double crochet in that same space, leaving two spaces I knit a slip stitch, and in this way, I knit a very pretty and attractive border.
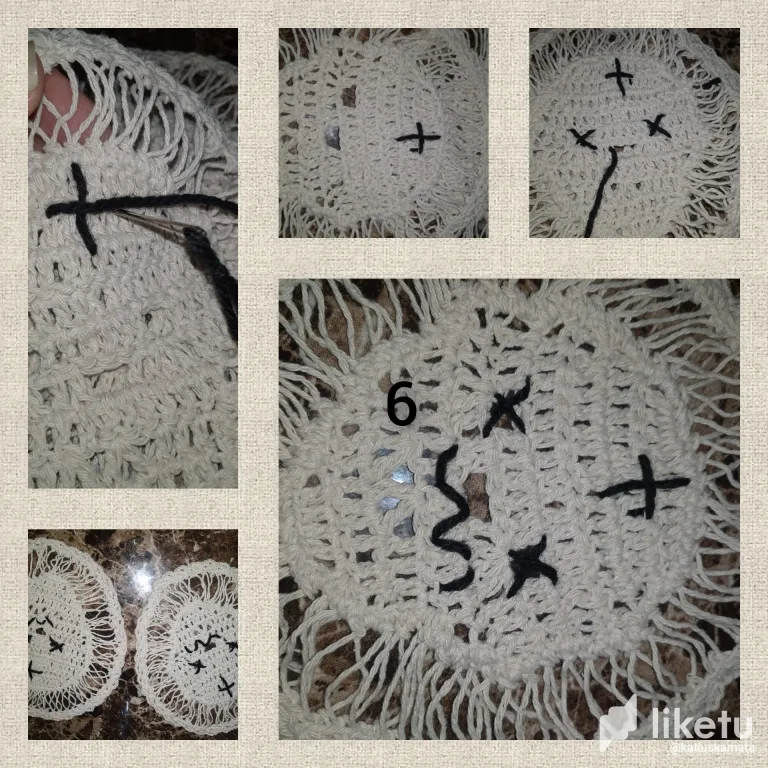
6.) The next thing will be, with the black needle and yarn, to embroider a cross on the forehead, I will knit an X in both eyes and in the mouth I will knit several v-shaped stitches. In this way I conclude. I hope, very satisfied with the final result. . All photos are my property, taken with my smartphone. . Use InShot to show steps . Use All Language translator.
Grateful for following me to the end. See you soon.//
Hola, a todos mis amigos amantes de el bricolaje, me complace estar una vez más con ustedes en esta gran comunidad @diyhub quien tomada de la mano por @liketu, nos traen este especial de Halloween. Es un gusto, ya muy cerca de celebrarce esta gran noche, donde compartimos, comidas y bebidas con familiares y amigos. A propósito de ellos, les mostraré un muy fácil, sencillo y creativo, tutorial, de cómo hacer, unos Espelusnantes Posa Vaso y Taza, ideal para decorar la mesa, inspirados en Calaveras. Sin más les invito a seguirme.
Materials/Materiales.
.Hilo pavilo, color tradicional.
. Hilo estambre.
. Aguja lanera.
. Aguja para tejer.
. Trozo de cartón de 2.5 cm de ancho.
. Tijeras
Step/Pasos
1.) Comienzo levantando diez, puntos cadenas, levanto tres cadenas más, equivalente a un punto alto, y en el punto cadena número diez, levanto, un primer punto alto, comenzó a recorrer los puntos cadenas y en cada uno de ellos, levanto un punto alto.
Tejo dos puntos cadenas,luego tres y en el punto cadena numero dos,levanto un punto alto,y de esta forma continuo, el recorrido, hasta llegar al siguiente extremos, dónde hago un aumento de tres puntos altos. De esta forma he dado aumento en esta pasada en comparación a la primera. Tejo tres vueltas, con puntos altos, sin necesidad de hacer aumentos.
2.) Continuo, en la pasada o vuelta número cinco, tejo cuatro puntos altos tres puntos cadenas, dejo tres espacios de la pasada anterior, tejo cinco puntos altos, tres puntos cadenas dejo tres espacios y cinco puntos altos. De esta manera , he dejado dos espacios separados por cinco puntos altos, que simularán los orificios en los ojos de la calavera.En la siguiente pasada, tejo un punto alto en cada punto alto de la pasada anterior,incluyendo los puntos cadenas de separación, uno más en los puntos que separan los ojos, tejo tra puntos cadenas, dejo tres espacios y en el quinto, tejo un punto alto, continuo con puntos altos, y de esta amera, simuló el orificio de la nariz de la calavera.
3.) En esta vuelta, con punto delizado, corro dos espacios para hacer disminución y a partir de ahí, tejo solo puntos altos, hasta llegar al otro lado, dónde igual dejo,nlos dos puntos altos de la pasada anterior sin tejer. Hago una nueva disminución, está vez de un punto. Tejo cuatro puntos altos, continuo con dos puntos cadenas, tomo lazadas con la aguja y levanto un punto alto,enintroduzco justo en el mismo espacio de el punto alto número cuatro, dejo un espacio y tejo un punto alto, dos puntos cadenas y un punto alto en el mismo espacio de el anterior. Continuo con puntos altos. En esta pasada, hago una nueva disminución de dos puntos altos de la vuelta pasada igual ocurre en el otro extremo, doy vuelta a el tejido y hago una nueva disminución de dos puntos altos. De esta forma he tejido la silueta de la Caravela.
4.) Usando el trozo de cartón, comienzo a recorrer el rostro de la caravela, pasando el hilo por el cartón, fijando con punto deslizado en cada punto de partida, me ubico en el siguiente espacio y así iré repitiendo hasta recorrerlo todo.
5.) Me ubico en la parte alta de las hebras tejo medio punto dos puntos cadenas y tomo el siguiente, y de esta forma ,bhago el recorrido e involucró a todas las hebras. Ahora llevando dos punto cadenas y tejo en ese mismo espacio un punto alto, dejo dos espacios tejo un punto deslizado, y de esta forma,tejo una orilla muy bonita y vistosa.
6.) Lo siguiente será, con la aguja y estambre de color negro, bordar una cruz en la frente, tejo en ambos ojos una equis y en la boca tejere varias puntadas en forma de v.
De esta forma concluyo. Espero, muy satisfecha con el resultado final.
. Todas las fotos son de mí propiedad, tomadas con mí teléfono inteligente.
. Use InShot para mostrar los pasos
. Use traductor All Lenguaje.
Agradecida me hayas seguido hasta el final. Hasta pronto.
For the best experience view this post on Liketu
Que lindo resultado 👻
Gracias @marile21 que bueno le haya gustado.
It is an excellent creative work, I loved it, it looks spectacular, I think I would use it to attach it to a black bag or a flannel and it would be more visible.
Es un excelente trabajo creativo, me encantó, se ve espectacular, creo que lo usaría para pegarlo a un bolso negro o a una franela se vería más resaltante. Gracias por compartir, éxitos en el concurso 😊👌
Claro amiga, un gran toque de imaginación...gracias que lindo te haya gustado.
Es muy bonito para cenar en una fiesta de Halloween. Buen trabajo