[ENG/ESP] Origami Contest - Pikachu Origami 3D
Hello dear friends of HIVE I hope you are well. I am very happy to participate for the first time in @diyhub for the International Origami Day which was celebrated on the 11th of November. For me this art is very relaxing and tests my ability to create with simple materials something wonderful, even though it takes time and patience to make an animal, object or character.
Known to have originated in China, origami (折り紙) or origami (from the Latin papȳrus, 'paper' and flexus, 'to fold') is the folding of paper into various shapes and does not allow the use of cuts or glue, but some traditional Japanese designs do use these tools.
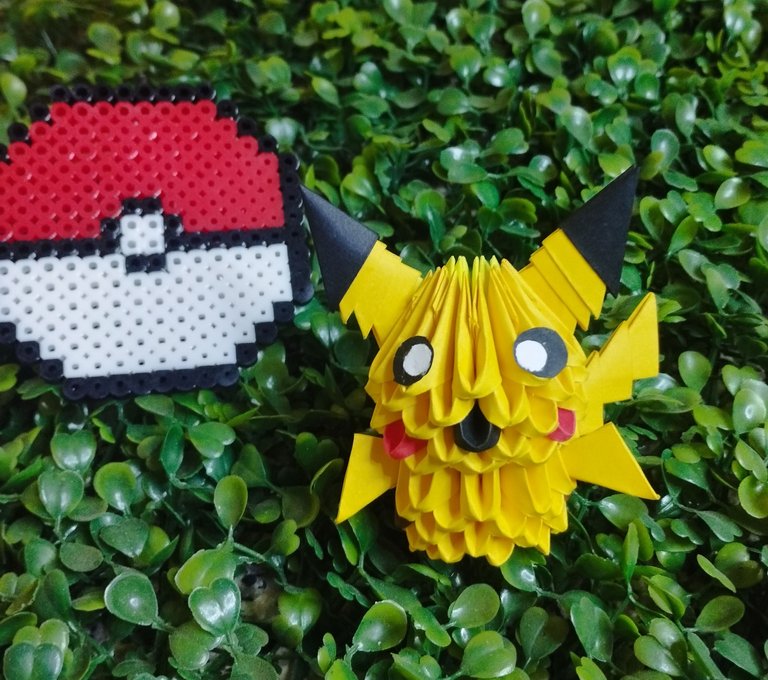
For this contest I decided to participate by choosing one of my favourite characters which is Pikachu (ピカチュウ Pikachu in Japanese) from the anime Pokémon, Pikachu is a Pokémon of the electric type and is one of the most known and representative characters of the Pokémon franchise.
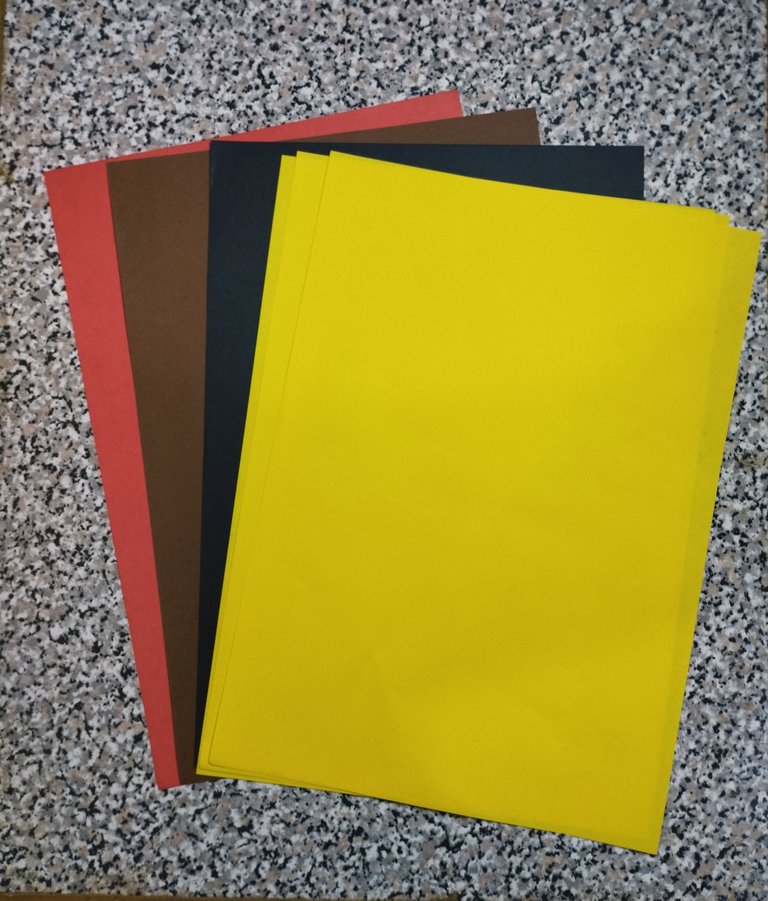
The materials I used are as follows:
Coloured sheets
3 yellow sheets
1 black sheet
1 brown sheet
1 red sheet
1 scissors
1 glue stick
Here is the step by step.
Hola queridos amigos de HIVE espero se encuentren bien. Estoy muy contento de participar por primera vez en @diyhub por el Día Internacional Del Origami el cual se celebró el 11 de Noviembre. Para mi este arte es muy relajante y pone a prueba mi capacidad para crear con materiales sencillos algo maravilloso, aun que también poder elaborar algún animal, objeto o personaje requiere de tiempo y paciencia.
Se sabe que este arte se origino en China, el origami (折り紙) o papiroflexia (del latín papȳrus, 'papel' y flexus, 'doblar') consiste en el plegado de papel para obtener figuras de formas variadas y no permiten el uso de cortes ni pegamento pero algunos diseños tradicionales Japoneses sí utilizan estas herramientas.
Para este concurso decidí participar eligiendo a uno de mis personajes favoritos que es Pikachu (ピカチュウ Pikachu en japonés) del anime Pokémon, Pikachu es un Pokémon del tipo eléctrico y es uno de los personajes más conocidos y representativos de la franquicia de Pokémon.
Los materiales que utilice son los siguientes:
Hojas de colores
3 hojas amarrillas
1 Hoja negra
1 Hoja marrón
1 Hoja roja
1 Tijera.
1 Pegamento
A continuación les dejo el paso paso.
As a first step, fold the sheet in half.
Como primer paso doblamos la hoja a la mitad.
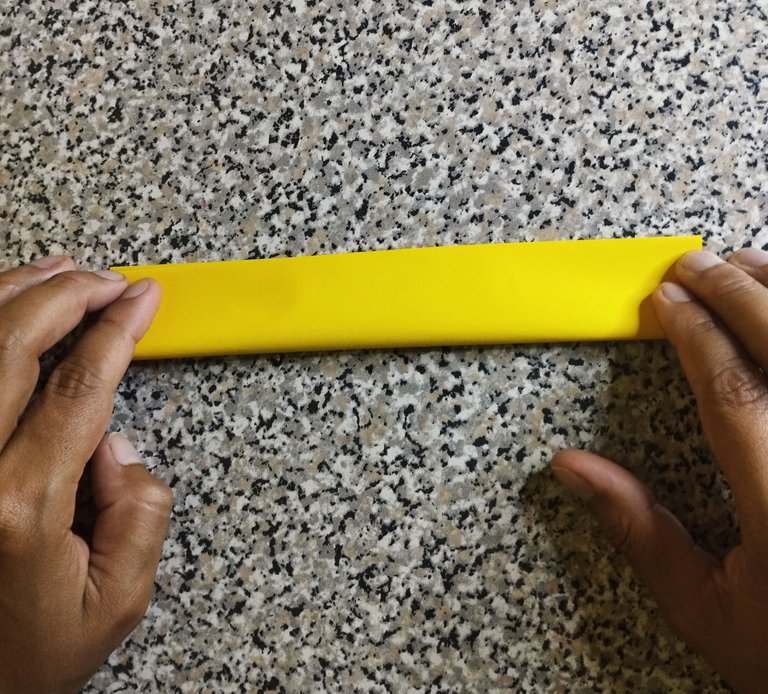
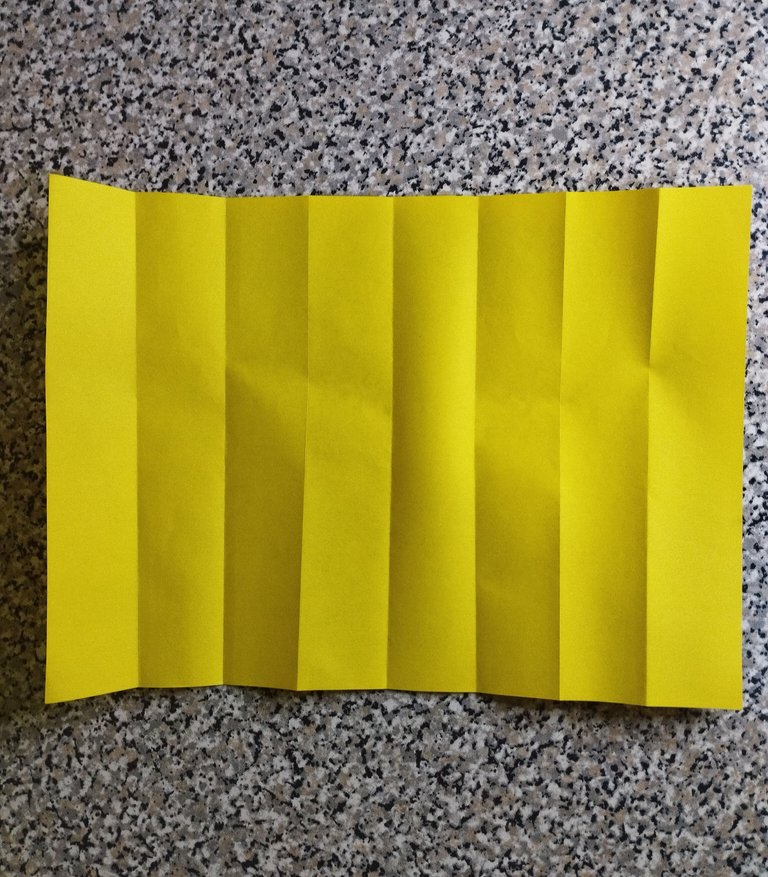
In the same position, repeat the process two more times until it looks like a thin rectangle.
En esa misma posición repetimos el proceso dos veces más hasta que quede como un rectángulo delgado.
When the paper is opened, it should have these folds.
Cuando se abre el papel debe quedar con esos pliegues.
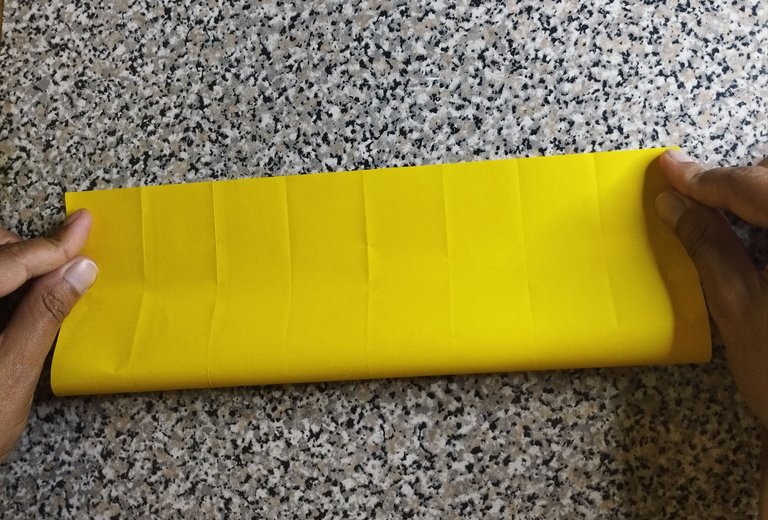
In the same position, fold in half and repeat the process once more.
En esa misma posición se doble a la mitad y se repite el proceso una vez más.
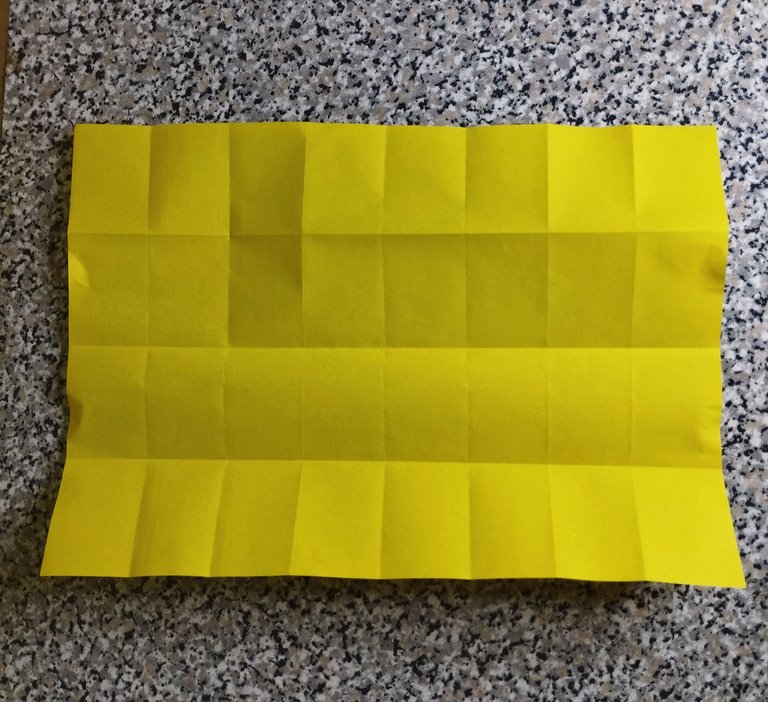
When you open the paper again, you should be left with 32 small squares.
Al abrir nuevamente el papel debe quedar 32 cuadrados pequeños.

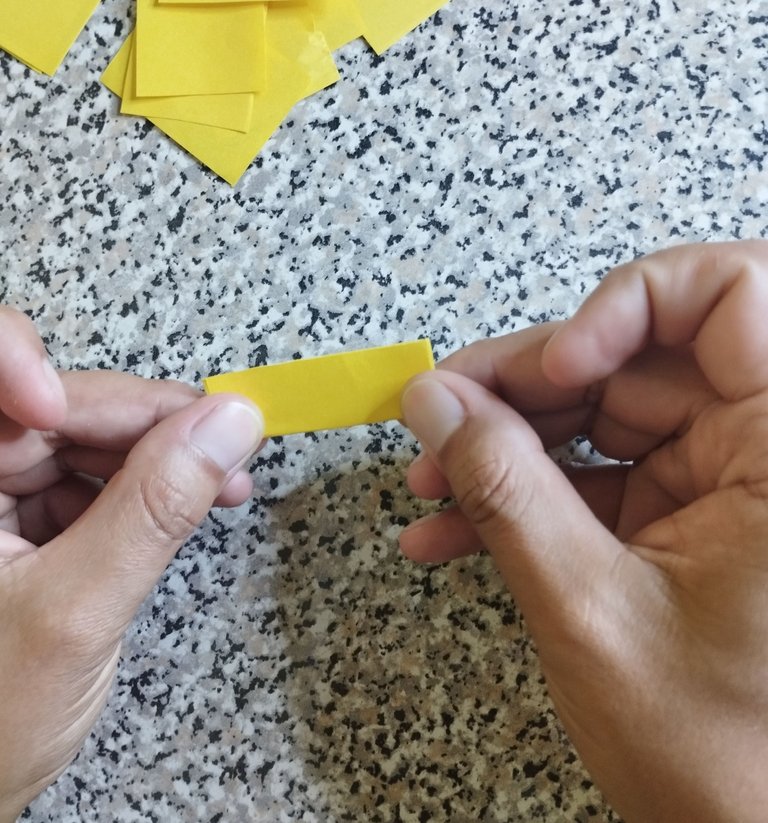
Then with the help of the scissors cut out the squares, in the yellow colour there should be 95 modules, 6 modules brown, 2 modules red and 3 modules black. At the end of this step each paper will automatically have an average size of 3.5cm x 5.5cm.
Luego con la ayuda de las tijeras se recortan los cuadraditos, en el color amarillo debe haber 95 módulos, 6 módulos marrón, 2 módulos rojo y 3 módulos negro. Al finalizar este paso cada papel automáticamente ya tendrá una media de 3.5cm x 5.5cm
Here you take each piece of paper individually, take the side that measures 5.5cm and fold it in half.
Aquí se toma cada papel de manera individual se toma del lado que mide 5.5cm y se dobla a la mitad.

Then one side is folded in half again.
Luego de un lado se vuelve a doblar a la mitad.
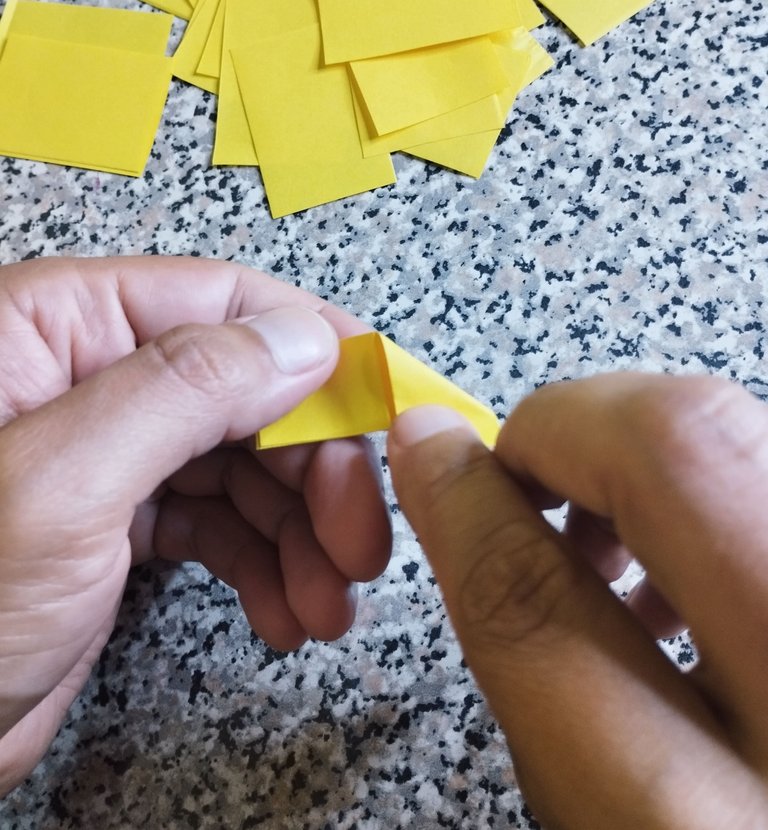
In this step we bend a flange using the line in the middle as a guide.
En este paso doblamos una pestaña guiándonos de la línea de en medio.
Here the other flap is folded over and should form a triangle.
Aquí se dobla la otra pestaña y debe quedar un triangulo.
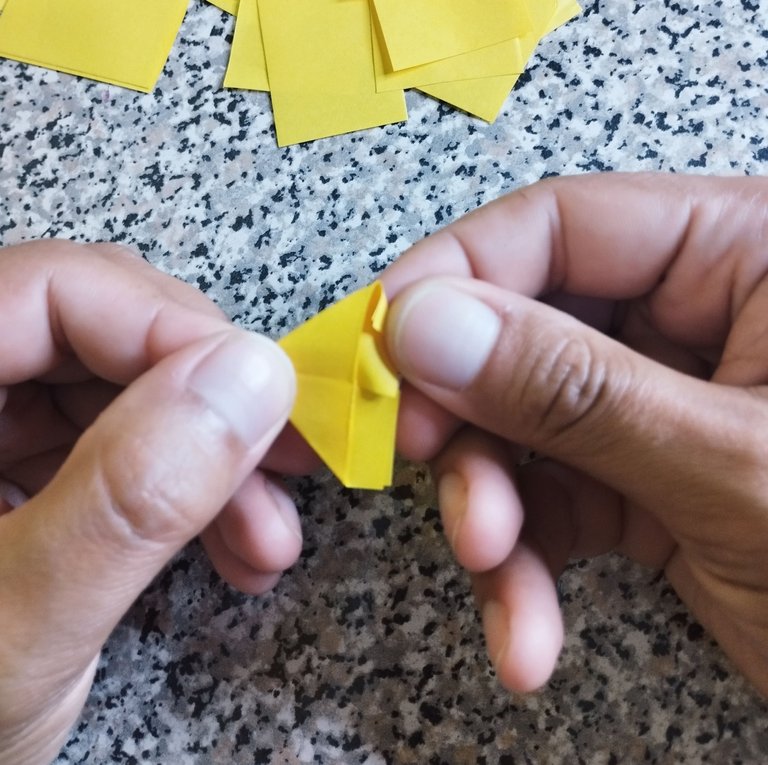
The triangle is turned over and the end of the triangle is folded into a small triangle and the same with the flange.
Se da la vuelta al triangulo y del extremo se realiza otro dobles que debe quedar un triangulo pequeño y lo mismo con la pestaña.
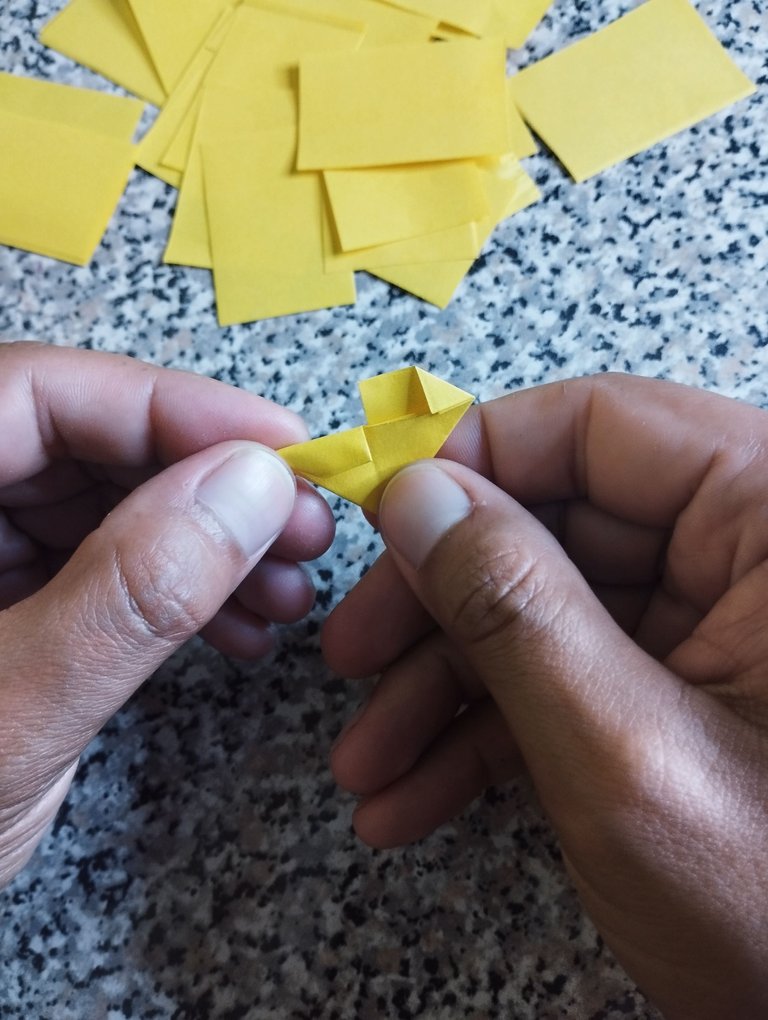
Then both tabs are folded inwards so that they are aligned with the fold and with the help of the middle line they are folded closed.
Luego ambas pestañas se doblan hacia adentro que quede alineado con el pliegue y con la ayuda de la línea de en medio se dobla para cerrar.
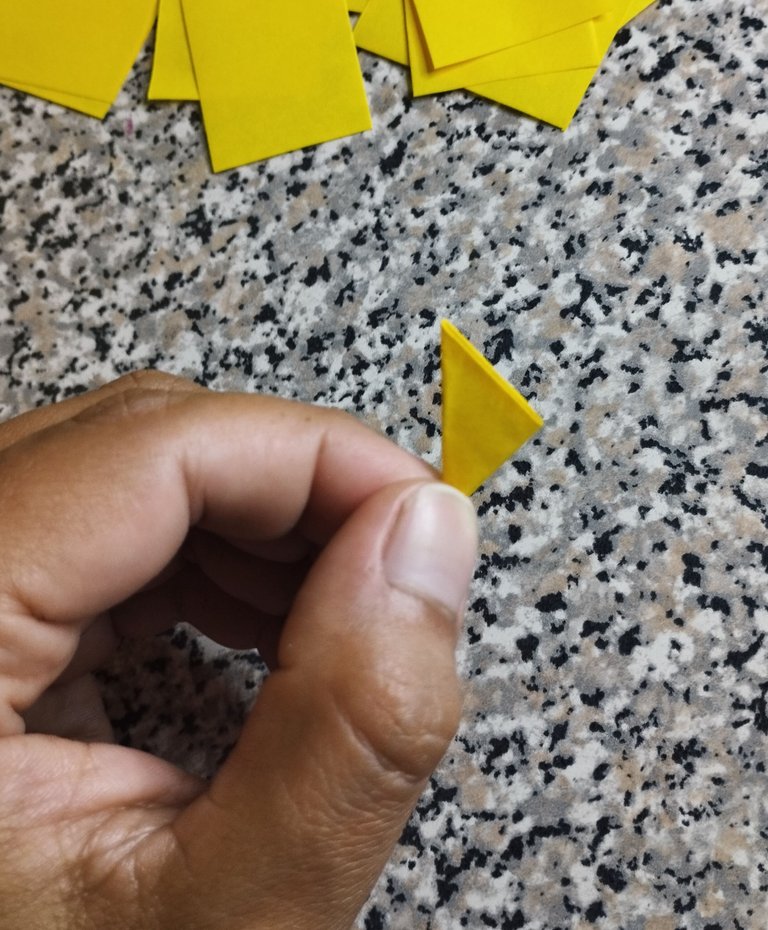
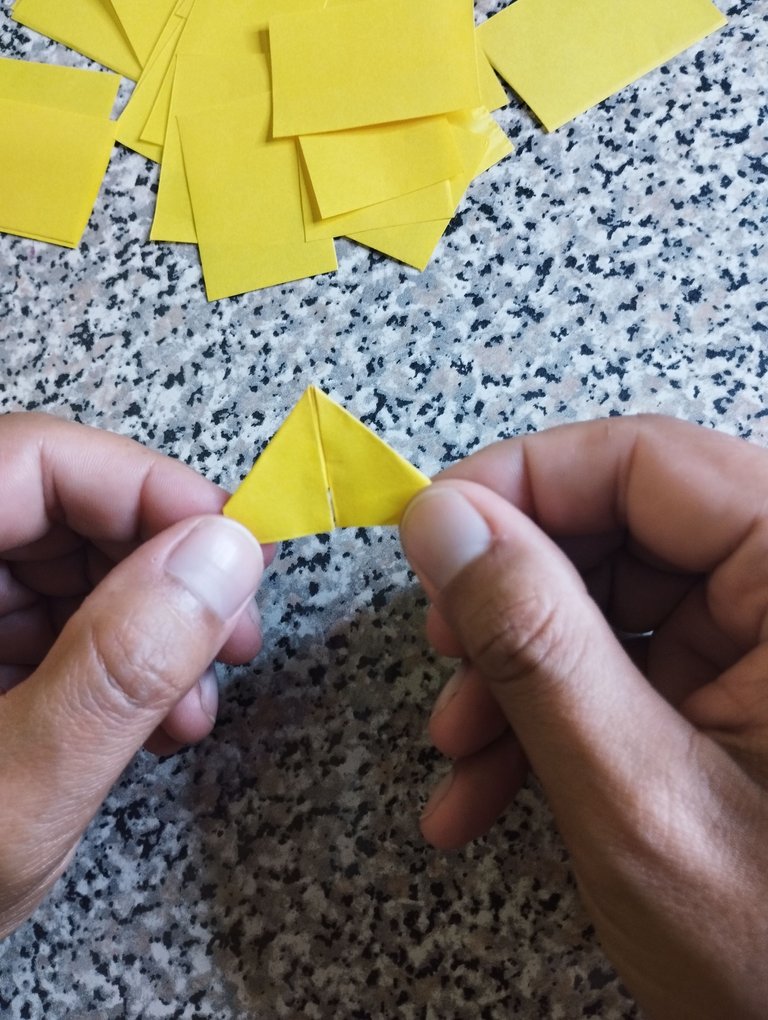
And it should look like this, a perfect triangle.
Y debe quedar así, un triangulo perfecto.
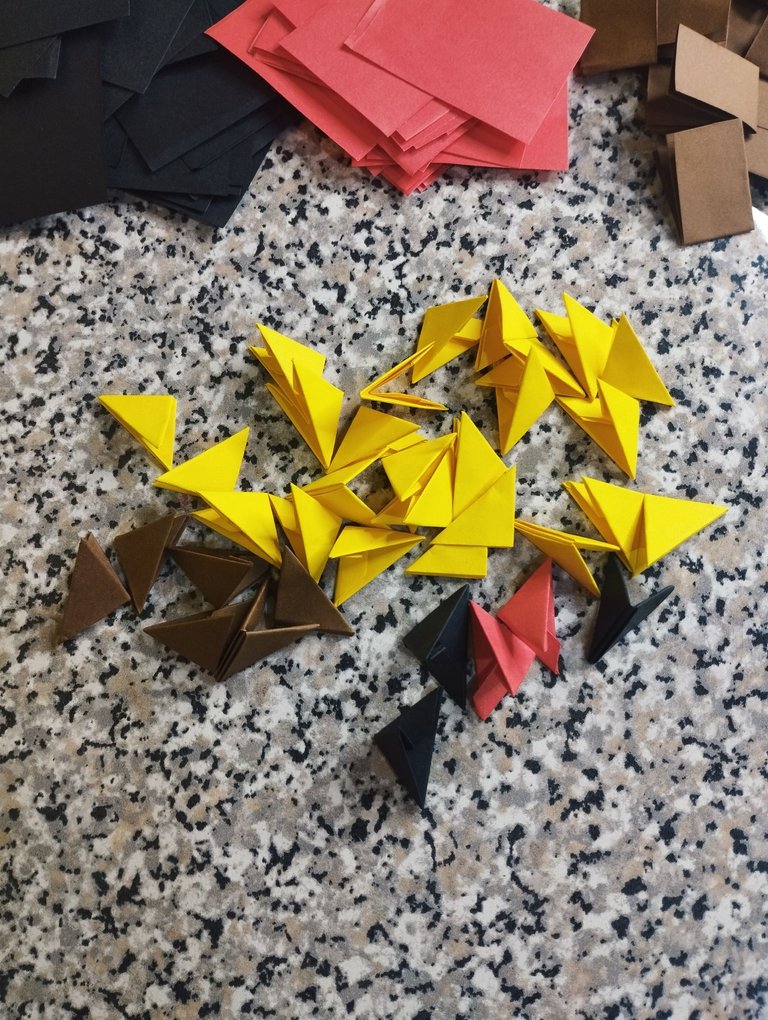
Repeat the process with all the colours to be used.
Se repite el proceso con todos con todos los colores que se van a utilizar.
Then on one side of each triangle there will be a fold to fit one over the other.
Luego de un lado de cada triangulo tendrá un pliegues para poder encajar uno sobre el otro.
With the help of the end of a pen or brush, round off the corner of each module.
Con la ayuda del extremo de un bolígrafo o pincel se redondea la esquina de cada modulo.
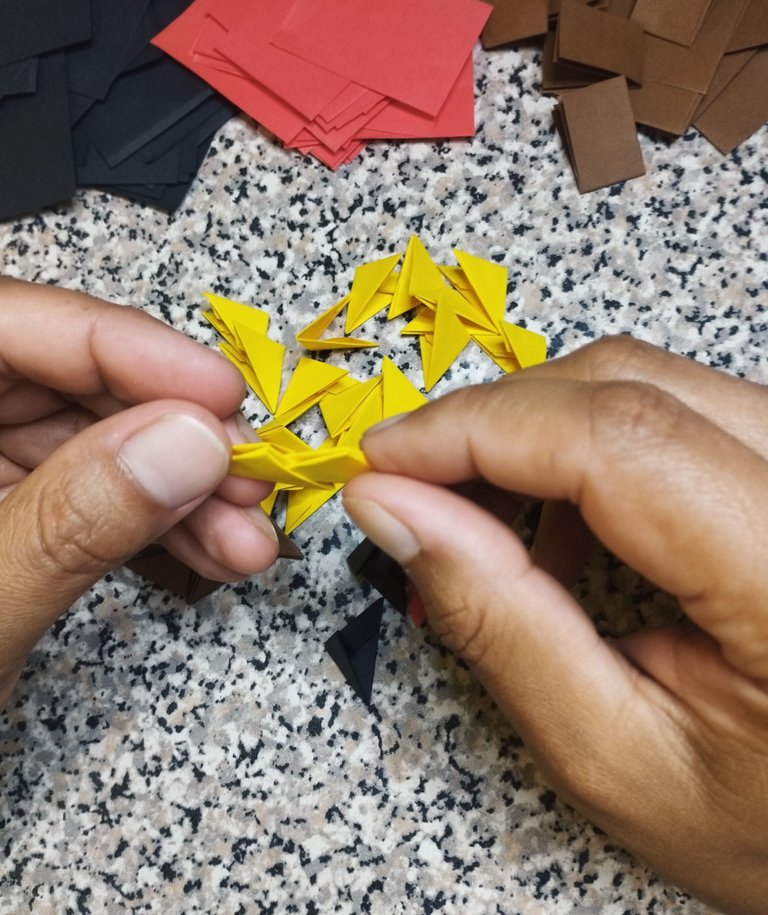
In this step, the first two levels of 10 modules each are stacked.
En este paso se va apilando los primeros dos niveles de 10 módulos cada uno.

Placing the brown modules on the back.
Colocando los módulos de color marros que va en la parte de atrás.
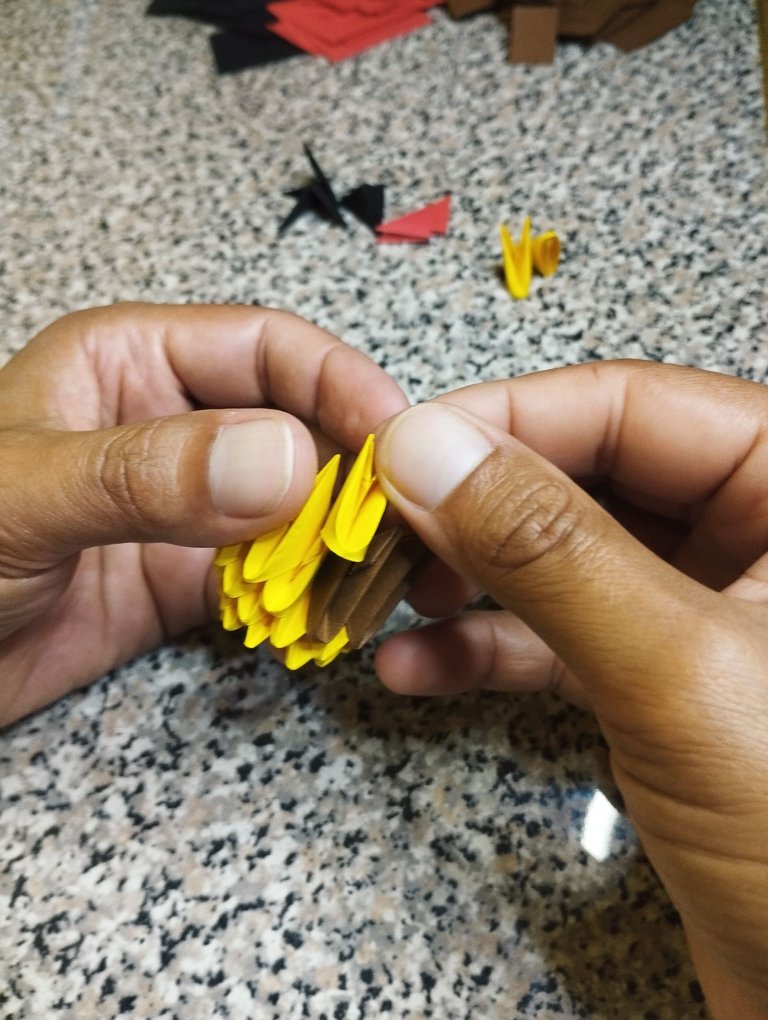
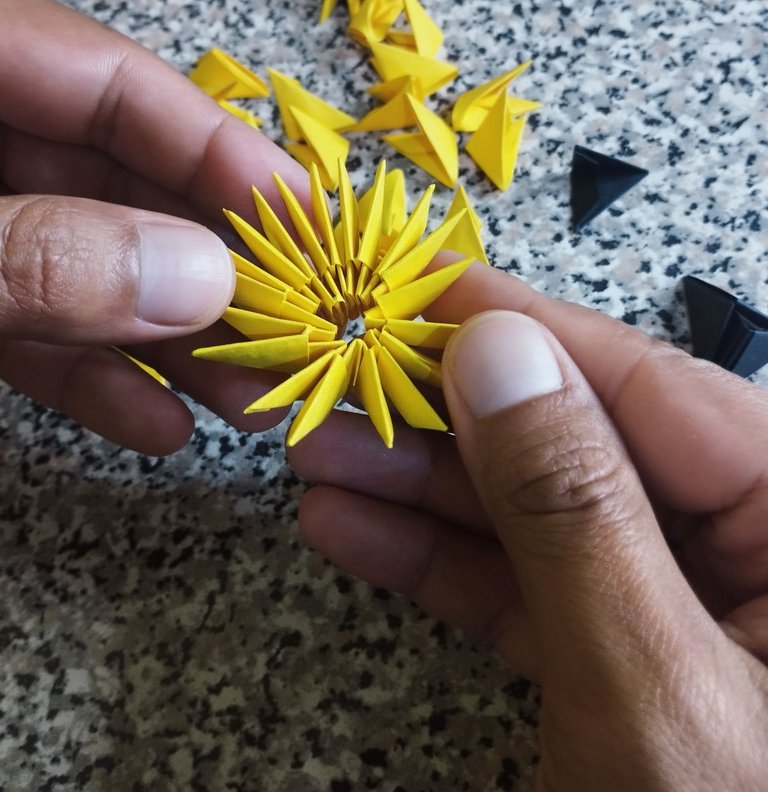
Here you continue with the yellow modules and have four levels.
Aquí se continua con los módulos amarillos y se tiene cuatro niveles.
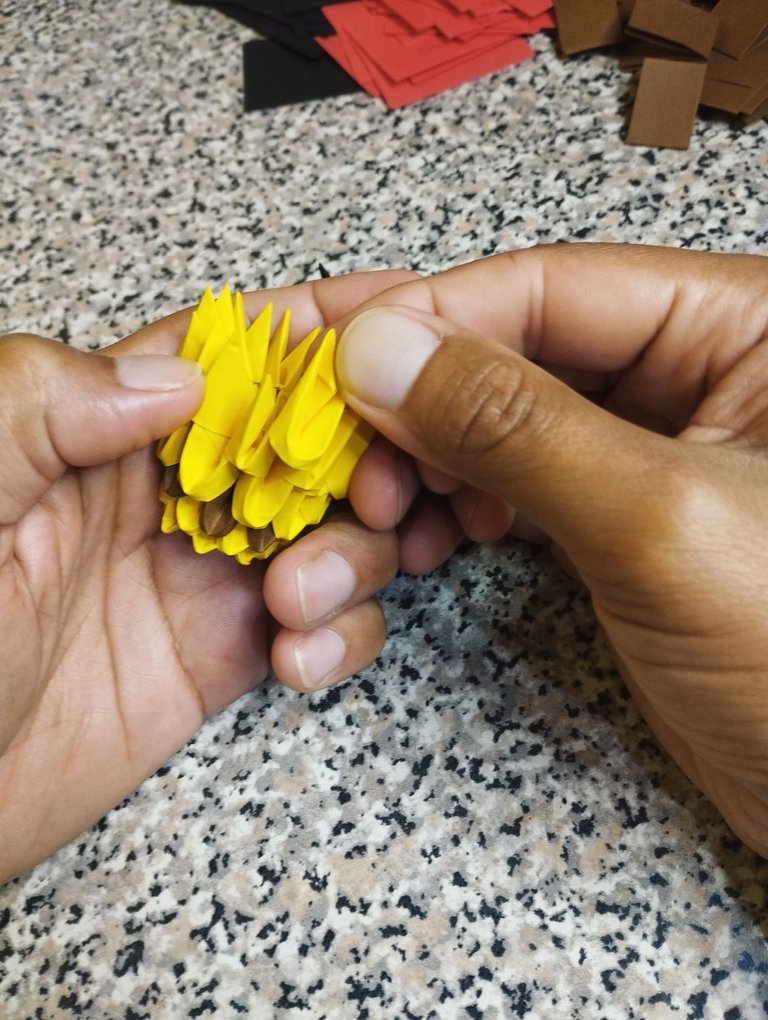
Here are five levels.
Aquí cinco niveles.
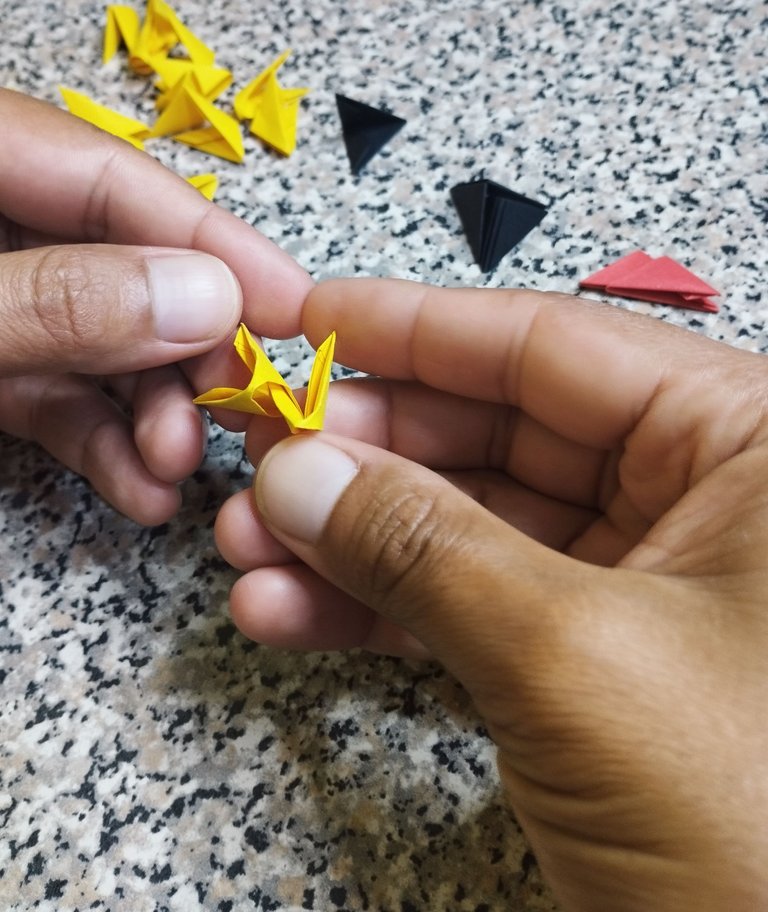
The yellow module is placed in the centre so that each side can have the red ones, which are the cheeks of the character.
Se coloca es modulo amarillo en el centro para que de cada lado pueda ir los rojos que viene a ser las mejillas del personaje.
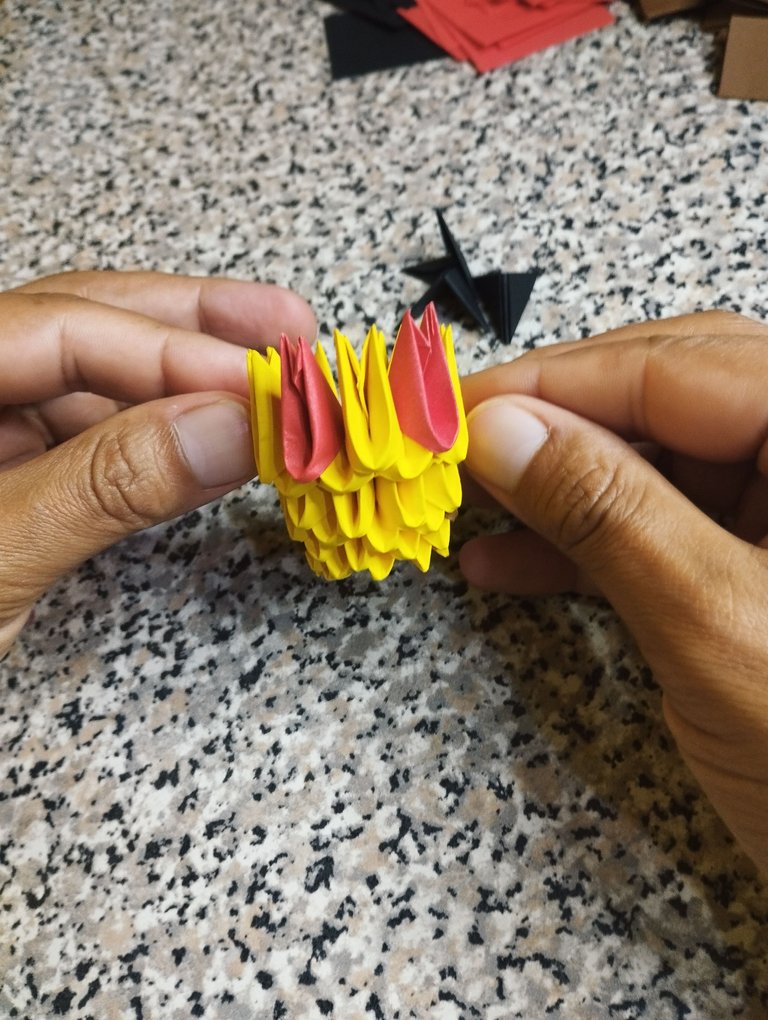
In this part a black module is placed, which is the mouth. Then another level of yellow modules is added.
En esta parte se coloca el un modulo negro que viene a ser la boca. Luego se agrega otro nivel de módulos amarillo.
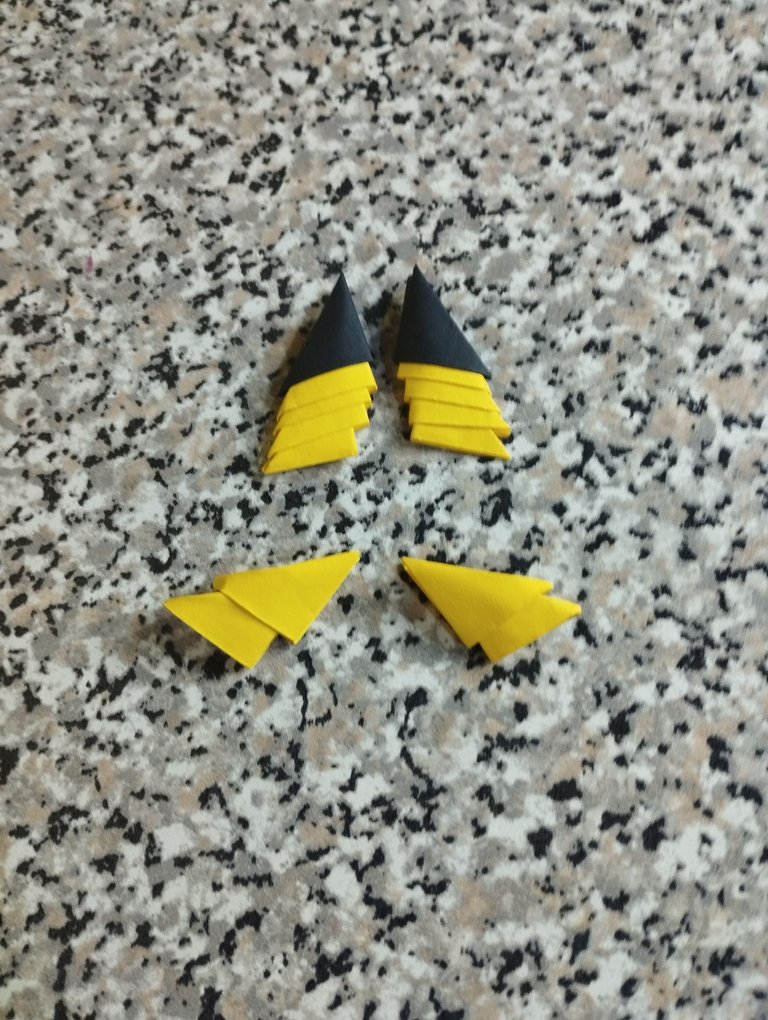
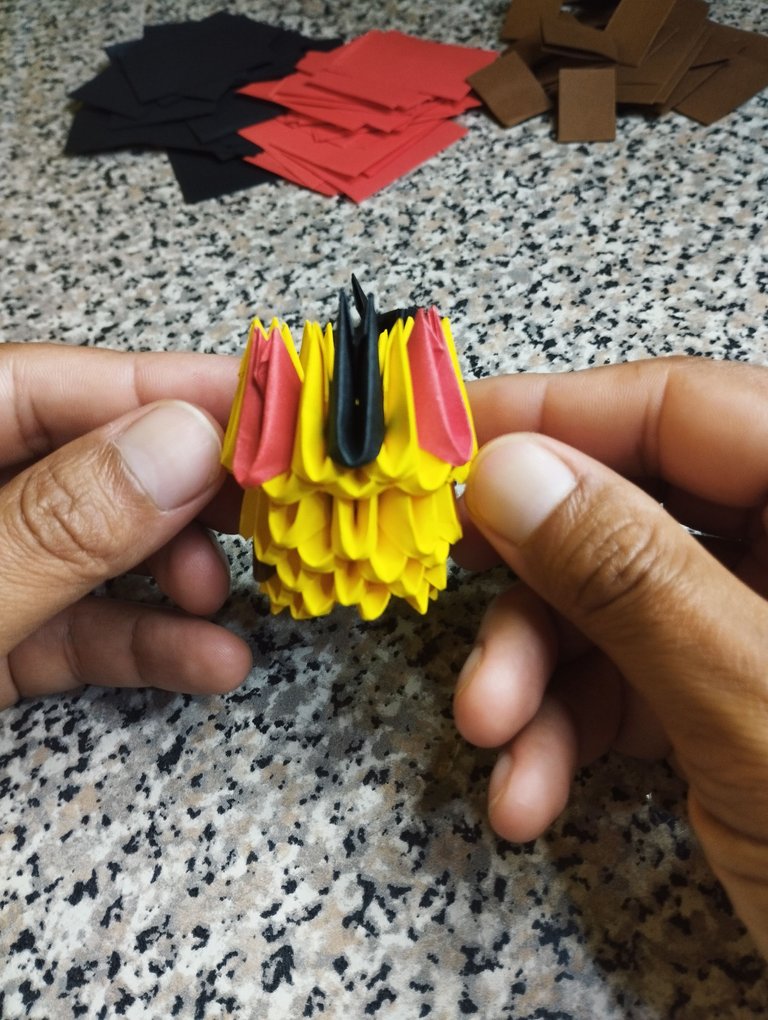
Here 4 yellow modules are used, 1 black module for each ear and 1 or 2 modules for the hands.
Aquí se usan 4 módulos amarillo 1 negro para cada oreja y 1 o 2 módulos para las manos.

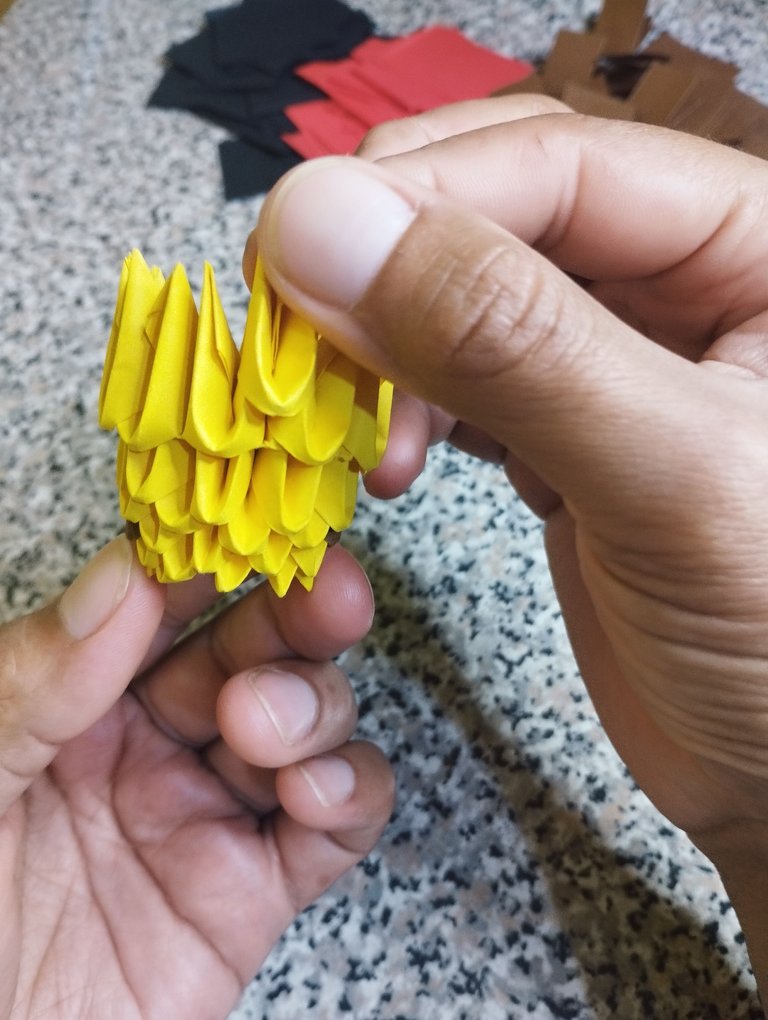
At the level of the cheeks, yellow modules are placed for both hands and the same on the head for the ears. At the end a pile of yellow modules is made for the tail.
A la altura de las mejillas se colocan los módulos amarillo para ambas manos y lo mismo en la cabeza para las orejas. Al final se hace una pila de módulos amarillos para la cola.
As a final detail cut out circles for the eyes that are placed with glue, as part of a decoration I placed a pokeball made of hama beads, (in another tutorial I will share with you how I did it), all on an artificial lawn, and that way we have a Pikachu Origami 3D.
Como detalle final se recortan círculos para los ojos que se colocan con pegamento, como parte de una decoración le coloque una pokebola hecha de hama beads,(en otro tutorial les compartiré como lo hice), todo sobre un césped artificial. y de esa manera nos queda un Pikachu Origami 3D.
I hope you like my work, thank you for coming here. All comments are welcome. Until next time take care. 🤗
Espero les guste mi trabajo, gracias por llegar hasta aquí. Todos los comentarios son bienvenidos. Hasta la próxima cuídense. 🤗
Translated by https://www.deepl.com/
Me encanta este Pikachu y su color en origami es muy real.
Thank you very much, your comment appeared.
Wow !! This is very impressive!! Well done dear👍
I wanted to make a 3D origami doll myself for my second entry using this same technique, but It's way harder than I thought it would be hahaha.
I'll be sharing it much later when I get the hang of it.
Good luck with the contest✨!
If I understand you, some figures already finished seem easy but in reality they are not, of course with practice you master the technique, I am sure that when you make your figure it will be excellent. Thank you very much for your good wishes and for your comment. 🤗
Jaja! Encantador! Hice un dragón con la misma técnica de origami e 3D. Luce muy bonito la verdad, además de que cada bloque es tardío de hacer pero bien vale la pena
Si esa técnica de 3D es bastante llamativa, el suyo quedo muy bien y si toma su tiempo y como dice usted pues vale la pena.
Esto quedo espectacular @joss21, bello y muy cuchi, me encanto. Gracias por compartir tu trabajo en nuestra comunidad, sumarte al concurso con este lindo trabajo. Suerte...
!DIY
Me alegra que le gustara, gracias por su comentario :)
Cuanta paciencia y talento para este arte en papel. Buen trabajo
!DIY
!discovery 38
Gracias, aprecio mucho su comentario.
This post was shared and voted inside the discord by the curators team of discovery-it
Join our Community and follow our Curation Trail
Discovery-it is also a Witness, vote for us here
Delegate to us for passive income. Check our 80% fee-back Program
Nice work in 3D origami spectacular well done and neat, this beautiful that pikachu. Thanks for joining the contest in our community. Good luck and lots of success...
You can query your personal balance by
!DIYSTATSYou can query your personal balance by
!DIYSTATSQue bonito ha quedado la pieza amigo. Feli idade!
Gracias :-)