Needlework Your Valentine! Friendship roses. // Rosas de la amistad.

Un feliz día tengan mis queridos y apreciados amigos que hacen vida en esta comunidad @needleworkmonday, no quise dejar pasar la oportunidad de compartir con ustedes de este bello presente para mi querida amiga @motica29; entre Las cosas que tenemos en común está el color favorita azul y en especial las rosas azules, es por ello que cuando vi unos retazos de telas con diferentes estampados en tonalidades azules, estos delicados prendedores con rosas azules, en nombre de nuestra amistad.
A happy day have my dear and appreciated friends who make life in this community @needleworkmonday, I did not want to miss the opportunity to share with you this beautiful present for my dear friend @motica29; among the things we have in common is the favorite color blue and especially blue roses, which is why when I saw some scraps of fabrics with different prints in blue tones, these delicate pins with blue roses, on behalf of our friendship.
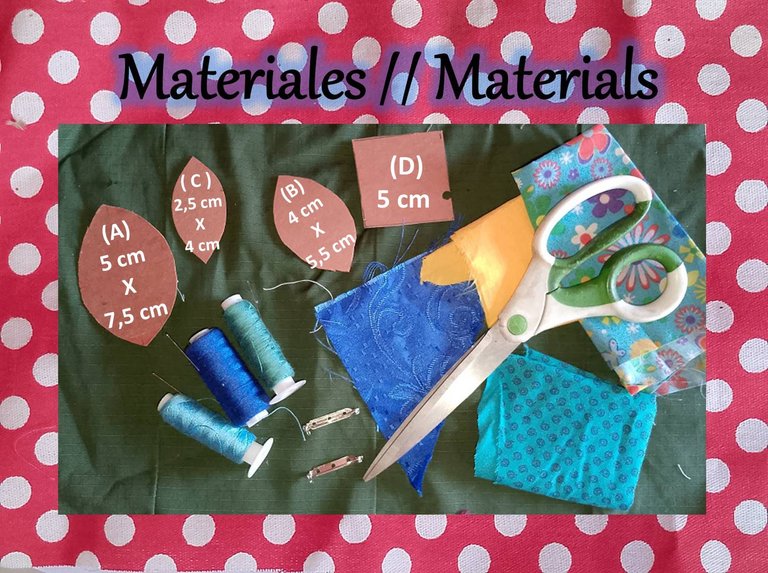
Para estos prendedores utilicé:
-Retazos de varios tonos azules, verdes y amarillo
-Moldes de cartón en forma de hojas de diferentes medidas (tal como los ven en las fotos)
-Tijera
-Hilos
-Agujas
-Base para prendedor
-Barra de silicón.
-Y por supuesto no podía faltar pistola de silicón.
For these pins I used
- scraps of various shades of blue, green and yellow
- Cardboard molds in the shape of leaves of different sizes (as you see them in the pictures)
- Scissors
- Threads
- Needles
- Pin base
- Silicone stick.
- And of course, a silicone gun is a must.

Paso 1 lo primero que hice fue cortar los pétalos para la rosa, las hojas y base del prendedor:
-2 pétalos de (A)
-2 pétalos (B)
-1 pétalo (C)
-2 cuadrados (D)
Para la base de la flor recorté
-E) 1 círculo de 2 cm de diámetro en entretela y
-F) 1 círculo de 5 cm en tela verde.
Step 1 the first thing I did was to cut the petals for the rose, leaves and base of the pin:
- 2 petals from (A)
- 2 petals (B)
- 1 petal (C)
- 2 squares (D)
For the base of the flower I cut out - E) 1 circle of 2 cm in diameter in interlining and
- F) 1 circle of 5 cm in green fabric.

Paso 2 Pétalo C) para este pétalo doblamos por la mitad a la largo y hacemos un pespunte por la orilla, ajustamos dándole la forma del capullo y prensamos la costura y cortamos.
Step 2 Petal C) for this petal, fold in half lengthwise and stitch along the edge, adjust to the shape of the bud, press the seam and cut.
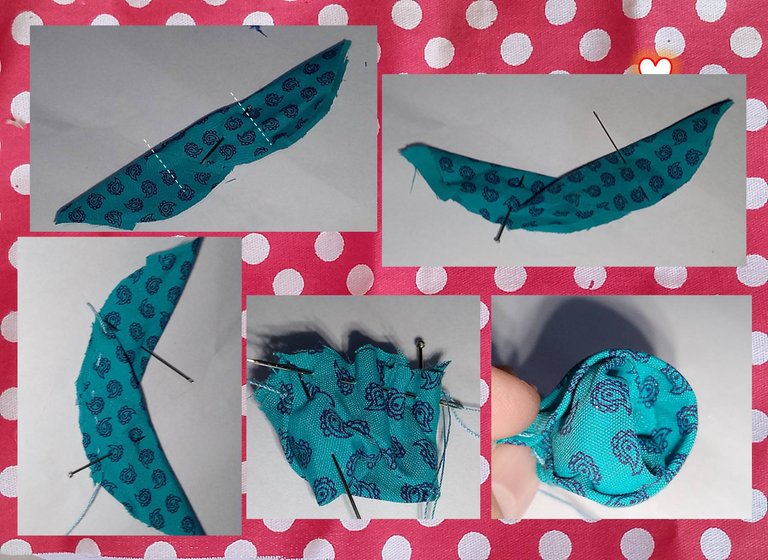
Paso 3 Pétalos A y B) lo primero que hacemos para realizar estos pétalos es marcar el centro de ambos piezas, luego siguiendo el arco de los bordes de las piezas unimos con un alfiler y comenzamos a coser un pespunte desde un extremo de estas uniones hasta la siguiente, al llegar al otro extremo cerramos de manera circular los otros extremos de cada pieza y seguimos el pespunte hasta cubrir todo el borde, prensamos el hilo y ajustamos la costura y cortamos, dándole forma a nuestros pétalos.
Step 3 Petals A and B) the first thing we do to make these petals is to mark the center of both pieces, then following the arc of the edges of the pieces we join with a pin and begin to sew a backstitch from one end of these joints to the next, when we reach the other end we close in a circular way the other ends of each piece and continue the backstitch to cover the entire edge, we press the thread and adjust the seam and cut, giving shape to our petals.

Paso 4 Las hojas: doblamos nuestros cuadrados diagonalmente de manera que nos quede un triángulo y volvemos doblar en el centro de este triángulo y cosemos un pespunte por el orillo, ajustamos el hilo y cortamos.
Step 4 The leaves: we fold our squares diagonally so that we have a triangle and we fold again in the center of this triangle and sew a backstitch along the selvage, adjust the thread and cut.

Paso 5 para la base de nuestra rosa, tomamos el círculo de entretela y lo centramos en el círculo de la tela verde, hacemos un pespunte por la orilla, prensamos el hilo, ajustamos la costura y cortamos, listo ya todas nuestras partes de la rosa.
Step 5 for the base of our rose, we take the circle of interlining and center it on the circle of green fabric, we stitch along the edge, press the thread, adjust the seam and cut, ready all our parts of the rose.
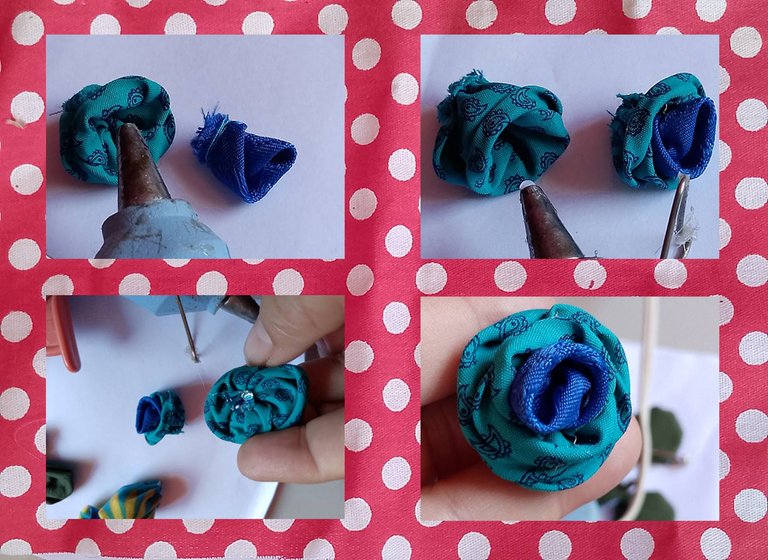
Paso 6 ya para culminar con la ayuda de la pistola de silicón ya caliente colocamos un poco de silicón en el pétalo (B) y colocamos el pistilo de nuestro rosa (C) ajustándolo que quede bien centrado, seguidamente repetimos el proceso con el pétalo (A) y pegamos el pétalo resultante (B-C); formando así nuestra rosa.
Step 6 and to finish with the help of the hot silicone gun we place a little silicone on the petal (B) and place the pistil of our rose (C) adjusting it so that it is well centered, then repeat the process with the petal (A) and glue the resulting petal (B-C); thus forming our rose.

Paso 7 Posteriormente colocamos silicón en la base para la rosa y pegamos las dos hojas una al lado del otro, luego volvemos a colocar silicón en el centro del círculo y pegamos nuestra rosa, cuidando que quedara centrada y le damos forma a cada pétalo; seguidamente por la parte de atrás de nuestra rosa le colocamos suficiente silicón pegamos y ajustamos fuertemente nuestra base de prendedor y listo ya terminé mis prendedores de la amistad.
Step 7 Then we put silicone on the base for the rose and glue the two leaves side by side, then we put silicone in the center of the circle and glue our rose, taking care that it was centered and give shape to each petal, then on the back of our rose we put enough silicone glue and tightly adjust our base pin and ready and I finished my friendship pins.

No soy muy bien dada a realizar flores o rosas, más este desafío me ayudo a realizar algo que demuestre cuanto valoro nuestra amistad, comprar algo en el mercado es fácil y quizás mucho más hermoso, pero dar algo hecho con tus manos, para mí tiene un valor sin igual, y más cuanto no es tu fuerte realizar dicha labor, espero les haya gustado.
I am not very good at making flowers or roses, but this challenge helped me to make something that shows how much I value our friendship, buying something in the market is easy and perhaps much more beautiful, but giving something made with your hands, for me has an unparalleled value, and more when it is not your forte to perform such work, I hope you liked it.

Contenido original.
Las fotos fueron captadas con mi celular Moto E6I y editadas en PowerPoint, utilizando los elementos disponibles del mismo.
Los banner fueron creados por mí en PowerPoint.
La traducción fue a través de www.DeepL.com,Translator (versión gratuita).
Original content.
The photos were captured with my Moto E6I cell phone and edited in PowerPoint, using the available PowerPoint elements.
The banners were created by me in PowerPoint.
The translation was done through www.DeepL.com,Translator (free version).
This is so beautiful, the color is really nice I definitely love it, thank you so much for sharing
Greetings, I'm glad you liked it, thanks for reading and commenting.
What a beautiful pin detail, it was great to share on friendship day, the color you chose to make these roses is ideal for friends, they can use it at any time.
Que hermoso detalle es genial para compartir en el día de la amistad, el color que elegiste para hacer estas rosas es ideal para las amigas, lo pueden usar en cualquier momento.💯🌹❤️
Thank you dear @lauracraft among several things that unites us is the color blue and it is a simple way to show how important your friendship is to me, thank you for reading and for commenting such beautiful words. 💗💗👍
Gracias querida @lauracraft entre varias cosas que nos une esta el color azul y es una sencilla manera de demostrar lo importante que es su amistad para mí, gracias por leer y por comentar tan bellas palabras.
Oh this looks so pretty and it’s definitely a substitute for bow since bows are common now
I love this and it’s something I’ll try soon
I love that you liked it and that you are encouraged to perform, thank you for your beautiful words, for reading and commenting.
Greetings and have a successful week
wow really simple yet creative and beautiful
Thank you for your appreciation, for reading and commenting, have a nice day.
These friendship rose pins are very beautiful @gladymar1973. The results make me think you’ve done them before…that’s how pretty they are. You really did a great job. I love the leaves and the color of the roses. It makes me so happy that you tried these out because you wanted to make something with your hands for your friend.
Thank you for the inspiration and for joining the contest ~ 😉
How nice that you say that, this is the first time I dared to make roses, I am not very skilled in this type of art, I just wanted to prove to myself that I could make them and well this was the result, I am glad you liked them.
Here is another type of rose making I will love to learn . I love the friendship between you too and it's good to share gifts at these seasons.
Dear @monica-ene I am pleased that you liked it, and even more pleased that you are encouraged to make it, I am sure you will like it.
Gracias mi bella amiga @gladymar1973 , apreció mucho tu obsequio y que pienses en mi en este día especial de la amistad...un abrazo ❤️
De nada mi querida amiga, hermana y consejera, agradezco al Padre el haber cruzado nuestros caminos y juntas crecer y esforzarnos por ser cada día mejor de lo que fuimos ayer.