Valentine's Day contest: Migli Bigli-Amigurumi [ESP–ENG]


Saludos hivers amantes de la creatividad con agujas, para mí realmente es un placer participar en este fabuloso concurso propuesto por @needleworkmonday donde nos invitan a crear un obsequio especial para compartir el día del Amor y la Amistad. Muchas opciones pasaron por mi mente, lo cual me retraso el tiempo para realizar esta publicación, ya que sentía la necesidad de trabajar en algo que transmitiera lo que es realmente un sentimiento noble, sincero y sublime; hasta que al fin logre obtener una idea perfecta para el regalo ideal.
Greetings hivers lovers of creativity with needles, for me it is really a pleasure to participate in this fabulous contest proposed by @needleworkmonday where we are invited to create a special gift to share the day of Love and Friendship. Many options went through my mind, which delayed me the time to make this publication, as I felt the need to work on something that transmits what is really a noble, sincere and sublime feeling; until finally I managed to get a perfect idea for the ideal gift.
💝💝💝💝💝💝
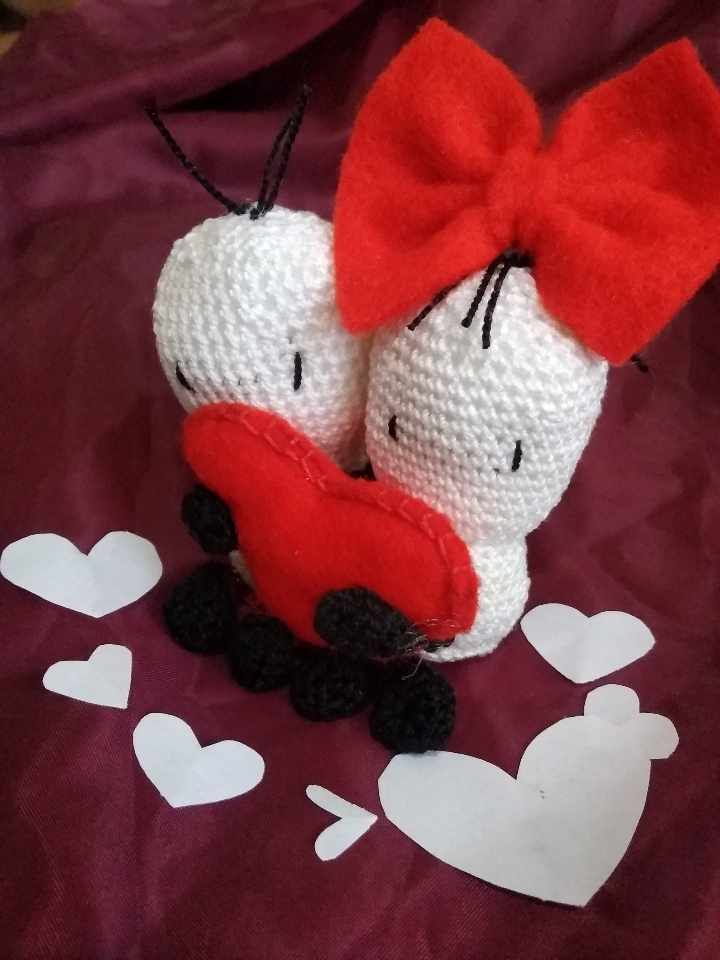
Se trata de dos personajes que transmiten ternura y belleza, ellos han captado la atención de muchas personas, en especial los enamorados, quienes se sienten representados por estos lindos personajes denominados Migli Bigli. Ellos son mi obsequio ideal porque representan lo que es el amor puro y sincero; a partir de allí, también se asocia a la amistad, porque cuando esta es real se convierte en sentimientos leales, auténticos y recíprocos.
They are two characters that transmit tenderness and beauty, they have captured the attention of many people, especially lovers, who feel represented by these cute characters called Migli Bigli. They are my ideal gift because they represent what pure and sincere love is; from there, it is also associated to friendship, because when it is real it becomes loyal, authentic and reciprocal feelings.

💝💝💝💝💝💝
Materiales
Crochet en colores blanco, negro y rojo
Aguja de tejer
Aguja lanera
Retazo de fieltro color rojo
Relleno
Tijera
Pistola de silicona
Patrón de corazón en papel
Materials
Crochet in white, black and red colors
Knitting needle
Knitting needle
Piece of red felt
Stuffing
Scissors
Silicone gun
Paper heart pattern
💝💝💝💝💝💝

💝💝💝💝💝💝
Elaboración/Prepared by
💝💝💝💝💝💝
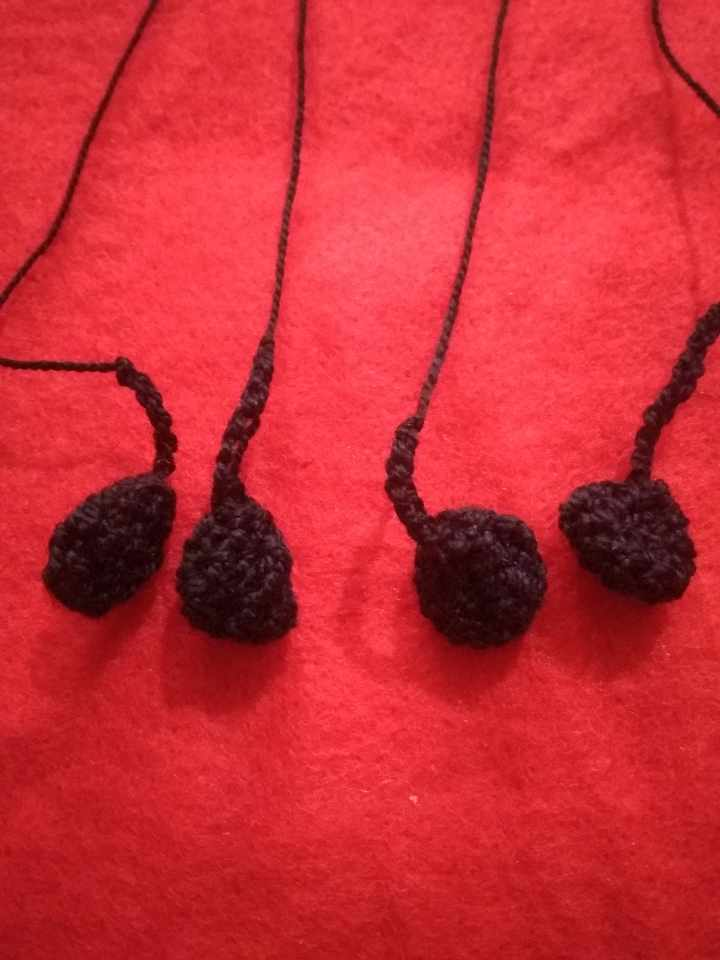
Lo primero que vamos a elaborar son los brazos y piernas; estos son de color negro, así que tomamos nuestro hilo para formar un anillo mágico con seis puntos bajos en la primera vuelta, seguimos con la segunda vuelta en la que será un punto bajo y un aumento, logrando nueve puntos, para la tercera vuelta será un punto en cada espacio lo que resultara nueve puntos y en la última vuelta será un punto y una disminución, llevando el tejido a seis puntos, cerramos con punto deslizado, dejando hilo excedente y con la aguja lanera terminamos de cerrar; en el mismo hilo trabajamos con la aguja de tejer levantando seis cadenetas; culminamos con punto deslizado y dejamos hilo de sobra.
The first thing we are going to elaborate are the arms and legs; these are black, so we take our yarn to form a magic ring with six low stitches in the first round, we continue with the second round in which will be a low stitch and an increase, achieving nine stitches, for the third round will be a stitch in each space which will result in nine stitches and in the last round will be a stitch and a decrease, taking the fabric to six stitches, we close with slipped stitch, leaving excess yarn and with the knitting needle we finish closing; on the same yarn we work with the knitting needle raising six chains; we finish with slipped stitch and leave excess yarn.
Todo este proceso lo repetimos para las piernas y brazos de ambos personajes.
We repeat this process for the legs and arms of both characters.

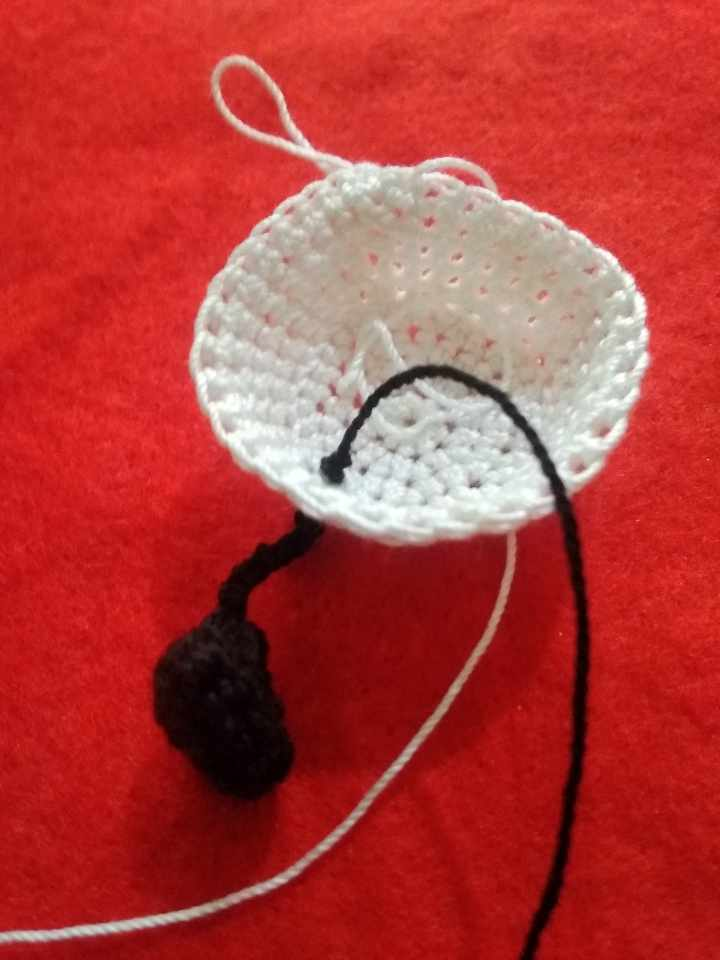
A partir de aquí trabajamos el cuerpo con el hilo de color blanco, para ello realizamos un anillo mágico y 8 puntos bajos en él, luego una vuelta de aumento logrando así 16 puntos, en la próxima vuelta haremos un punto y un aumento lo que nos dará 24 puntos; en la vuelta 4, serán 2 puntos bajos más un aumento con un resultado de 32 puntos. Ya para la próxima vuelta vamos a trabajar un punto en cada espacio, tomando en cuenta que dichos puntos serán en la hebra delantera, que es lo que permitirá realizar la base circular del resto del cuerpo; a partir de allí trabajamos 4 vueltas de 32 puntos, uno en cada espacio; ahora vamos a unir las piernas al cuerpo y esto será en la parte de la base, dejando 6 puntos de espacio entre estas.
From here we work the body with the white yarn, for this we make a magic ring and 8 single crochet stitches in it, then a round of increase achieving 16 stitches, in the next round we will make a single crochet and an increase which will give us 24 stitches; in the 4th round, there will be 2 single crochets plus an increase with a result of 32 stitches. For the next row we will work one stitch in each space, taking into account that these stitches will be in the front strand, which is what will allow us to make the circular base of the rest of the body; from there we will work 4 rows of 32 stitches, one in each space; now we will join the legs to the body and this will be in the part of the base, leaving 6 stitches of space between them.


Una vez unidas las piernas a lo que llevamos de cuerpo, lo que vamos a hacer preparar la base que nuestros personajes puedan sentarse sin complicación alguna y para eso lo que hacemos es llenar de silicona caliente el espacio plano; es decir, la base de la pieza, tratando siempre de esparcir bien la silicona con la pistola y esperamos que seque bien para continuar con el tejido.
Once the legs are attached to the body, what we are going to do is to prepare the base so that our characters can sit without any complications and for that what we do is to fill the flat space with hot silicone; that is, the base of the piece, always trying to spread the silicone well with the gun and we wait for it to dry well to continue with the weaving.
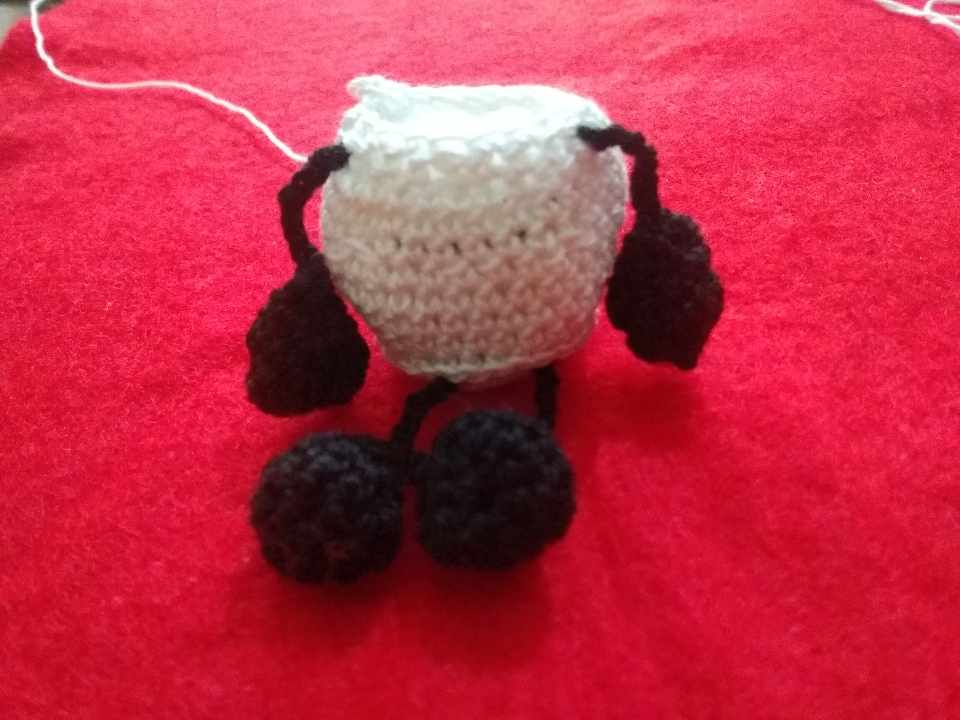
Estando bien seco la silicona, le damos continuidad al trabajo con 6 puntos bajos y una disminución, obteniendo 28 puntos, luego hacemos 2 vueltas de 28 puntos cada una; proseguimos con 3 puntos y una disminución que nos dará 24 puntos bajos, continuamos con 2 vueltas más de 24 puntos bajos y vemos como va tomando forma; ahora colocamos los brazos de manera que nos queden con 8 puntos de separación para que se note la diferencia entre las piernas y estos, seguidamente rellenamos.
Once the silicone is dry, we continue the work with 6 single crochets and a decrease, obtaining 28 stitches, then we make 2 rows of 28 stitches each; we continue with 3 stitches and a decrease that will give us 24 single crochets, we continue with 2 more rows of 24 single crochets and we see how it takes shape; now we place the arms so that we have 8 stitches of separation so that the difference between the legs and these are noticeable, then we fill in.

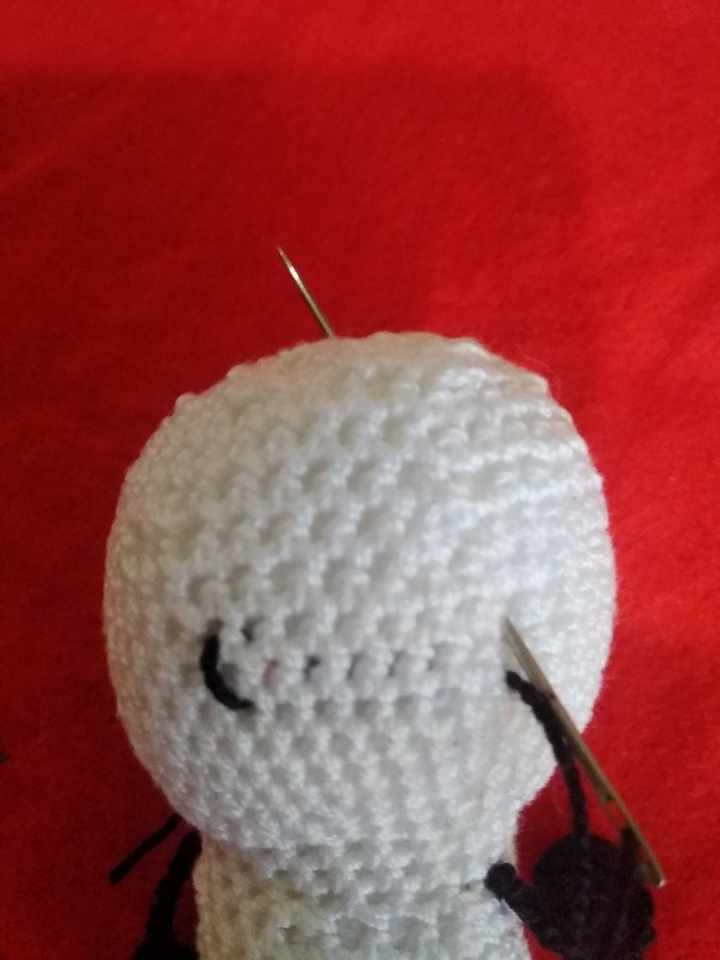
Para iniciar la parte de la cabeza, tomamos la hebra delantera para tejer un punto y un aumento, lo cual nos dará 36 puntos bajos, en la próxima vuelta vamos con 4 puntos y un aumento, obteniendo 42 puntos bajos, nos vamos a la otra vuelta con 2 puntos y un aumento para conseguir 48 puntos; a partir de la próxima vuelta, hacemos 7 vueltas de 48 puntos cada una, es decir; un punto en cada espacio.
To start the head part, we take the front yarn to knit one stitch and one increase, which will give us 36 single crochets, in the next round we go with 4 stitches and one increase, obtaining 42 single crochets, we go to the other round with 2 stitches and one increase to obtain 48 stitches; from the next round, we make 7 rounds of 48 stitches each one, that is to say; one stitch in each space.

Continuamos y esta vez con disminuciones, así que en esta vuelta son 6 puntos y disminución para concretar 42 puntos bajos, luego trabajamos 2 vueltas más de 42 puntos cada una; en la próxima vuelta hacemos 2 puntos y disminución para obtener 36 puntos, en la siguiente vuelta 4 puntos y disminución que darán 30 puntos, luego vamos a la otra vuelta con un punto y disminución consiguiendo 24 puntos, luego en la próxima vuelta 2 puntos y disminución con un resultado de 18 puntos bajos.
We continue and this time with decreases, so in this round are 6 stitches and decrease to make 42 single crochets, then we work 2 more rounds of 42 stitches each; in the next round we make 2 stitches and decrease to obtain 36 stitches, in the next round 4 stitches and decrease that will give 30 stitches, then we go to the other round with a stitch and decrease getting 24 stitches, then in the next round 2 stitches and decrease with a result of 18 single crochets.
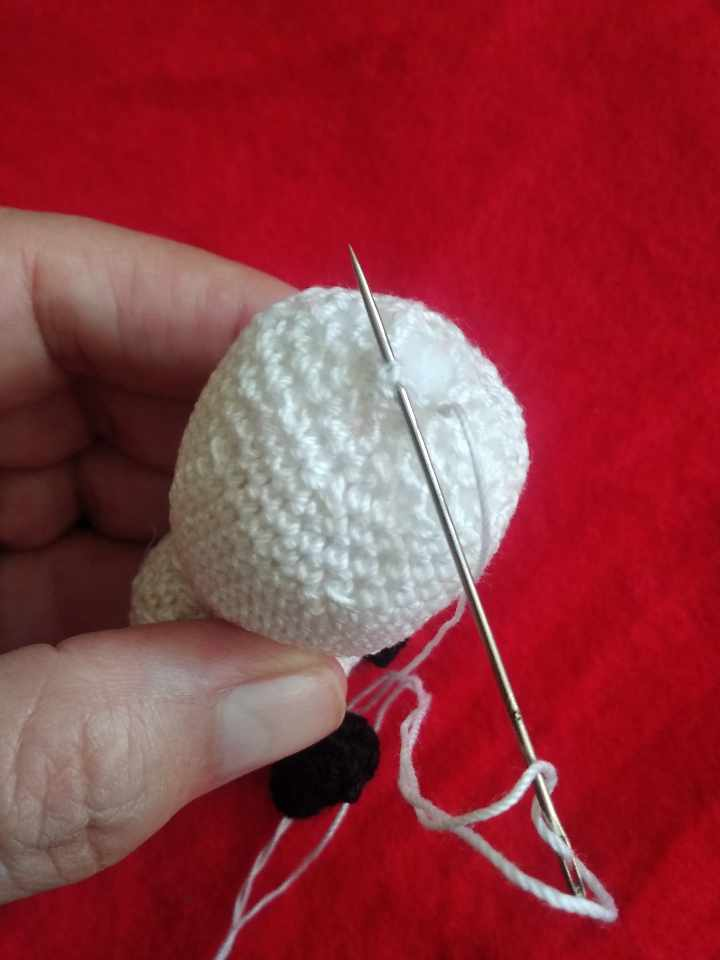
Rellenamos, hacemos otra vuelta con un punto y disminución que nos llevara a 12 puntos, luego otra vuelta más, de un punto en cada espacio, culminamos con punto deslizado, cortamos el hilo, dejando excedente para rematar con la aguja lanera y por último, escondiendo bien el hilo cortamos.
We fill in, make another round with one stitch and decrease that will take us to 12 stitches, then another round of one stitch in each space, we finish with a slip stitch, we cut the yarn, leaving excess to finish off with the knitting needle and finally, hiding the yarn well, we cut it.

Repetimos todos los pasos y obtenemos la parejita de enamorados.
We repeat all the steps and we get the couple in love.


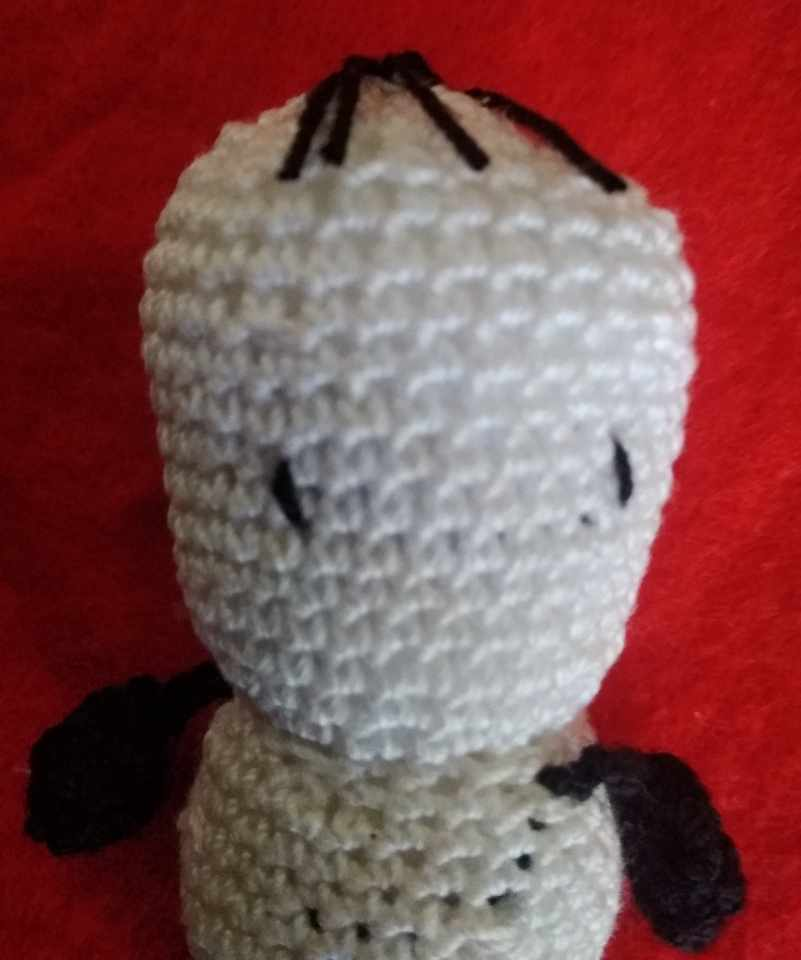
Es hora de realizar ojos y cabello, para ello necesitamos colocar hilo negro en la aguja lanera; la cual vamos a introducir por la parte trasera de la cabeza para sacar en la parte delantera de esta, lo que hice fue contar desde el cuello hacia arriba 6 vueltas para que la aguja saliera allí, después de ello vamos a realizar es una simple puntada hacia arriba, dejando un punto vacío; introducimos la aguja de manera que la saquemos en la misma dirección de para hacer el otro ojo y aquí llevamos la aguja a la parte superior de la cabeza para formar el cabello; como se muestra en las imágenes 3 y 4, el cabello del personaje masculino tiene solo 3 hilos que van levantados y el personaje femenino 4 hilos acostados hacia lo que es la frente.
It is time to make eyes and hair, for this we need to place black thread in the wool needle; which we are going to introduce through the back of the head to take out in the front of this, what I did was to count from the neck up 6 turns for the needle to come out there, after that we are going to perform is a simple stitch upwards, leaving an empty stitch; we introduce the needle so that we take it out in the same direction to make the other eye and here we take the needle to the top of the head to form the hair; as shown in images 3 and 4, the hair of the male character has only 3 threads that go up and the female character has 4 threads lying towards the forehead.

Del fieltro recortamos un rectángulo, tomando la medida del ancho de la cabeza de la chica, en este caso yo elegí el lazo grande; luego a la aguja lanera le coloque hilo rojo para pasar unas puntadas separadas en el centro del rectángulo para fruncirlo y quede la forma del lazo.
From the felt we cut a rectangle, taking the measure of the width of the girl's head, in this case I chose the big bow; then to the wool needle I put red thread to pass a few separate stitches in the center of the rectangle to gather it and to get the shape of the bow.

Si cortamos un trozo más de fieltro, lo colocamos en el centro del lazo y por la parte trasera cosemos con hilo y aguja para asegurar.
If we cut an extra piece of felt, we place it in the center of the bow and sew on the back with thread and needle to secure it.
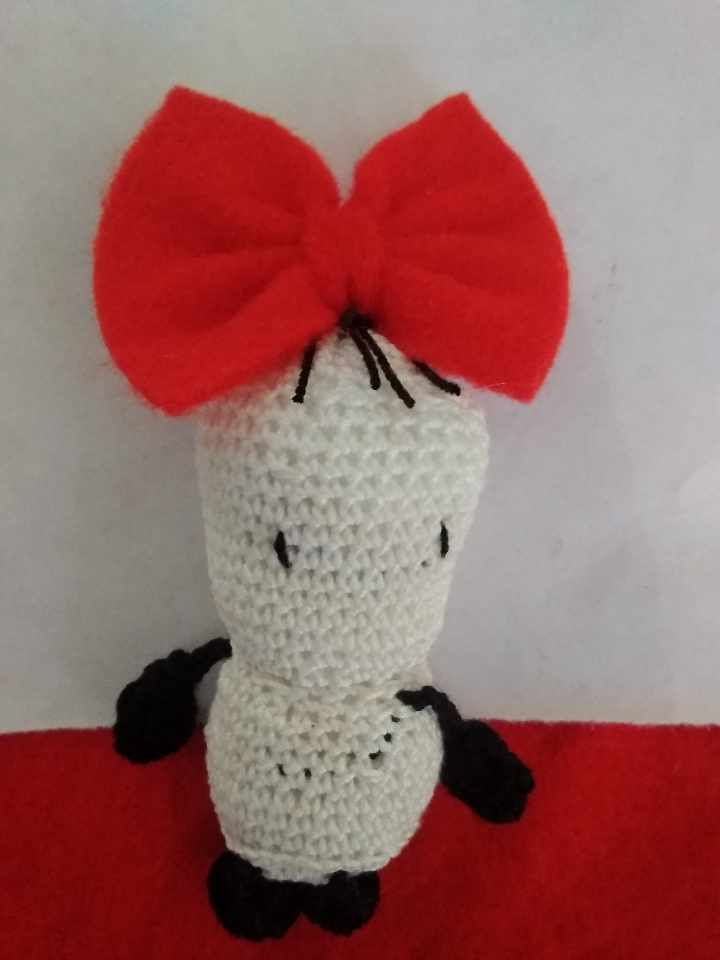
Con un poco de silicona pegamos el lazo encima del cabello.
With a little silicone we glue the ribbon on top of the hair.


En un papel dibujamos un corazón para luego transferir al fieltro, sacando dos piezas que luego coseremos con hilo rojo por todo el borde, rellenamos y luego cerramos, rematando muy bien para que no se desbarate la costura.
We draw a heart on a piece of paper and then transfer it to the felt, taking out two pieces that we will sew with red thread all around the edge, fill it and then close it, finishing it off very well so that the seam does not fall apart.
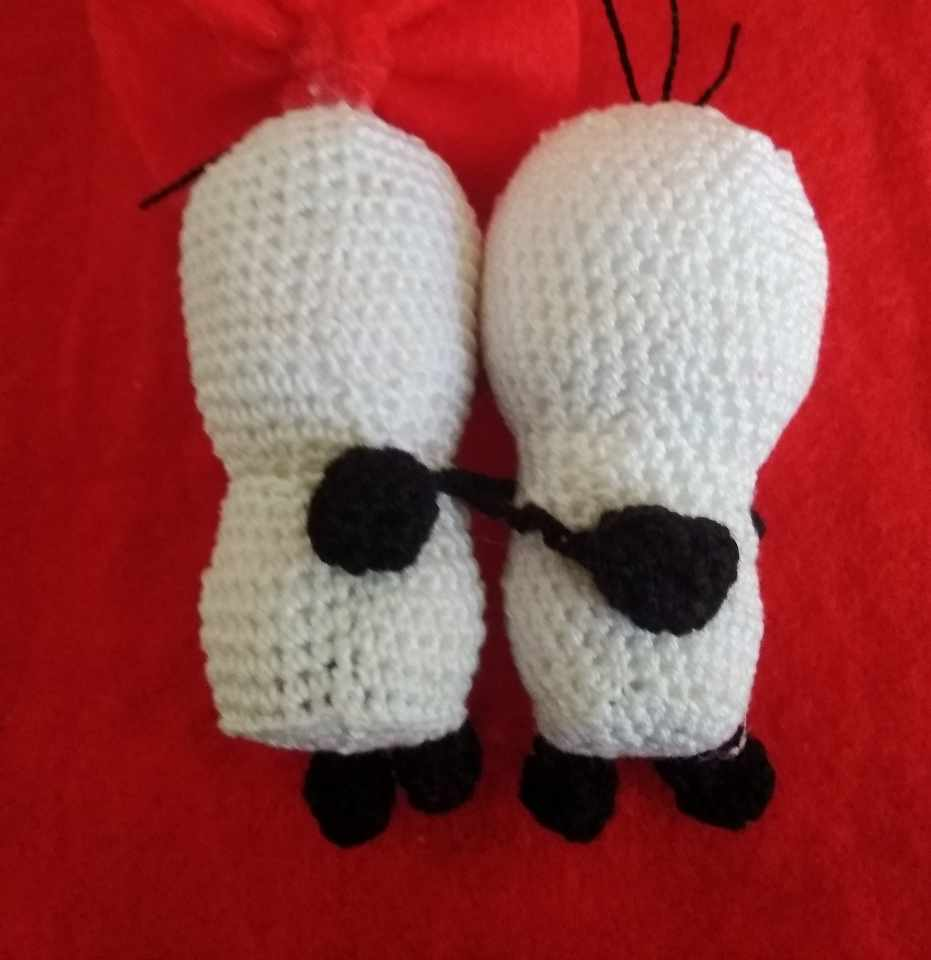
Unimos nuestra pareja de enamorados, colocándolos boca abajo para luego colocar silicona caliente en una de sus manos para que queden abrazados como lo muestra la imagen.
We join our couple in love, placing them face down and then place hot silicone on one of their hands so that they are embraced as shown in the image.

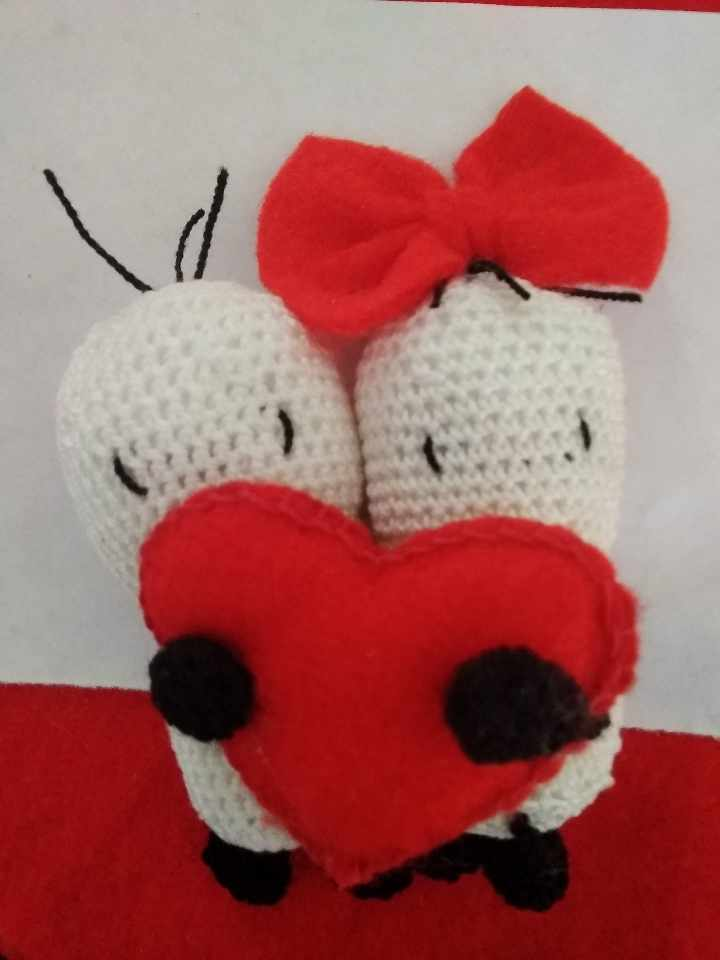
Acá vamos a pegar el corazón al cuerpo de ambos personajes y luego, en las manos que quedaron libres, colocamos un punto de silicona caliente para pegar las manos al corazón para que queden sosteniéndolo.
Here we are going to glue the heart to the body of both characters and then, on the hands that were left free, we place a dot of hot silicone to glue the hands to the heart so that they remain holding it.

💝💝💝💝💝💝
0
0
0.000
Quedaron bellísimos
Gracias!
This is so beautiful. I love every detail.
I have always wanted to try some amigurumi, but it seems hard, so I never really bothered but your steps make it look easy. I think I will give it a try.
Lovely work.
It is very easy, the only thing you have to put is love to do it.
I’ve never seen an easier and understanding tutorial than this
Every part was really understanding
The part where you poured the silicone to hold the legs was really a brilliant one.
I am fascinated to know that you like my tutorial.
What a cute representation of love and friendship @giocondina! I love the work you did on these. That red bow and heart are so adorable.
Thank you for your participation ~
Thank you for your appreciation, it motivates me a lot.
Wow, i will accept this like a Valentine's gift, this really really beautiful, i love it, well done
Happy that you like my gift.
I smell love in the air, this is alot of work
Well done dear.
Thank you, thank you, thank you!
es un hermoso recuerdo de Amor y de amistad, que bello quedó